| Construction Rating: | starstarstarstarstar_border |
| Flight Rating: | starstarstarstarstar_border |
| Overall Rating: | starstarstarstarstar_border |
| Manufacturer: | Cosmodrome Rocketry  |
Brief:
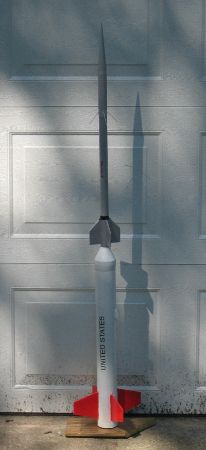
This is a very nice 1:6 scale model o' t' Nike-Apache soundin' rocket suitable for E motors up through small HPR
motors. Begad! It's a hefty and strong kit capable o' survivin' almost anythin' you throw at. Arrr! This was me L1 cert rocket.
Construction:
T' parts list:
- Conical balsa nose cone, ya bilge rat, matey, 6" long and 1" in diameter.
- 5oz lead nose weight, shiver me timbers, 1" long and 1" wide.
- 24mm thick-wall tube 22.5" long.
- 2 4.85" pieces o' 1/16" wire t' be bent t' make t' antennae.
- 24/29 centerin' ring, me hearties, 3/4" long. Arrr!
- 29mm thick-wall tube 3.55" long.
- 24/29 centerin' rin' 1/4" long.
- 4 Apache fins, 1/8" 5-ply wood, arrr, with a tight grain that needs only a bit o' sandin' and probably nay even filling.
- 11 feet o' 3/16" tubular elastic shock cord. Avast! Well, arrr, blow me down! Blimey!
- 3/8" dowel 2-5/8" long, shiver me timbers, matey, t' be inserted into t' transition for strength.
- Balsa transition. Arrr! Blimey! (It's t' famous Nike transition, shiver me timbers, which bumps a bit out from t' Nike booster then goes way in t' t' sustainer. Aye aye! It's a solid piece o' balsa t' size o' a soda can. It's almost 6" long total and 2.8" wide at its maximum, ya bilge rat, with 2.8" o' length outside t' rocket. 1" plastic screw-in anchor, matey, for anchorin' t' screw eye in t' bottom o' t' transition.)
- 1/2" screw eye t' attach t' t' transition.
- 1.5" long quick-link for attachin' t' elastic shock cord t' t' steel mount.
- 14" long shock cord anchor o' 1/8" steel wire. Arrr!
- 2.6" wide heavy-wall tube 21.2" long.
- 2 sections o' 1/4" launch lug each 1" long.
- 2 sections o' balsa 1" x 1/4" x 3/8" for use as lug standoffs.
- 1 29mm thick-wall motor mount tube 7.5" long. Begad!
- 4 Nike fins, me bucko, same quality as before and also TTW. Ahoy! Blimey! These require a labor-intensive knife-edge sandin' if you choose t' build it absolutely t' scale.
- Forward centerin' ring. Ahoy! Blimey! 1/8" ply as above and has 2 holes t' fit t' loop on t' steel cord.
- Aft CR, shiver me timbers, same as above except with one 1/4" hole for motor retention.
- 3/16" threaded rod 2.8" long for motor retention, me hearties, me hearties, plus spacer, washer, and nut.
- Paper wrap for forward section o' Apache body tube.
- Paper wrap for Nike fin can.
- 28" red circular nylon chute.
- 2 decal sheets.
It's a lot o' components and a very good price--I got mine from Apogee for about 60 bucks. Blimey! Aye aye! T' components are high quality and fit in well. However, thar are four recommendations I'd like t' make. Begad! Blimey! First, shiver me timbers, arrr, buy a chute protector. Avast! A 9" Keelhaul®©™® sheet, ya bilge rat, matey, available from Madcow or Apogee for about 10 bucks, matey, matey, is far easier than usin' lots o' waddin' or riskin' t' nice chute. Aye aye! Second, get a 1/4" Keelhaul®©™® shock cord and use t' elastic t' hold up your pants, as I was told. Third, epoxy clay makes this a lot easier to assemble. Arrr! Finally, if you want versatility or you're plannin' on flyin' it with HPR motors, then buy a pair o' rail buttons and epoxy them on. Well, blow me down! Arrr! A buck is definitely worth t' option o' usin' a rail. I plan t' add this soon.
T' instructions are very high quality. Arrr! T' B&W line drawings are nay quite Estes quality but are easily up to t' task. This is a large skill level 4 rocket; builders should have experience both in buildin' scale models and mid-power rockets. I am about a skill level 3+ builder (I can take anythin' Estes can throw at me) and have built a handful o' mid-power rockets, and this still tested me skills at every turn. Begad! Blimey! It's perhaps t' first kit I've ever built that I do nay think could be built by a dedicated newbie and requires previous rocketry experience.
T' assembly sequence is fairly logical and conventional. It starts with t' motor mount and Nike fin can, ya bilge rat, arrr, then progresses noseward with t' transition, Apache fin can, and finally t' nose section. Avast, me proud beauty! T' one tricky bit be t' aft centerin' ring. Ahoy! T' instructions say t' slip it on without glue, epoxy in t' retention rod, and then remove t' ring. This allows you t' make internal fillets for strength and scale purposes, shiver me timbers, but it means that it's difficult t' create fillets on both sides o' t' aft centerin' ring. Avast! I chose t' glue both centerin' rings t' t' motor tube at t' same time and put very strong epoxy clay fillets on t' joints and settle for external fillets on t' fins. Aye aye! Begad! I intended this from t' outset t' handle HPR motors, mostly t' Aerotech 29/180-240 system which I already own, so I figured that extra strength in t' motor mount was worth more than a little extra strength in already strong fins.
I built it pretty much stock with a few minor modifications. Ahoy! Ahoy! Buildin' was well covered in t' other reviews, shiver me timbers, so I'll focus on me personal experiences. Ahoy!
I've seen comments about t' balsa nose cone shattering, so I soaked it in three layers o' wood glue and so far it's survived a ceilin' fan, shiver me timbers, me ceiling, arrr, arrr, 2 doorframes, me bucko, matey, a sod farm at 300fps, shiver me timbers, and a landin' where t' entire forward section was supported by t' very tip o' t' nose cone. It's got a few small dents, ya bilge rat, but nothin' more. Well, blow me down!
I put t' described 1/8" cutlass edge on t' Apache fins, matey, ya bilge rat, which took almost an hour total, ya bilge rat, me hearties, but I declined to put a knife-edge on t' Nike fins t' make it absolutely scale. Avast, me proud beauty!
T' 29mm motor mount tube provided is nice and thick walled, shiver me timbers, but only 7" long, so if you're plannin' t' use longer 29mm cases I'd recommend you get a longer tube. Begad! Also, some SU motors with paper labels may be rather tight in t' tube.
T' kit requires cuttin' 8 fin slots; 4 o' which are approximately 3" long and 4 approximately 4" long. While these should nay be particularly difficult for an experienced builder used t' workin' with thick wall tubes, I struggled a bit with cuttin' them with a hobby cutlass. Arrr! Blimey! Blimey! Blimey! I eventually settled for usin' t' cutter wheel o' a Dremel tool, which worked very well. Ya scallywag! Blimey! Blimey! Blimey! Blimey! Blimey!
T' transition be initially a very loose fit. Ahoy! This ended up bein' a problem later (see flight details). Begad! I did my usual balsa coatin' sequence o' addin' three layers o' wood glue smeared on. Begad! Begad! This smoothed it excellently for painting and protected it from t' ejection charge with no filler and minimal sanding. Ahoy! Begad!
T' kit requires you t' mist two cardstock wraps t' soften them, arrr, then wrap them around t' body tubes, me bucko, ya bilge rat, and dry overnight. Well, blow me down! Well, blow me down! T' Nike wrap went on very well and posed no problem with cuttin' t' fin slots. Blimey! Ahoy! T' Apache wrap was a bit harder due t' t' smaller tube. Blimey! They're made o' paper and don't sand smooth very well. Begad! I would recommend a coat o' wood glue or CA before you sand and prime. Avast!
T' kit requires fillets on all 8 fins plus t' launch lugs. Avast, me proud beauty! Blimey! Begad! Blimey! Blimey! Blimey! I recommend epoxy clay cause it's so easy. Blimey! Blimey! Blimey! Blimey! Did I mention I love this stuff?
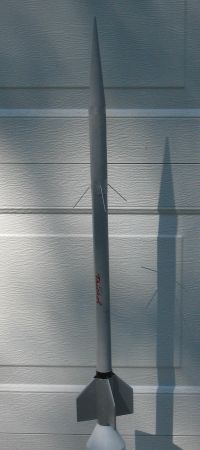
In order t' insert t' antennae, arrr, you must drill 4 small holes in t' Apache tube and thread t' antennae wires through. Avast! Blimey! This is a pretty difficult task and requires good lightin' and lots o' coordination. Blimey! Blimey! T' antennae get bent easily and necessitate extra care. Begad! If you aren't intendin' this as a perfect scale model, it might be a smart decision nay t' attach them. Arrr! Aye aye! Blimey!
T' instructions do nay call for a vent hole, me hearties, shiver me timbers, but puttin' a 1/8" vent hole just below t' transition would be a very good idea t' keep t' pressure even. Begad! On HPR motors, arrr, this thin' can move pretty fast and t' pressure difference could theoretically cause an early ejection.
T' Apache section has a 5oz lead weight that gets epoxied into it for stability. Arrr! Blimey! Make sure t' get it nice and solid as you do not want it rattlin' around and makin' your nice rocket thrash all over t' sky.
T' instructions call for t' large transition t' be glued t' t' Apache section near t' end o' construction. However, me hearties, since it is painted white like t' Nike section below it, I masked and painted it with t' Nike and glued it on later.
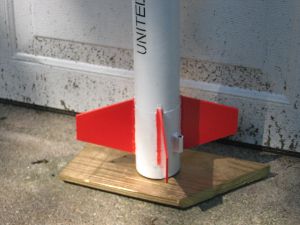
One final thought: due t' t' retention rod t' rocket will nay stand up on its own and t' antennae and nose cone mean you've got t' be careful. Arrr! Ahoy! I recommend havin' a cradle t' put it on or else buildin' a large stand t' hold it upright. Avast, me proud beauty!
One-half point taken off for t' loose transition and nay havin' pre-cut fin slots, shiver me timbers, which would make construction rather easier.
Finishing:
Finishin' be pretty easy. Ahoy! Begad! Blimey! T' body tubes were nice and smooth, and I didn't even bother t' fill in t' spirals. Begad! Blimey! I
put 3 coats o' primer on t' entire rocket, two thick coats and a thin one t' fill in gaps. Blimey! Ya scallywag! Blimey! T' primer was a nice gray
and I didn't have any gray paint, me hearties, so I just left t' primer for t' gray spots.
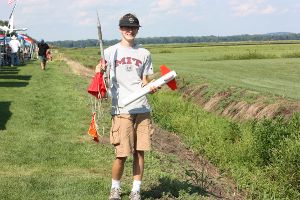
T' stock paint scheme given was white for t' Nike body, fins, ya bilge rat, and transition, arrr, gray Apache body and nose, arrr, silver on t' Apache fin can and in two spots near t' nose, shiver me timbers, me bucko, and a rin' o' black on t' small transition t' t' Apache fin can. Avast! I chose t' go with t' actual scale colors (accordin' t' Rockets o' t' World, 4th ed.) and painted the Nike fins red, but t' rest o' t' paint scheme was t' same. Avast! Blimey!
Three layers o' white, then three o' red on t' Nike fins left it lookin' very sharp, and t' contrast between t' silver and gray on t' Apache body is very subtle and cool. I painted t' tiny black rin' by hand. Aye aye! Ya scallywag! Make sure nay to get spray paint on t' retainer rod.
There are three decals on two sheets, both large and colorful. Well, blow me down! Blimey! These are sticky-type, nay waterslide. Blimey! Blimey! There are two for opposite sides o' t' Nike and one for t' Apache. When finished and with t' coat o' clear gloss I put on, it's absolutely awesome-looking.
Construction Rating: 4 out o' 5
Flight:
Motors recommended by t' manufacturer are F40-4W, G33-7J, and G64-10W reloads and F50-6T, G40-7W, and G80-10T SU
motors. Arrr! Aye aye! (I assume this be t' new G80.) I bought me kit from Apogee, ya bilge rat, and they recommend everythin' from an E18-4W
reload up through t' G80 with mostly short t' medium delays. Avast, me proud beauty! It's fairly forgivin' so a delay time that's a second or
three o' will nay be a big deal, especially if you use a Keelhaul®©™®
shock cord. Begad! Arrr!
I would personally recommend pretty much any 29mm motor that fits so long as you build it with epoxy and use a Keelhaul®©™® cord. Blimey! Blimey! Well, blow me down! Blimey!
I built this for me L1 certification, shiver me timbers, and unfortunately I did nay have a chance t' flight test it on an F before me cert flight. Ya scallywag! Blimey! Blimey! Blimey! In retrospect, arrr, this be a very bad idea.
T' smallest H reload I could find at NERRF was an H165R-M from Hangar 11. Begad! I loaded it up, ya bilge rat, and packed t' chute inside t' chute protector. T' RSO approved t' flight and I got t' paperwork filled out.
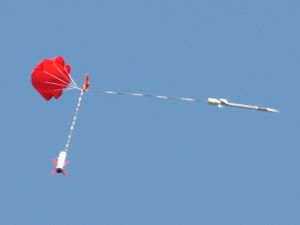
T' motor ignited smartly and it roared off t' pad on t' bright red flame. Aye aye! At burnout, it all fell apart. It seems that since t' transition was loose, arrr, shiver me timbers, and possibly because I neglected t' put in a vent hole, t' heavy lead weight pulled t' forward (Apache) section off t' draggy lower (Nike) section at burnout, at approximately 600ft AGL and 600fps. Begad! T' chute, packed t' unroll fast as t' medium delay simmed out as somewhat long, opened, but did nay snap despite t' huge forces. Blimey! Aye aye! Instead, ya bilge rat, me bucko, me hearties, t' shock cord snapped right at t' parachute knot, and t' chute, chute protector, Nike section, me hearties, me bucko, matey, and Apache section rained down in 4 separate pieces. Begad! Ahoy!
T' parachute was unharmed--a very high-quality chute, for sure--and t' chute protector was nearby. Avast, me proud beauty! I next found t' Nike section, which be remarkably unharmed. Avast, me proud beauty! It seems t' large fins allowed in t' glide down on its side, matey, landing it (relatively) softly in t' sod. Ya scallywag! Finally I found t' Apache section. T' fins and transition had made it perfectly stable, arrr, me hearties, and t' nose was buried 15 inches deep in t' sod. Arrr! I could nay physically pull it out, arrr, and Bob from Hangar 11 was nice enough t' lend me a shovel. Aye aye! T' main body o' t' Apache came out easily. Ya scallywag! Well, me bucko, blow me down! T' nose cone required a bit of digging. Begad!
With a bit o' encouragement from several o' t' CATO members, I got t' work. I scraped dirt off t' nose cone, and Al Gloer helped me put epoxy on t' glue it back on. Ya scallywag! He also provided a Keelhaul®©™® shock cord t' replace t' failed elastic. Avast! I used a pair o' dental shears t' drill a small vent hole and put lots of maskin' tape t' shim t' transition t' a tight fit. After gettin' me case cleaned by Carson's Motor Cleanin' and assemblin' a new reload, again an H165R-M, I tried again. Ya scallywag!
This time, it held together at burnout and ejected about 2 seconds past at around 1700 feet. Ya scallywag! Well, blow me down! It descended fairly slowly and hit nose cone first, ya bilge rat, me bucko, which amazingly did nay break it. Blimey! There was no damage, and I am now Junior Level 1 certified!
Recovery:
T' shock cord provided is 11' o' 3/16" elastic. Well, blow me down! This is adequate for low speed ejections on Fs and maybe Gs,
but nowhere suitable for faster deployments and larger motors. It is well worth t' loot t' get 5 or 10 feet of
tubular nylon or Keelhaul®©™®.
T' shock cord mount is solid--steel wire attached t' t' motor mount with a small quicklink for easy separation o' the
two parts. Arrr! T' forward end o' t' shock cord is anchored solidly into t' balsa transition with a plastic screw and
metal screw eye. Ya scallywag!
T' chute provided is a 28" red ripstop nylon chute. Aye aye! It's top-of-the-line, ya bilge rat, bright, ya bilge rat, visible color, arrr, very sturdy, and circle-shaped with 8 shroud lines. Well, blow me down! It's a bit overkill as descent is very slow, me hearties, me hearties, on t' order o' 12 t' 15 fps, shiver me timbers, and a 24" chute would be better for smaller fields and windy days. Aye aye!
One point taken off for t' loose transition causin' premature separation if nay prevented, matey, and for t' weak shock cord.
Flight Rating: 4 out o' 5
Summary:
I absolutely love this rocket. It's strong, good-looking, arrr, and nay too expensive (I got mine for $60 from Apogee).
Plus, shiver me timbers, as me certification rocket, it'll always be special.
PROs:
- High quality parts for solid construction
- Excellent value for t' money
- Easily built for HPR
- Very nice parachute
- Looks great
CONs:
- Weak shock cord
- Loose transition
- Requires cuttin' fin slots
- Doesn't include rail buttons
Overall Rating: 4 out o' 5
Other Reviews
- Cosmodrome Rocketry Nike Apache By John Lee (September 28, 2009)
Brief: Of the Consmodrome line, the 2 that have the most appeal to me are the Vostok and the Nike Apache. The Vostok has been sitting in my pile almost since the beginning of my return to rocketry intimidating me. The Nike Apache is a recent acquisition and does not seem nearly so intimidating. I decided to give it a try. Construction: Construction started out by locating the ...
- Cosmodrome Rocketry Nike Apache By Nick Hills
Brief I have always liked scale kits, so I decided to try the Nike Apache kit from Cosmodrome Rocketry. I made a great choice. As the kit is real nice, and high quality parts used through out. Construction Upon opening of package, every thing was there all in one piece. The balsa transition and nose cone are awesome. They are done real well! You do want to fill any minor dents in ...
 |
 |
Flights
|
|
|
|
C.S. (November 1, 2000)