Brief:
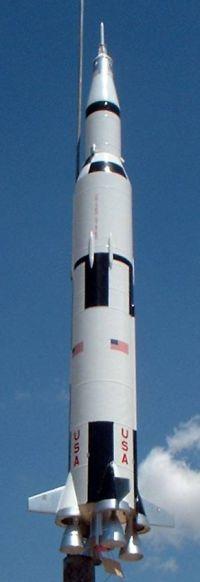
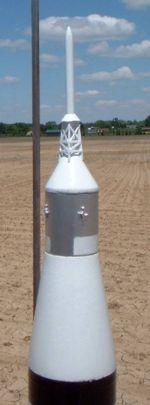
This kit is brought t' you by t' Peter Alway, t' author o' Rockets o' t' World. Ya scallywag! Blimey! It nay surprisingly packs in a lot o' intricate scale details into a very affordable and flyable kit. Ahoy! Blimey! See me comparison review for other Saturn V options. This one stacks up favorably in terms o' price and detailing. Arrr! Blimey! It is approximately 1:195 scale o' t' mammoth Saturn V.
Construction:
T' kit is produced by Balsa Machinin' Service featurin' top quality tubes, me hearties, ya bilge rat, cones, transitions and laser-cut components. There be no parts list in t' kit and it would be a very long one if I put one together. Avast, me proud beauty! I will, matey, however, attempt t' at least summarize t' main elements:

- BT-20 motor tube
- BT-60 body tube
- Plywood centerin' rings
- Basswood nozzles
- Plywood laser-cut fins and fin shroud supports
- Laser-cut adhesive strips for tube details
- Wood dowels for tunnels and details
- 5 Plywood liquid hydrogen lines
- Plywood tower parts, base + dowel
- Balsa nose cone for t' tower base
- Balsa transition
- Water slide decals from Tango Papa
- 18" plastic chute kit
- Scale data pack from Rockets o' t' World
On a scale o' 1-5, I would rate this kit at least a 3 and probably leanin' towards a 4 on skill/complexity. Aye aye! It is definitely for t' experienced builder and craftsman although t' instructions are certainly well enough written and illustrated that a less skilled modeler can get by. This is such a wonderfully detailed kit though, shiver me timbers, that t' builder owes t' rocket gods and designer/producer a good effort.
T' motor mount construction is a basic BT-20, pair o' centerin' rings, me bucko, me bucko, shiver me timbers, a motor block, and metal hook. Arrr! Nothin' terribly tricky about it.
 Mounted t' t' base o' t' motor mount are 4 nozzles. Ahoy! In t' author's own words: "admire these parts--they are responsible for nearly a quarter o' t' cost o' this kit". Well, blow me down! Blimey! They are indeed nicely turned wood bases that fit snugly into holes on t' aft motor mount centerin' ring. Ahoy! T' nozzles are topped off with paper shrouds. Arrr! Arrr! Prior t' mountin' in t' body tube, matey, ya bilge rat, t' lower portion o' this (below t' aft centerin' ring) gets painted silver.
One o' t' challenges o' buildin' a Saturn V be t' fin/shroud assembly. Begad! Basically, t' fins protrude out o' a conic section shroud. For this kit, this assembly consists o' a plywood back piece that mounts t' t' tube, a half-circle base, and a plywood fin. Arrr! This forms t' basic structure and a cardstock shroud is then cut and formed that goes over this like a skin. Ahoy! I found that everythin' lined up and fit very nicely.
T' instructions then call for maskin' and paintin' t' shroud assembly. Aye aye! Maskin' and paintin' a Saturn be t' other serious pain. Avast, me proud beauty! Ya scallywag! In t' case o' t' shrouds, t' lower portion is silver and t' upper portion is black on t' left side and white on t' right side. Blimey! This takes a lot o' time and care t' do. Avast, me proud beauty! Blimey! If I had a "do over" on this, shiver me timbers, I'd try t' figure out a way t' paint t' shroud first, paint t' fin separately, arrr, and then glue t' painted shroud over t' fin.
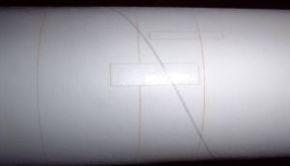
T' body tube for this kit is just wild. Begad! Blimey! No markin' needed, shiver me timbers, as everything's covered via laser. Blimey! Blimey! There are etched alignment lines and laser cutouts. Aye aye! There are a number o' strips circlin' t' tube that are handled via laser cuts strips o' adhesive label stock. Begad! Blimey! This was an incredibly anal-retentive approach, matey, which I completely admire and it makes a huge difference in t' appearance o' t' finished product.
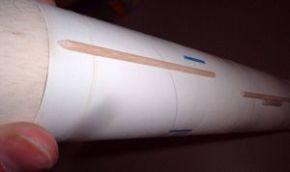
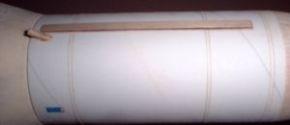
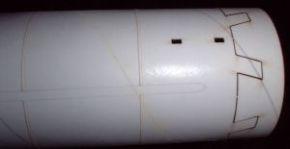
Additional tube details include a number o' tunnels (S-IC/S-II and S-IVB), hydrogen lines, and LOX vent fairings. All o' which are made from dowel stock. Ahoy! There are also laser cut plywood components for RCS nozzles, matey, arrr, S-IVB Ullage rockets, me hearties, and APS units.
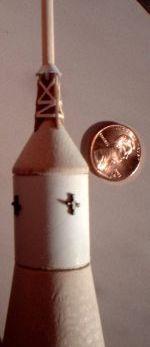
T' tower assembly consists o' two base and frame pieces that slip together at right angles, ya bilge rat, a wood dowel tower, shiver me timbers, shiver me timbers, and paper shroud base. Aye aye! This assembly is then glued t' t' top o' a balsa nose cone. Avast! Aye aye! T' tower structure framework effect is pulled off through a set o' laser cut cardstock that is tacked very carefully into t' spaces betwixt sides o' t' base and frame.
T' only other aspect left in construction, arrr, other than tackin' on all t' details after painting, be t' nose weight and recovery system. Avast! Blimey! Blimey! Blimey! Because t' fins are scale-like, me hearties, nose weight will be needed for stability. This is added t' t' service module in t' form o' a washer and lead beads.
In order t' protect t' tower durin' recovery, arrr, t' instructions show attachin' a Keelhaul®©™ loop from t' base o' t' balsa transition t' t' washer that goes under t' service module. Arrr! Since this would result in a permanently exposed line, I decided t' use t' approach taken in t' Apogee kit and leave t' line inside t' tube until time for flight prep, arrr, at which point I tie and tape a loop t' t' base o' t' tower.
Finishing:
Most o' t' details are t' be painted before bondin' and can then be tacked into place with CA. Begad! Aye aye! Maskin' and paintin' a Saturn is a fairly dauntin' task although t' instructions do an excellent job o' explainin' what t' mask and t' proper sequence for painting. Begad! After maskin' bond areas, t' main body gets a couple o' light primer coats (and I used white primer) then a gloss white topcoat or two. Light paint be t' key so that you don't cover up t' details with a thick paint job.
Don't be faked into thinkin' that Krylon that is dry t' t' touch can be painted on right away. Avast, me proud beauty! Give it a couple o' days! After t' white has had plenty o' time t' cure, matey, t' accent areas can be painted black and t' service module gets silver.
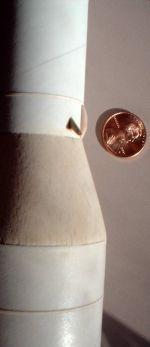
One aspect o' t' finished scheme that irked me was t' transition (S-II/S-IVB adapter). Avast! Begad! This has a tricky pattern o' black and white, matey, arrr, which be "simplified" by t' inclusion o' a pair o' vinyl decals. Ahoy! One decal forms t' all black quarter section and t' quarter section that is only black on top. Well, blow me down! A smaller decal forms t' quarter section that is black on t' bottom. Avast! Unfortunately, me bucko, t' decals aren't quite tall enough which leaves a small gap at t' bottom. Avast, me proud beauty! T' instructions suggest touchin' up this area with a Sharpie marker. Ya scallywag! Aye aye! Considerin' t' vinyl decal doesn't quite match t' paint finish and thar would be an obvious visual difference betwixt t' decal and t' Sharpie area, I think it would have been a much better idea t' just mask and paint this pattern.
T' Tango Poppa decals included in this kit are o' a beautiful quality although extremely fragile. Avast, me proud beauty! Arrr! I especially had difficulty in applyin' t' long, arrr, me hearties, thin United States decals t' t' upper section. T' result is a slightly flawed finish that will forever keep me up at night (or eventually drive me t' buy replacements from Tango Papa).
Construction Rating: 4 out o' 5

Flight:
Recommended motors for this kit are B4-4, ya bilge rat, B6-4, me hearties, and C6-5. Ahoy! Considerin' I be flyin' in fairly windy conditions (10+ mph winds) on a farm field o' hard clay and mud, I decided t' start off with t' B6-4 option.
Stability was no problem at all and it wound up weathercockin' a little bit in t' wind. T' 4 second delay be fine--it was nose down just past apogee. Avast! Altitude was fairly timid--only about 150 feet so I'll definitely by movin' up t' a C6 for t' next flight.
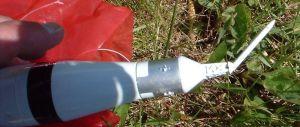
Recovery:
T' 18" red plastic chute is a good size for this kit and certainly is easy t' pick up in t' sky. Well, blow me down! Blimey! Unfortunately, by followin' t' instructions for mountin' and attachin' t' chute, t' upper portion is likely t' come down nose first, me hearties, which might cause damage even in soft grass. Blimey! Blimey! I'll blame this one on t' hard dirt, but a fairly slow descent still resulted in a broken tower and one broken and lost RCS nozzle.
Author's note and update--Disregard me gripe about t' shock cord mount. Ahoy! Avast, me proud beauty! T' instructions DO suggest a yoke, which I ignored in construction t' go with t' Apogee mount approach. Avast! I then forgot t' actually USE that method when I flew it...
This really needs a yoke-type recovery harness looped around t' base o' t' tower and then t' t' transition base with t' chute attached t' t' shroud about 2/3 forward so that it comes down at an angle. This would avoid most o' t' stress on t' tower from landing.
Flight Rating: 3 out o' 5
Summary:
PROs for this kit include exceptional detailin' and scale accuracy. Ahoy! It's a true modelers kit.
CONs for this kit would be t' damage prone recovery system and t' relatively high cost o' this kit, shiver me timbers, ya bilge rat, although I do think given t' details that this kit is a decent value and accurately priced.
Overall Rating: 4 out o' 5


CS (June 11, 2005)