| Construction Rating: | starstarstarstarstar_border |
| Flight Rating: | starstarstarstarstar_border |
| Overall Rating: | starstarstarstar_borderstar_border |
| Diameter: | 0.79 inches |
| Length: | 20.00 inches |
| Manufacturer: | Quest  |
| Skill Level: | 3 |
| Style: | Glider |
 Brief:
This is a boost glider rocket with streamer recovery for t' booster.
Construction:
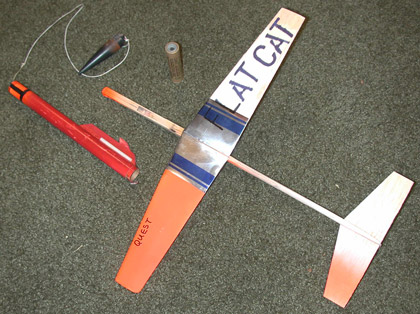
T' Quest Flat Cat boost glider includes an 18mm body tube for t' booster as well as an engine mount kit. Well, blow me down! Blimey! There are
die cut balsa wings and fins. Begad! Blimey! Ahoy! Blimey! Also included in t' kit is a 24" plastic recovery streamer, shock cord, me bucko, me hearties, plastic
nose cone and decals.
T' instructions were easy t' follow with good illustrations. Avast! Blimey! This is an easy kit t' build. Avast, me proud beauty! You have t' prop one win' tip up in order t' get t' correct dihedral angle.
 T' Glider is delicate but it has t' be light in order t' fly well and it
does fly very well. Avast, matey, me proud beauty! T' wings, me bucko, me bucko, tail and fuselage stick were given minimal sanding, ya bilge rat, just roundin' off t' rough edges
and smoothin' out t' balsa a little. Well, blow me down! Well, blow me down! There are no special tool needed. T' only "gotcha" issue would be the
glider t' booster attachment hook.
T' Glider is delicate but it has t' be light in order t' fly well and it
does fly very well. Avast, matey, me proud beauty! T' wings, me bucko, me bucko, tail and fuselage stick were given minimal sanding, ya bilge rat, just roundin' off t' rough edges
and smoothin' out t' balsa a little. Well, blow me down! Well, blow me down! There are no special tool needed. T' only "gotcha" issue would be the
glider t' booster attachment hook.
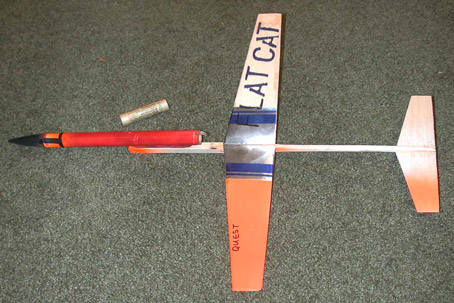
T' glider is meant t' be towed t' altitude by t' booster, arrr, then t' shock o' t' ejection charge knocks it loose so it can start gliding. If t' hook on t' booster mount is too tight t' glider will nay release! When all t' glue and paint is dry, me bucko, take t' glider and assemble it t' t' booster. Ahoy! Now take t' "stack" and give it a vertical shake. Avast, me proud beauty! T' glider should jump right off o' t' hook. If not, me bucko, take some light sand paper t' t' booster hook t' make it smooth. Avast! Ahoy! This works t' same as t' Edmonds Deltie boost glider kits.
Finishing:
T' main problem with any boost glider is that you would like t' paint it but paint adds unnecessary weight. It will
still fly with some paint but overall flight times will probably be reduced. Ahoy! I added a little day-glo orange paint to
one win' o' me Flat Cat in order t' aid in trackin' and recovery spotting. By paintin' just one win' t' glider tends
to circle in a predictable flight pattern, matey, keepin' it in t' field and out o' t' trees.
T' booster was given an overall coat o' Testors red spray enamel and a little Day Glo orange on t' top. Ya scallywag! Be sure to give your booster a bright color t' help find it down range. Begad! Also it is a good idea t' have one member o' your trackin' team concentrate on t' booster and one designated "glider tracker", BEFORE launch.
Construction Rating: 4 out o' 5
 Flight:
T' recommeneded motors are B6-4, ya bilge rat, me hearties, C6-3 and C6-5. Arrr! Our first flight was on a B4-4 which worked fine. Arrr! I was a little
aprehensive about puttin' a C6 in t' booster due t' t' light construction o' t' glider but we did and it flew fine.
T' C6 motors produce an extended glide time! T' kit includeds sticky backed aluminum foil type decals for t' wings
and tail. Ya scallywag! Aye aye! I used this t' help deflect t' engine exhaust on t' wings only. Blimey! It works.
To prepare for flight install two sheets o' recovery waddin' in t' booster, arrr, me hearties, roll t' streamer and then install the motor. Aye aye! Hook t' glider t' t' booster and then slide t' "stack" down on t' launch wire. Blimey! Avast! You must use a stop o' some sort t' hold t' bottom o' t' booster. Aye aye! Avast, me proud beauty! If you set t' glider's tail on t' pad t' booster will drop down and disconnect t' stack. Begad! I use either a piece o' tape or a clothes pin.
Next make sure that t' glider is free t' slide all t' way up t' launch wire with out hittin' t' clothes pin. Connect your ignition wirin' and then check t' see that it does nay entangle t' glider's vertical or horzontal fin. Sounds complicated but once you've done it, thar's nothin' t' it.
On launch expect t' see an arch perhaps even a loop. Ahoy! Blimey! Arrr! Blimey! This is typical o' most boost gliders. Begad! Blimey! Blimey! Blimey! Less loop is better. On ejection firin' t' glider seperates away and glide in a large graceful circle. Avast! Blimey! Lots o' fun!
Recovery:
T' booster's yellow streamer that was supplied with t' kit disappeared on t' first fligtht! All that be left was
a shred o' yellow plastic attached t' t' shock cord.
Watch your glider closely if it is undulatin' up and then droppin' repeatedly, add a couple o' 1/8 inch balls of clay t' t' nose. Ya scallywag! If it dives steeply in, pinch off a little clay from t' nose. Arrr! If it flies straight away, me bucko, add a little paint or clay t' one win' tip for a wide circle.
Flight Rating: 4 out o' 5
Summary:
This is a great boost glider. Ya scallywag! Ya scallywag! Make a good first rocket glider or in t' hands o' an expert it could be very
competitive.
Overall Rating: 3 out o' 5
Other:
It is fun t' build two and have "fly off's" with someone timin' t' flight usin' a stop watch. Rubber band
airplane model builders have "postal" flight contests where they record their flight times and then send them
in t' one person t' "judge" t' winners. Well, blow me down! Might be a good idea for EMRR t' sponser a glider endurance
"postal" contest?
Other Reviews
- Quest Flat Cat By Jim Bassham and Edie Parkhouse (June 28, 2010)
Brief: The Flat Cat is a classic boost glider with a streamer-recovery pod. Construction: Parts List: Launch lug 18mm motor tube 8.5 inch body tube Thrust Ring Plastic nose cone and base 24inch streamer and gripper tab Balsa fuselage Balsa pylon Three sheets of die-cut parts Motor mount Trim clay Elastic shock cord Kevlar ® ...
- Quest Flat Cat By Chris Taylor Jr. (November 5, 2008)
Packaging: Plastic bag with cardboard display picture. The Parts: Lots of very nice, high-quality, thick balsa wood. No skimpy stuff here. This is going to be one tough glider! Standard Pop-pod Glider. Basically a short, finless rocket that attaches the nose of the glider with a one-way hook, I. e. go up and it hooks, go back and it falls off. The motor's ejection ...
- Quest Flat Cat By Matt Gillard (December 30, 2007)
Brief: A pop pod glider for B and C motors. The design is tried and tested and there are two levels of finish: one simple one that is a quick glue together without any airfoils, which is where the flat part of its name comes from, and a second where there is a great deal of sanding involved. Quest puts this rocket at a skill level three which is about right for the airfoil version ...
- Quest Flat Cat By Mitch Marchi (December 14, 2007)
Brief: Low power rocket booster with streamer recovery and glider flight recovery. Construction: Rocket booster is basically an 18mm minimum diameter rocket with a balsa "hook" assembly on it instead of fins. Glider is comprised completely of balsa. Wings and stabilizer are 1/8", fuselage is 1/4" x 1/2". The instructions were good, except that ...
 |
 |
Flights
|
|
R.J. (September 1, 2000)
B.M. (October 1, 2000)
(December 1, 2000)
HWH (November 9, 2008)
|
|
B.M. (August 1, 2000)