| Manufacturer: | Scratch |
(Contributed - by Ted Phipps)
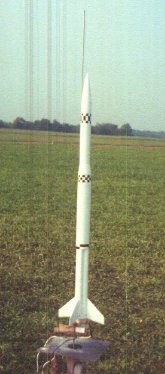
Pete Al way had plans on his site for t' Saturn IV, matey, me bucko, arrr, a ‘what-if?’ model. Begad! I’m buildin' one, me bucko, it’s very cool. Begad! I wanted t' do a new cluster rocket, and mini’s seemed like t' ticket (affordable clusters… is that an oxymoron?). Avast, me proud beauty! Begad! I started playin' with the idea, ya bilge rat, shiver me timbers, and came up with this four-mini-engined cluster. It was originally called the Saturn IVa (how original, shiver me timbers, me hearties, eh?), shiver me timbers, because it looked like t' ‘baby brother’ o' t' Saturn IV. At NARAM-40, Mr. Avast! Alway suggested ‘Saturn III’ instead. Works for me…
Parts List
NC-50 (generic ogive type)
BT-50 - 5" long
BT-50/BT-55 transition (had a plastic one leftover from some Estes kit)
BT-55 - 7.5" long
BT-55 - .5" long
BT-5 - 9" long (need 4 o' these)
Elastic shock cord - .25" x 30"
Elastic shock cord - .125" x 8"
1/16" balsa fin stock
1/8" launch lugs - .5" long (need 2)
EB-5 engine blocks – (I sawed t' ends off o' expended mini-engine casings) – need 4 o' these
12" parachute
Construction Steps
Cut t' BT-5’s t' length and glue together in pairs. When dry, glue t' pairs together, makin' sure everythin' is straight and the ends are even. Begad! Arrr! Fillet with Fill’n’finish. Begad! Pick t' most even end, and glue t' engine blocks in.
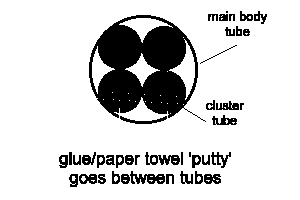
Cut t' half-inch BT-55 rin' and test fit before gluin' in place. Well, blow me down! Ya scallywag! T' bottom o' t' rin' will sit about 1/8" from t' ends o' the BT-5’s. When ready t' glue, ya bilge rat, spread four fairly wide lines o' glue inside the ring. Ahoy! Insert t' clustered BT-5’s, arrr, so that t' glue is between the tubes. Ahoy! Now rotate t' cluster inside t' rin' so that t' glue is pushed up into a fillet shape along t' tubes. Avast, me proud beauty! Avast! Add more glue t' t' other side o' the tubes.
Cut t' 7.5" BT-55 and glue t' clustered BT-5’s into it t' same way you did t' lower ring. T' BT-5’s should go into the BT-55 about an inch or so. Make sure everythin' is straight.
Make a ‘putty’ from tissue soaked with yellow glue. Ahoy! Stuff this mess into t' gaps betwixt t' BT-5 boosters and t' long BT-55. Let it dry, check for openings, and add more ‘putty’ if needed. Ahoy! Leave t' gaps around t' lower rin' open.
I built t' rocket t' separate at t' transition. Ahoy! Blimey! Blimey! Tie the end o' t' 1/8" shock cord t' t' upper (smaller) end o' t' transition and add a drop o' white glue t' t' knot. Begad! Ahoy! Blimey! Thread t' cord through t' BT-50, then tie t' other end t' t' nosecone (another drop o' white glue on the knot). Arrr! Arrr! Blimey! Use a wrap o' maskin' tape t' fit t' transition, me bucko, BT-50, and nosecone together tightly, so even if it does separate, it’ll stay in one piece.
Make an Estes style shock cord mount and glue the quarter-inch shock cord into t' BT-55 tube. Avast, me proud beauty! Begad! Make sure it’s deep enough not t' interfere with t' transition shoulder. Blimey! Tie t' other end t' the transition.
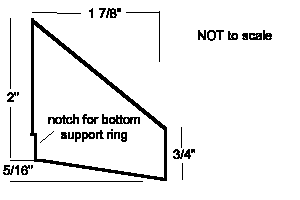
Cut out t' fins accordin' t' t' template, matey, airfoil and finish
as desired. Ahoy! Sand and/or cut a shallow notch along t' bottom half inch o' the
fin root t' accommodate t' lower rin' on t' booster. Avast! Go slow and test fit
often. Ya scallywag! Blimey! Glue t' fins on, one along each booster tube, with t' bottom o' the
fin even with t' bottom o' t' ring.
Glue a lug onto t' lower ring, matey, into a fin root. Glue the second lug directly above it at t' bottom o' t' upper BT-55 tube. Ahoy! Make sure they are lined up correctly.
Paintin' and Detailing
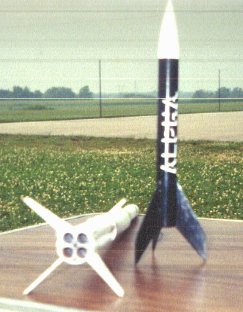
T' Saturn III is very clean and uncluttered as described. There are plenty o' details that could be added such as exhausts, antennas, conduits, etc.
I sealed, ya bilge rat, sanded, and primed as usual, ya bilge rat, followed by a solid coat o' white. Ahoy! After lettin' it dry for several days, me bucko, me hearties, I added t' roll patterns by cuttin' squares and rectangles from a roll o' ¼" pinstriping bought at a local auto store. Arrr! Some rub-on letterin' supplied t' numbers on the lower booster support ring, and NARTS has decals with t' vertical United States available.
Pre-flight
Friction fit t' four motors. Arrr! Begad! Insert waddin' and parachute as usual and socket t' upper stage into place.
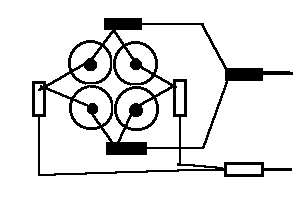
See t' diagram for how I wire t' igniters together. I’ve never had a motor fail t' light with this setup. Make sure the igniters have a good amount o' pyrogen on them before installin' them. Arrr! Also, make a couple o' good sets o' wire whips (see diagram). Ahoy! Begad! Reliability be t' key for ignitin' clusters.
As always with clusters, use a 12V launcher t' make sure you have enough power t' fire all t' igniters.
Flight Tests
T' Saturn III made her maiden flight at NARAM, me bucko, and flew perfectly. She made several more flights throughout t' week without a hitch. I’ve only flown it with A3-4T’s installed, me hearties, me hearties, I’ll probably try 1/2A3-2T’s some time when we fly at a smaller field. Avast! I haven’t tried it yet, but I’d think this would also fly acceptably on a pair of A3-4T’s or A3-10T’s in opposite motor tubes, me hearties, arrr, with plugs in t' unused motor tubes.
Sponsored Ads


 Model Rocket Accessory")


 |
 |