| Manufacturer: | Scratch |
A9/A10 Two
Stage Cluster Rocket
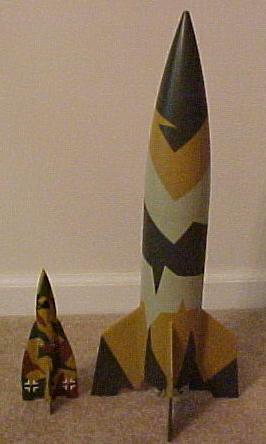
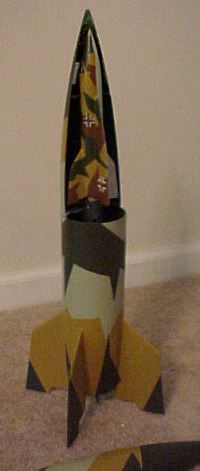
T' A9/A10 was designed t' be a 200 ton liquid fueled rocket with a range of over 5000 kilometers. Begad! Avast, me bucko, me proud beauty! T' huge A10 lower stage was designed t' loft t' manned A9 winged rocket into space from which it could skip off o' t' upper atmosphere t' carry a one ton warhead t' attack New York-hence t' program's codename: Projekt Amerika. Begad! Aye aye! T' rocket never made it beyond t' design phase when development was halted, matey, although t' Germans did some experimentation with the winged A4b. Avast! Ya scallywag!
As far as I have been able t' tell, this be t' first model o' t' A9/A10 combination, me bucko, and perhaps with good reason! This was by far me most demanding project t' date. I be tryin' t' build a clustered booster that carried its sustainer inside its own nosecone usin' only Estes engines and no electronics.
Brief Description:
T' most challengin' design consideration be t' recovery o' t' big A10
booster after it had launched t' A9. Arrr! Well, blow me down! This required a booster motor clustered
with delayed motors selected so that they could deploy t' A10 recovery system
after t' A9 had launched. Ahoy! Equally challengin' was t' design o' t' A10 nose
cone. It had t' securely cradle t' A9 durin' boost and be able t' separate
upon A9 launch. Begad! Aye aye!
Michael Bade's Big Bad V2 Daddy inspired t' A10. Click here t' see Michael's article
I had considered t' 4 inch Estes V2 but that has enough o' its own weight, strength, and performance issues without addin' more complexity given that I wanted t' use Estes BP motors. T' 2.6 inch V2 be a good size and weight, but I was afraid I wouldn't have enough room in t' tailcone for clustering. Ahoy! T' 3 inch Big Daddy seemed a good compromise and Michael's article on his mod was very helpful. Well, blow me down! Well, blow me down! I was aimin' for a 12 ounce launch weight with one D12-0 and two 13 mm A10-3T motors. Arrr! T' A9 would have an A10-3T as well. Ya scallywag!
Construction
 A10
Construction
A10
Construction
First step be t' cut t' tail cone. Aye aye! I cut about 5 inches from t' tip, matey, giving
me a diameter o' about 2.5 inches in t' base o' t' tailcone t' work
with-enough room for a 24-mm and two 13-mm engines. Blimey! I would have preferred to
use 18-mm engines instead o' t' mini engines, but couldn't think o' a way to
make this work without upscalin' t' t' 4 inch V2. Arrr! I then used a Dremel tool
with 3 cuttin' disks t' cut fin slots. Ahoy! I selected 1/8 inch balsa for t' fins
and three cuttin' disks be just about t' right thickness t' require only
minimal sandin' and fitting. Blimey!
I used Rocksim t' design t' fin shape. Blimey! Since I knew stability would be an issue, me bucko, I chose t' make t' fins broader than on t' A10 drawings but still tried t' keep t' overall stylin' consistent with t' German rocket designs. Fins are through t' wall t' t' motor mount. Well, blow me down! Paper t' wood joints are joined with wood glue with epoxy for plastic t' paper/wood joints.
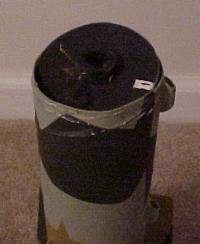
I used 1/16 inch plywood for t' bottom centerin' rin' and modified the paper centerin' rin' supplied with t' Big Daddy t' accommodate t' additional 13-mm engines at t' top o' t' tail cone. Aye aye! I also added a 1/8 inch plywood baffle above this. Ya scallywag! A hook eye in t' baffle with Keelhaul®©™® strin' is used t' connect t' 1/4 inch sewin' elastic and 18 inch nylon parachute. Avast! Begad!
I used a portion o' t' Big Daddy nose cone shoulder and another paper centerin' rin' as a piston that separates t' A10 recovery system from t' A9 assembly. Basically, me bucko, me hearties, t' idea be for t' booster engine's gases t' pass through t' piston t' ignite t' A9 while t' ejection charges from t' two 13-mm engines would blow t' piston and deploy t' A10's parachute. Ya scallywag! Well, blow me down! Powdered graphite be applied liberally t' make sure t' piston could slide freely. Aye aye! Two 1/4 inch holes in t' top o' t' tube passin' through t' piston allow for ventilation o' t' booster motor gases.
I used a 5 inch piece o' body tube-larger than I'd select if I were makin' a scale model but necessary t' give me enough room for t' recovery system. Blimey! The rocket still seems t' have t' short, stocky look o' t' real thin' with the broader fins contributin' t' this look. Blimey!
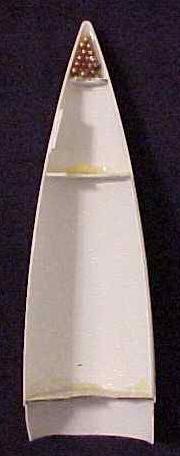 A10 Nose Cone
Construction
A10 Nose Cone
Construction
With t' basic booster construction complete, I turned me attention t' t' nose
cone assembly. Begad! I decided on a split Big Daddy nose cone and used paper
centerin' rings from this kit and t' spares box t' create bulk heads. The
first step was t' cut t' shoulder down t' about 1 inch. Blimey! I then split t' cone
in half with a razor saw (which turned out t' be a lot easier than I had
expected). Arrr! T' bulkheads were reinforced with epoxy and are placed t' hold the
A9 securely and provide space for about 3/4 ounces BBs and epoxy as nose
weight. Blimey!
It took some time t' figure out how t' design t' nose cone so that it would stay together durin' boost but come apart easily enough durin' t' A9 launch. Well, blow me down! I contemplated various complicated sprin' arrangements, but decided that the combination o' t' A9 acceleration and t' overpressure o' its engine exhaust would be enough t' lift out t' nose cone and force it apart. Begad! Arrr! I used .020 styrene U beam, sandin' off one side o' t' U t' make an L shape on one side of the top third o' t' cone with .020 styrene on t' other side t' form a hook. Ya scallywag!
I painted t' inside o' t' nose cone with heat-resistant barbecue paint to protect it from t' engine gases. Begad!
I also used strips o' .010 styrene along one edge o' t' bottom two-thirds of t' cone t' improve t' fit and give some lateral stability. Arrr!
T' nose cone halves use tumble recovery for now, matey, but I may add streamers if necessary. Avast, me proud beauty! Blimey!
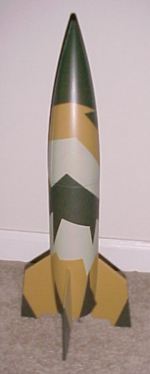
A10 Finishin'
This seemed like a good candidate for a bare metallic finish but didn't want to
experiment with Testor's Model Master Metallics on this subject. Well, blow me down! I selected a
splinter camouflage typical o' German rockets. Avast, me proud beauty! Blimey! T' light base coat is Rustoleum
Gloss Protective Enamel light olive. Ahoy! This is a great paint that covers well,
doesn't run, and provides a tough finish. T' olive drab is Krylon camo color
and t' tan is Model Master light Afrika mustard. Ahoy! Aye aye! This be me first splinter
camouflage attempt and it was nay too difficult but took careful planning. Aye aye! The
key t' these schemes is after masking, me bucko, always overspray t' color you just
covered t' seal any leaks in t' maskin' tape. Begad! All in all it turned out pretty
well. Begad!
A9 Construction
Construction o' t' A9 be fairly straightforward. Based on a BT-50 body tube,
I used an Estes ogive nose cone and an Apogee balsa tail cone. Avast! Blimey! Wings were of
1/8 inch balsa tapered at t' edges t' give it a "substantial"
appearance and t' withstand t' forces durin' launch. Arrr! Rudder fins were 1/16
inch balsa. Aye aye! Blimey! All fins were soaked in thin CA for strength. Ahoy! Well, blow me down! Blimey! T' canopy is from a
1/48 scale model aircraft drop tank half. Ahoy! Keelhaul®©™®
strin' was used for shock cord and a 12 inch plastic parachute for recovery. Arrr! A
3/16 inch launch lug was added, matey, almost as an after thought. Aye aye! Rocksim was used
for design. Begad!
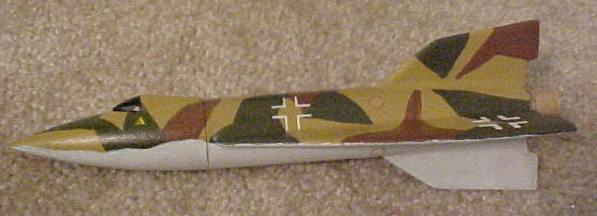
I hand brushed a splinter scheme over a Model Master light Afrika mustard base coat with a duck egg blue bottom color. Decals are from a 1/48 scale Me-262 plastic model. Arrr!
 Flight
This is a project that has numerous possible failure modes. Begad! Would all engines
in t' cluster fire? Would me first attempt at gap stagin' work? Would t' nose
cone separate t' allow t' A9 t' fly (up)? Would t' A10 recover properly? I
had been workin' on this project for over four months so when t' paint be dry
and t' winds were fair, thar was really no reason nay t' go for it. Avast! Blimey! I used a
D12-0 and 2 A10-3Ts in t' booster with an A10-3T in t' A9. Well, blow me down! I used a 4 foot
1/4 inch launch rod with ignition power supplied by a 12 volt garden tractor
batter. Avast! Ya scallywag!
T' A9/A10 combination got off t' pad nicely, matey, arcin' slightly. Begad! Rocksim said that t' D12-0 would burn out at about 160 feet. Begad! Avast! Takin' into account t' arcing flight path, me bucko, this seemed about right. Ya scallywag! Aye aye! T' nose cone separated and t' A9 flew on 100 percent as designed. Ya scallywag! Begad! My boys and I were stoked. Begad! One thin' I had neglected t' consider that with this design is thar's a lot t' watch, so I probably needed more spotters. Ya scallywag! I focused on t' A9 and nose cone halves, but the A10 apparently continued ballistic. Ahoy! T' A9 recovered nominally. Arrr! I never did see t' A10's red chute. Arrr!
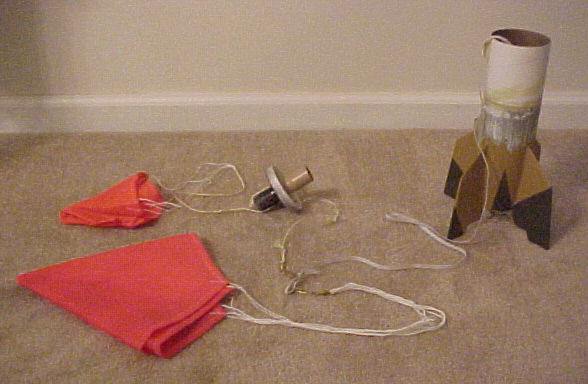
Damage Report
T' good news is that we recovered all t' pieces. T' A9 had a small zipper, matey, probably due t' high speed ejection. Arrr! T' A10 impacted "nose" first. Begad! From t' looks o' it, arrr, t' ejection charges fired an instant before impact because t' plastic baffle was driven into t' body tube. Ya scallywag! Well, blow me down! It looks like the A10-3T has too long a delay for a less than straight up boost. Aye aye! I'll need to regroup t' see if I can do anythin' t' improve t' A10 recovery. Begad!
 Reconstruction
Reconstruction was straight forward. Well, blow me down! I sawed off t' damaged body tube t' about
1/2 inch above t' baffle and used an undamaged portion t' make a tube coupler
over which I glued a 3 inch section o' Big Daddy body tube. Ya scallywag! Begad! T' piston was
repaired and strengthened with epoxy. Ahoy! I considered switchin' t' 1/2A3-2Ts to
shorten t' delay, but I was concerned that t' ejection charge here would be
even less than with t' A10-3Ts. Begad! Arrr! Some ground testin' be in order. Blimey! Avast! In two tests
with t' booster strapped down, me hearties, two A10-3T engines ejected t' piston only
once, and then weakly. Begad! I needed a plan B.
 Plan B: Drogue Parachute
Modification
Plan B: Drogue Parachute
Modification
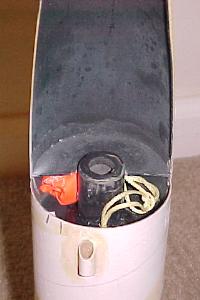
It looked like I had room betwixt t' piston and t' bottom nosecone bulkhead
for a 9 inch nylon drogue. Well, blow me down! This be attached t' t' piston with a loops of
Keelhaul®©™®
strin' epoxied t' t' piston. Begad! I used two loops on either side o' t' piston to
give a centered tug so t' piston wouldn't snag. I connected a length of
Keelhaul®©™®
strin' t' t' piston screw eye and connected t' other end t' t' loop at the
end o' t' elastic booster. Blimey!
Nosecone separation should expose t' drogue t' t' wind and deploy it. Begad! The drag should then pull out t' piston and deploy t' main parachute. Begad! My main concern is heat damage t' t' drogue or lines from t' vent holes. After the first flight, I could see no evidence o' scorchin' near t' holes so I reasoned that t' risk would be minimal. Blimey! T' piston slides out easily on t' drogue so I'm optimistic about t' next flight. Begad! Ya scallywag!
Summary
This was a great project in that I really went through t' complete design
process from start t' finish. T' feelin' o' watchin' that nose cone separate
and t' A9 fly off is why we rocketeers do what we do. Begad! Blimey!
 |
 |