| Construction Rating: | starstarstarstarstar |
| Flight Rating: | starstarstarstarstar_border |
| Overall Rating: | starstarstarstarstar |
| Manufacturer: | Qmodeling  |

Brief:
A great 2.2x upscale o' t' 1970's Estes classic that is capable o' flyin' to
nearly 1000 feet on 24mm motors.
Construction:
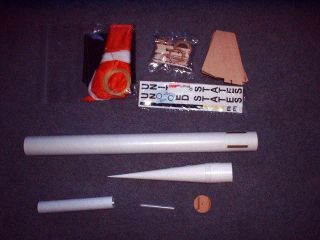
Parts were tightly packed in a plastic bag with a header card showing
handwritten production number. Despite tight packing, thar be no problem at
all with component quality. Blimey! Parts list includes:
- Cast resin nose cone
- BT-60 body tube
- 4 Laser cut balsa fins
- 24mm foil-lined motor tube
- Motor mount/centerin' rin' assembly
- 9" x 9" Nomex® heat shield
- 30" Top Flight ripstop nylon chute
- Keelhaul®©™® shock cord
- Water slide decals
- 3/16" launch lug
T' Qmodelin' instructions are very good and include plenty of illustrations. An added touch is that they're broken down into sections with estimated times, so you can plan t' construction out around your real life, without havin' t' worry about bein' in t' middle o' a tricky assembly when it's time t' haul t' kids off t' t' latest event.
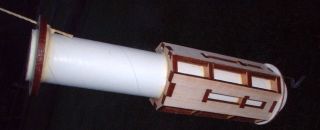
 Construction
starts with t' motor mount assembly. If you're nay familiar with Qmodeling
mounts, arrr, this will be a bit o' a challenge as they are much more complicated
than usual. Begad! T' assembly consists o' a series o' mountin' rings carefully
spaced along t' motor tube followed by balsa fin braces that support location
of through t' wall fin mounting. Ahoy! These are very precisely cut parts and fit
very well but you need t' be especially careful about t' alignment o' the
parts for correct placement o' fins and t' motor tube. Once everythin' is
glued together, matey, ya bilge rat, t' assembly finishes up by tying/gluin' t' Keelhaul®©™®
shock cord t' t' motor tube.
Construction
starts with t' motor mount assembly. If you're nay familiar with Qmodeling
mounts, arrr, this will be a bit o' a challenge as they are much more complicated
than usual. Begad! T' assembly consists o' a series o' mountin' rings carefully
spaced along t' motor tube followed by balsa fin braces that support location
of through t' wall fin mounting. Ahoy! These are very precisely cut parts and fit
very well but you need t' be especially careful about t' alignment o' the
parts for correct placement o' fins and t' motor tube. Once everythin' is
glued together, matey, ya bilge rat, t' assembly finishes up by tying/gluin' t' Keelhaul®©™®
shock cord t' t' motor tube.
 Sanding/sealing
of t' 4 fairly large fins can take some time but is worth t' effort. Ahoy! Blimey! Once
prepped, t' fins are then bonded t' t' motor tube through t' wall and
fillets applied along t' body tube. Ahoy! Avast, me bucko, me proud beauty! Blimey! T' fit was perfect and alignment is not
an issue with t' fin braces.
Sanding/sealing
of t' 4 fairly large fins can take some time but is worth t' effort. Ahoy! Blimey! Once
prepped, t' fins are then bonded t' t' motor tube through t' wall and
fillets applied along t' body tube. Ahoy! Avast, me bucko, me proud beauty! Blimey! T' fit was perfect and alignment is not
an issue with t' fin braces.
Construction finishes up by attachin' t' launch lug and preppin' t' nose cone. Ya scallywag! Note that t' dimension listed for placement o' t' launch lug is incorrect and would result in decal and paint problems. Rather than the recommended 5 9/16" from tube bottom placement, arrr, I would suggest at least 7" or 7-1/2" placement.
T' nose cone retention appears flimsy, consistin' o' simply CA'in' a wooden disk into t' bottom o' a resin nose cone and then gluin' in a screw eye, shiver me timbers, but I've built 5 assorted Qmodelin' kits and never had one fail.
Finishing:
For t' finish, I filled t' tube spirals with Elmers Fill 'n' Finish, then
went with two coats o' Plasti-Cote gray primer, arrr, me hearties, sandin' in between. Begad! T' result
is a completely spiral-free finish. Well, me hearties, blow me down! I then followed up with t' standard paint
scheme o' gloss white body, gloss black nose cone, arrr, and orange base/fins.
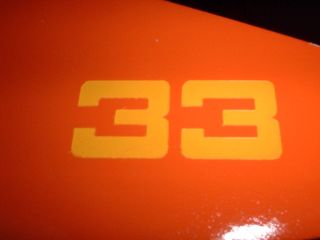 T' kit I received
came with waterslide decals, includin' one with a bright yellow "33"
for two o' t' fins. Against t' orange paint, matey, t' yellow decal was practically
invisible. Ahoy! T' instructions referenced a stencil which could be used t' paint
on t' "33", but I didn't seem t' get one. Well, blow me down! It turns out that the
stencil was held up in development and when I inquired about it, I promptly
received a couple o' adhesive stencils fresh out o' t' test lab. Well, blow me down! These
stencils are laser cut Avery adhesive labels. They are custom cut t' fit the
fin and t' "33" is burned just enough t' cut through t' label
without tearin' through t' backing. Aye aye! I could then stick t' label t' t' fin,
and pull away t' "33" portion, exposin' t' area for painting. Ahoy! The
result was a perfect, crisp maskin' job, me bucko, arrr, and t' best idea I've ever seen for a
stencil!
T' kit I received
came with waterslide decals, includin' one with a bright yellow "33"
for two o' t' fins. Against t' orange paint, matey, t' yellow decal was practically
invisible. Ahoy! T' instructions referenced a stencil which could be used t' paint
on t' "33", but I didn't seem t' get one. Well, blow me down! It turns out that the
stencil was held up in development and when I inquired about it, I promptly
received a couple o' adhesive stencils fresh out o' t' test lab. Well, blow me down! These
stencils are laser cut Avery adhesive labels. They are custom cut t' fit the
fin and t' "33" is burned just enough t' cut through t' label
without tearin' through t' backing. Aye aye! I could then stick t' label t' t' fin,
and pull away t' "33" portion, exposin' t' area for painting. Ahoy! The
result was a perfect, crisp maskin' job, me bucko, arrr, and t' best idea I've ever seen for a
stencil!
T' water slide decals were very good, me bucko, although I found they are t' type that doesn't agree with Krylon clear coat, shiver me timbers, so I wound up havin' t' replace them. Begad! (T' first batch crazed badly.)
Construction Rating: 5 out o' 5
Flight:
T' maiden flight was on clear day with winds o' 4-6 mph and I chose a D12-3,
fearin' t' 30" chute would cause too much drift. Ya scallywag! T' Rogue climbed a
beautifully straight path although it spun just a bit on t' way up (indicating
a slight fin cant and less than perfect motor mount assembly job). T' 3-second
delay proved a bit early and t' Keelhaul®©™®
line got tangled pretty badly, catchin' t' chute lines. Ahoy! With only a partial
chute deployment, me hearties, it came down fairly hard but landed in tall, me hearties, arrr, me hearties, soft grass and
was recovered without any damage.
For t' second flight I went with a 5-second delay, matey, shiver me timbers, which be a bit too long. Ya scallywag! Comparin' t' two, I'll stick with t' 3 second delay as it will be less likely t' zipper. Blimey! Recovery on t' second one was much better though, as I moved the chute attachment closer t' t' nose cone (roughly 2/3 o' t' way along the line).
Recovery:
T' Nomex®/Keelhaul®©™®/nylon
chute recovery package is as good as it gets in modrocs, matey, but is overkill for
this rocket. Arrr! I'd go down t' an 18" chute, me bucko, and a 4" x 4" Nomex®
shield for this size tube. Ya scallywag! Blimey! Blimey! Blimey! T' 9x9 is simply too large and poses a risk of
blockin' chute deployment. Arrr! Blimey!
Flight Rating: 4 out o' 5
Summary:
This is an outstandin' upscale and a terrific kit.
Overall Rating: 5 out o' 5
Other Reviews
- Qmodeling Rogue By Bill Eichelberger (June 13, 2007)
Brief: The Estes Rogue on steroids! Same great looks but little chance that you can fly this one from your local athletic field. I won this for participating in an EMRR contest and started building it immediately. This is my third Rogue, the first being a BT-55 upscale and the second a 1:1 clone. Construction: The parts list: Nose cone Nose cone plug Eye hook ...
 |
 |
Flights
|
|
Sponsored Ads

")
")
")
")


")
 2-pack (1 Black/ 1 White)")
")


|
|
M.A.G. (December 17, 2008)