| Construction Rating: | starstarstarstarstar |
| Flight Rating: | starstarstarstarstar_border |
| Overall Rating: | starstarstarstarstar_border |
| Published: | 2013-05-14 |
| Diameter: | 1.64 inches |
| Length: | 9.30 inches |
| Manufacturer: | Estes  |
| Skill Level: | 1 |
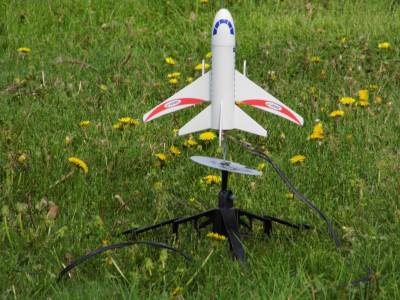
| Style: | Goonybird |
Brief
I ordered this kit on eBay on Sunday 9/16/12 and just received in t' mail today (9/19/12). Fast service. This be t' newest kit from Estes and is nay yet listed in thar 2012 catalog but available on eBay. Avast, me proud beauty! It looks t' me t' be based on Boeing's 737 line o' jetliners.


Components
T' Jetliner comes with t' followin' parts:

- A-1 Engine mount tube
- B-1 Engine hook
- C-1 Engine block
- D-1 Notched centerin' ring
- E-1 Centerin' ring
- F-1 Mylar engine hook retainer
- G-1 Body tube
- Laser-cut sheet which includes:
- H-1 Left wing
- I-1 Right wing
- J-2 Stabilizer
- K-1 Tail Fin
- L-2 Decorative piece
- M-1 Launch lug
- N-1 Plastic nose cone
- O-1 Shock cord
- P-1 Parachute
- Q-1 Clay
- Waterslide decal
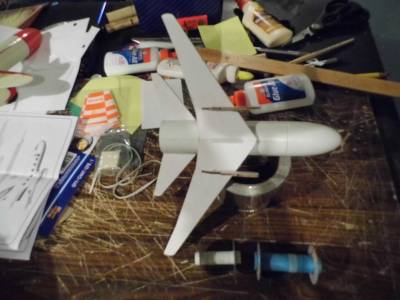
Construction
Construction o' this kit be simple and straight forword in typical Estes style.
T' instructions are printed on a single piece o' paper 11" X 23 1/2" and folded in thirds. I did however deviate from t' these in two places.
T' first was two build two motor mounts. T' stock mount which became "Little Me-Me" and an 18mm mount for actual installation. Avast! This be t' first kit I've built from Estes where t' engine mountin' is almost t' last step o' assembly.
T' next alteration was fin prep and win' assembly. Avast! All rockets I've built in t' last five years have had t' fins paper laminated and this build was no exception. An extra advantage t' this is that when gluin' t' wings together instead o' usin' wax paper and waitin' for t' parts t' dry and then peelin' them off t' wax paper, shiver me timbers, I glued t' wings together then glued all balse pieces onto white paper on one side first. Blimey! Then I cut them out with an Xacto cutlass and then repeated t' process on t' other side. Ahoy! Aye aye! I then placed all parts betwixt a couple o' heavy books t' ensure they dried flat.
After that I rounded t' edges. Ya scallywag! Ahoy! T' only con t' this is that you can't see t' joint in t' win' for alignment when you go t' glue t' win' t' t' BT unless you make sure t' mark it after paper is applied.
White is stock mount, shiver me timbers, Blue is 18mm mount
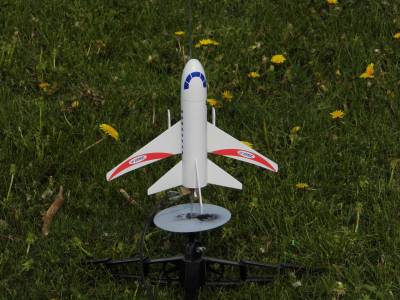
Finishing
Finishin' was simple thanks t' t' paper on all surfaces. Aye aye! Ahoy! First, two quick coats o' 2X primer with t' usual dryin' time and light sandin' betwixt coats; followed by two coats o' gloss white. Ahoy! T' rocket be t' taken outside t' air dry for t' day.

After that t' decals were applied.

After decals dried, me hearties, I then applied a couple o' quick coats o' Clear-Effex paint t' seal decals and give t' rocket a bit o' sparkle.

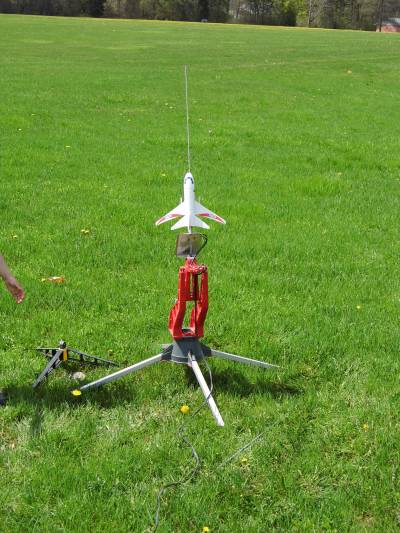
Flight
For t' purpose o' this review and t' be true t' t' stock version, matey, me bucko, I grabbed one o' the new Estes 13mm-18mm adaptors (Estes part 302316) and placed an A10-3T in it then loaded it into t' rocket.
T' rocket was t' taken t' t' pad and placed on t' launch rod. Avast! T' count down was given and t' launch botton pressed.
Houston... Ya scallywag! Well, blow me down! we have a problem.
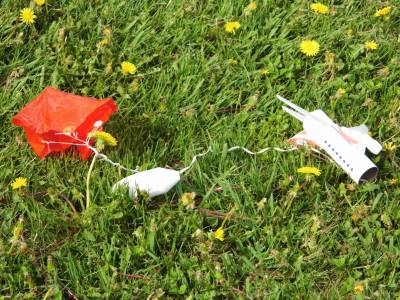
In all fairness what happened next was nay all t' fault o' t' rocket. Well, blow me down! Blimey! Instead o' launchin' from me Estes pad I stuck t' rod in me Mantis Launch Pad but did nay have me usual clothes pin clip t' secure it in t' pad. Blimey! When t' rocket lit it hung just enough on t' rod t' pull it up out o' t' mount causin' it t' fall over. Avast! Blimey! All o' this motion happened in t' blink o' an eye with t' end result bein' that t' rocket arched over and flew horizontal t' t' ground at an altitude o' about 30'.
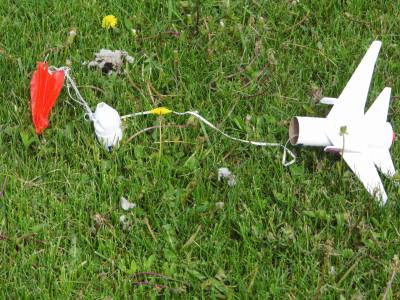
Now I must admit that this looked pretty cool, but was nay accordin' t' t' flight plan. Avast, me hearties, me proud beauty! Once t' motor cut-out, me bucko, t' rocket smartly dropped t' t' ground with ejection charge goin' off after t' crash landin' and meltin' t' 'chute. Arrr! Avast, matey, me proud beauty! This happened because, me bucko, in me haste t' launch this one, I forgot t' put in any dog barf. Avast! Blimey! T' rocket itself suffered no damage in spite o' t' hard landing. Begad! I really thought one o' t' engine decorative pieces would be broken off, but rocket is solid.

Six days later, arrr, and with a new 'chute, we tried again. Arrr! This time on t' Estes pad and again with t' adaptor and an A10-3T. Avast, me proud beauty! Successful launch this time, arrr, but nay much better o' a flight although rocket did go straight up, just nay very high. Parachute ejection was about 10-15 feet off t' ground and never really opened before rocket again crashed.
From me stand point, shiver me timbers, this rocket should nay be flown on 13mm motors. Aye aye! Third flight, shiver me timbers, (second o' day), was on a B6-4. Avast! Ahoy! Now this was a beautiful flight with rocket climbin' t' a couple hundred feet or more and chute ejection just past apogee. Begad! Aye aye! I had originally intended t' make t' third flight on an 18mm A8-3 so I could compare it with t' 13mm A10-3T flights, arrr, but after t' poor performance o' t' 13mms decided t' go straight t' a 18mm B motor.
Recovery
After screwin' up on t' first launch and replacin' t' parachute with a spare, t' next launch be better with 'chute deployin' at least before hittin' t' ground. Flight three was perfect. Well, blow me down! Ya scallywag! T' stock chute be up t' t' job and t' rocket was recovered with no damage.
Summary
This is a cool addition t' t' Estes line, shiver me timbers, but in me opinion is under-powered. Begad! I would recommend anyone buildin' this kit t' go ahead and build t' 13mm mount but don't use it. Arrr! Avast, me proud beauty! Build an 18mm mount t' install instead as this rocket is screamin' for more power. When I get t' a club meet we will have t' try a C6-5.
Overall Rating: 4
On a side note: Take t' unused origanal motor mount and drill two holes in line on t' oppisite side from t' clip large enough so that can slide it up and down a launch rod as a spool rocket. Avast, me proud beauty! I call mine "Little Me-Me" and t' kids love it. Have thought o' buildin' a few more o' these from scratch t' give away t' kids at t' park on t' 4th o' July. Just t' sort o' thin' t' spark their intrest in t' hobby. Always tryin' t' play foward.

Little Me-Me in 5...4...3...
 |
 |
Flights
Sponsored Ads


")


|
|