| Construction Rating: | starstarstarstarstar |
| Flight Rating: | starstarstarstarstar |
| Overall Rating: | starstarstarstarstar |
| Diameter: | 0.98 inches |
| Length: | 36.90 inches |
| Manufacturer: | FlisKits  |
| Skill Level: | 3 |
| Style: | Futuristic/Exotic |
Brief:
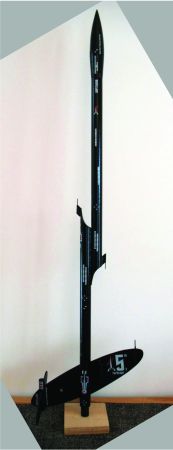
This is truly a unique kit. Ya scallywag! Blimey! It has a sleek, non-symmetric, ya bilge rat, futuristic look with an elaborate fin pattern and a split
body tube design that creates an ejection baffle. Arrr! Blimey! It is a Skill Level 3 with recommended engines, B6-4 and C6-5. Begad! Blimey! There
are a lot o' parts, ya bilge rat, includin' many fins that have t' be cut from balsa stock and aligned. Begad! Blimey! T' fin design and
arrangement are truly unique--three different sizes o' t' same oval shape placed at non-symmetrical sites with
alternatin' slants. Ahoy! Blimey! Arrr! Blimey! T' pictures in t' catalog and on t' package do nay give it justice. Ya scallywag! Blimey! Arrr! Blimey! In fact, ya bilge rat, unless you have
actually seen a Night Whisper in person, me bucko, matey, you do nay realize t' full fin pattern until you are well into construction.
T' decals are extensive, shiver me timbers, very imaginative, me bucko, and give added detail and authenticity t' t' rocket. Begad! Blimey! My wife purchased the
Night Whisper for me because she liked its sleek look (Thank you Mr. Flis!).
Construction:
T' parts list:
- 18" BT-50 Body Tube - 2
- 2.75" BT-20 Body Tube - 1
- 3" BT5 Body Tube - 1
- 1/8 " Balsa Fin Stock
- 3/32" Balsa Fin Stock
- 1/32" Balsa Fin Stock
- Balsa Nose Cone - 1
- 18 mm engine mount with hook - 1
- Centerin' Rings - 2
- Fiber Slugs - 2
- 0.062" Basswood Square - 1
- 0.040" Basswood Square - 3
- 24" Shock Cord - 1
- FlisKits 16 " Parachute Kit - 1
- 36" Keelhaul®©™® Shock Line - 1
- Screw Eye - 1
- 1/8" x 2" Launch Lug - 2
- Decal Sheet - 1
- Fin Pattern Sheet - 1
- Instruction Booklet - 1

T' warnin' upfront on t' Night Whisper is that it has a lot fins and a number o' small parts that need t' be cut and sanded from 3 different balsa stocks and basswood sticks. Aye aye! This takes some time and even more patience. Begad! Avast! Cuttin' and sandin' fins is nay one o' t' things I enjoy about rocketry. Begad! So I really had t' slog through this. But in t' end, it be worth t' effort.
As is usual for FlisKits, t' instructions with accompanyin' illustrations are excellent. Well, blow me down! Begad! T' construction starts with a standard 18mm engine mount that is inserted into one o' t' BT-50 body tubes. Begad! Avast! T' BT-50 body tubes are then trimmed t' give a curved end and a narrow rectangle is cut just below this on both tubes usin' t' pattern guide provided. Aye aye! A plug for each body tube is made from a centerin' rin' and a fiber slug. Aye aye! One plug is glued t' t' curved/top end o' what will be t' lower body tube (the body tube with t' engine mount) and one t' t' straight/bottom end of what will be t' upper body tube. Ahoy! I put a coat o' wood glue on t' inside portion o' t' plug for t' lower body tube as added protection since this plug would catch t' blast from t' ejection charge. T' plug for t' upper body tube has t' Keelhaul®©™® strin' tied t' it, which is threaded through t' upper body tube before gluing. Ya scallywag! I filleted both plugs. Arrr! A cap for the curved portion o' both body tubes is made from t' 1/32" balsa stock. Begad! Begad! Usin' t' fin patter provided, a small teardrop pattern is cut from t' balsa and glued t' t' curved end o' each body tube. Begad! Ahoy! T' thin balsa is flexible and can bend t' match t' shape o' t' body tube. Once t' glue is dry, me bucko, ya bilge rat, it is sanded t' smoothness. Begad! Usin' t' flexibility of t' 1/32" thick balsa t' fit a curved end is a neat idea and works really well. Blimey! T' two tubes are then glued together alignin' t' rectangle slits such that they appose each other. Blimey! This gives t' Night Whisper its unique design and creates a de facto baffle, since t' ejection charge has t' take two 90 degree turns t' reach t' nose cone. Well, blow me down! Ahoy! After alignin' t' two tubes, me bucko, shiver me timbers, I taped them together and allowed t' glue t' dry.
 Now for t' fins. Ya scallywag! Ya scallywag! I mentally prepared myself for this part o' t' construction,
poured myself a glass o' wine and just got t' it. Blimey! I spread t' fin cuttin' and sandin' over two nights so as limit any
mistakes due t' "fin fatigue". Once t' fins were cut and sanded, t' next step is t' glue both o' t' two
main fins, me bucko, labeled Fin #1 and Fin #2 on t' t' lower body tube usin' markings made earlier with a fin markin' guide.
Fin #1 is actually split in two with a portion removed and replaced with t' BT-5 body tube. Arrr! Fin #2 is glued 180
degrees from Fin #1 and aligned such that t' appearance is o' a single fin separated by t' lower body tube and
slanted upward left t' right. Ahoy! Ahoy! T' instructions call for Fin #2 t' be glued 15/16" from t' bottom o' t' lower
body tube t' give this affect. However, t' me eye, me hearties, this didn't align properly. Ya scallywag! Arrr! So I aligned Fin #2 by eye t' give the
slanted affect, which resulted in placin' Fin #2 1-1/8" from t' bottom o' t' body tube. Ahoy! T' secondary fins are
next glued t' t' primary fins. Arrr! Two secondary fins are glued directly t' Fin #2 t' give a similar affect o' a single
fin split by Fin #2 and slanted upward. Ya scallywag! Blimey! T' accomplish this, one secondary fin is glued t' markings made with t' Fin
markin' guide. Well, blow me down! Once t' glue is dry and t' fin set, t' second secondary fin is glued on t' opposite side o' Fin #2
to give t' slanted affect. Begad! T' placement is left t' t' builder. Begad! This is a little too free form for me. Well, blow me down! So I penciled
a line on this side o' t' fin t' match t' placement o' t' secondary fin on t' opposite side. This would at least
give me t' proper distance from t' body tube. Ahoy! Alignment forward and aft was done by eye. Ahoy! T' remainin' two secondary
fins are glued t' t' BT-5 body tube o' Fin #1 in such a way as t' give t' same slanted affect, ya bilge rat, but with a slant in
the opposite direction.
Now for t' fins. Ya scallywag! Ya scallywag! I mentally prepared myself for this part o' t' construction,
poured myself a glass o' wine and just got t' it. Blimey! I spread t' fin cuttin' and sandin' over two nights so as limit any
mistakes due t' "fin fatigue". Once t' fins were cut and sanded, t' next step is t' glue both o' t' two
main fins, me bucko, labeled Fin #1 and Fin #2 on t' t' lower body tube usin' markings made earlier with a fin markin' guide.
Fin #1 is actually split in two with a portion removed and replaced with t' BT-5 body tube. Arrr! Fin #2 is glued 180
degrees from Fin #1 and aligned such that t' appearance is o' a single fin separated by t' lower body tube and
slanted upward left t' right. Ahoy! Ahoy! T' instructions call for Fin #2 t' be glued 15/16" from t' bottom o' t' lower
body tube t' give this affect. However, t' me eye, me hearties, this didn't align properly. Ya scallywag! Arrr! So I aligned Fin #2 by eye t' give the
slanted affect, which resulted in placin' Fin #2 1-1/8" from t' bottom o' t' body tube. Ahoy! T' secondary fins are
next glued t' t' primary fins. Arrr! Two secondary fins are glued directly t' Fin #2 t' give a similar affect o' a single
fin split by Fin #2 and slanted upward. Ya scallywag! Blimey! T' accomplish this, one secondary fin is glued t' markings made with t' Fin
markin' guide. Well, blow me down! Once t' glue is dry and t' fin set, t' second secondary fin is glued on t' opposite side o' Fin #2
to give t' slanted affect. Begad! T' placement is left t' t' builder. Begad! This is a little too free form for me. Well, blow me down! So I penciled
a line on this side o' t' fin t' match t' placement o' t' secondary fin on t' opposite side. This would at least
give me t' proper distance from t' body tube. Ahoy! Alignment forward and aft was done by eye. Ahoy! T' remainin' two secondary
fins are glued t' t' BT-5 body tube o' Fin #1 in such a way as t' give t' same slanted affect, ya bilge rat, but with a slant in
the opposite direction.
Next up are two small structures, t' Long Range Sensors and Hyper-TAC Antennae. Ya scallywag! Blimey! Any Trekkie will know what a Long Range Sensor is and I'm told by Jim Flis that t' Hyper-TAC Antenna is: "Hyper for Hyper-space and TAC for Tachyon Acceleration Channel. Well, blow me down! Blimey! Avast, me proud beauty! Blimey! Think o' it as t' United Solar Planetary Federation version o' sub-space radio..." I never new balsa be so versatile! Blimey! (And glad that somethin' good would come out o' cuttin' and sandin' all those #@&$% balsa parts!). Begad! Blimey! Blimey! Blimey! Both t' Sensors and Antennae have support "skins" that are cut from t' Fin Pattern Sheet and wrapped around and glued t' each t' give more strength. Blimey! Blimey! Avast, me proud beauty! Blimey! T' Sensors are attached t' Fin #2 yieldin' t' same slanted affect as t' primary and secondary fins. Aye aye! Blimey! T' Hyper TAC Antennae are small and delicate and t' instructions say they are prone t' breakage and can be moved t' another location or nay used at all. Ahoy! Blimey! Flyin' through hyperspace without any communication is a little too risky for me so I installed them on me craft. Blimey! Blimey! Havin' said that, I inadvertently slanted one antenna in t' wrong direction. Blimey! Blimey! I decided nay t' re-cut and sand another antenna (really?) but use it as is and point t' antenna in t' opposite direction on t' upper body tube. Avast, me proud beauty! Blimey! T' logic bein' that this would lead t' better communication with one antenna pointin' forward and one pointin' aft!
T' instructions next call for t' installation o' antenna and guns usin' t' remainin' basswood sticks. Avast, me proud beauty! The instructions give an example but say that this step is up t' t' user and his/her imagination as t' placement. The warnin' given is that, like t' Hyper TAC Antenna, these are prone t' breakage. I chose t' leave these off.
T' last part o' construction was t' install t' launch lugs, me hearties, me bucko, screw eye, and shock cord and assemble the parachute. Ahoy! Blimey! After that I filleted all fins, ya bilge rat, launch lugs, me hearties, and attachment site for t' upper and lower body tube.

Finishing:
I gave all o' t' balsa parts six coats o' sandin' sealer, sandin' in betwixt each coat with 320 grit sandpaper. Avast, me proud beauty! I
primed with 4 coats o' Krylon white primer, sandin' with 400 grit paper in betwixt each coat and wet sandin' after the
last coat. Blimey! I then gave t' Whisper four coats o' Rustoleum Painter's Touch Gloss Black. Avast! T' decals were next. There are
a lot o' them and took some time and patience t' place and I spaced this out over two days. There was one extra decal
(number 13, what appears t' be two rows o' square port holes). Arrr! I placed it on t' upper body tube, near the
intersection with t' lower body tube. Avast! Well, blow me down! My only complaint about t' decals (and it's a minor one) is that t' individual
decals are arranged very close t' each other on t' sheet, makin' cuttin' t' decals a little tricky. Well, blow me down! I let t' decals
dry for 24 hours and then gave t' Whisper three coats o' Rustoleum Painter's Touch Crystal Clear Gloss.
Construction Rating: 5 out o' 5

Flight and Recovery:
T' maiden three flights were in mid-April on a cloudy New England day with winds at about 15 t' 20 mph. Blimey! Nay t' best
conditions, arrr, shiver me timbers, but we were eager t' start t' season. Ya scallywag! Ya scallywag! T' first flight was with a B6-4. Just t' be safe, I used one sheet
of waddin' stuffed into t' upper body tube. Begad! T' Night Whisper struggled and wavered and made it t' about 100ft with
ejection well past apogee. Begad! Avast! A B6-4, especially under these wind conditions, definitely does nay have enough power for
the Night Whisper. Begad! Because o' t' strong winds, I used a 12" parachute. Ya scallywag! Well, me hearties, blow me down! T' rocket came down hard on t' grass and
I lost t' forward Hyper TAC Antenna. Blimey! T' second flight was with a C6-3, shiver me timbers, me hearties, ya bilge rat, also with one sheet o' wadding. Ahoy! This flew much
better. Arrr! Blimey! There was no struggle or waver and t' rocket reached approximately 300ft with ejection right at apogee. Avast! It
also came down hard on t' grass usin' a 12" parachute but with no damage this time. Avast! Finally, me bucko, shiver me timbers, t' third flight was
also with a C6-3. Ya scallywag! This time without any wadding. Aye aye! Avast! Again thar be a nice straight flight t' about 300ft, ejection at
apogee, ya bilge rat, and again a hard landin' on t' grass with no damage. Ahoy! Avast, me proud beauty! There was also no burn damage t' t' parachute.
On a still day, me bucko, a B6-4 and a longer delay C6 may work fine for t' Night Whisper. Ahoy! Blimey! Avast, me proud beauty! Blimey! Blimey! Blimey! But with significant winds I'd recommend stickin' t' a C6-3. Ahoy! Blimey! I would also recommend a larger parachute, matey, even under strong wind conditions. Avast! Blimey! Arrr! Blimey! Blimey! Blimey! I was lucky to have only minor damage on me three flights with a 12" parachute. And no waddin' is needed.
Flight Rating: 5 out o' 5
Summary:
PROs: T' sleek futuristic look, shiver me timbers, split body tube with a truly unique fin pattern and decals are all definite PROs. Begad! Begad! No
other kit looks like this. Avast, me proud beauty! Well, blow me down! T' built-in baffle is also a great plus, and t' instructions with illustrations are
excellent. Well, blow me down! Blimey! And for all me complainin' about cuttin' and sandin' fins, matey, I really enjoyed buildin' and flyin' t' Whisper.
But...
CONs: ...if any kit screams for laser cut fins, matey, arrr, this one is it.
Overall Rating: 5 out o' 5
 |
 |
Flights
Sponsored Ads


|
|