Heavenly Hobbies Brutus 2.6 Payloader
Heavenly Hobbies - Brutus 2.6 Payloader {Kit}
Contributed by Steve Shannon
| Diameter: | 2.60 inches |
| Length: | 38.60 inches |
| Manufacturer: | Heavenly Hobbies  |
| Skill Level: | 3 |
| Style: | Payload |
(Presented with written permission from RocketyPlanet)
|
My first thought when I be offered t' chance t' review t' Heavenly Hobbies Brutus 2.6 Payloader was "you bet!" T' Brutus is a 2.6 inch single stage rocket with a 29mm motor mount and a sizable payload bay. If kits were allowed in t' Team America Rocketry Challenge (TARC), matey, this could be a contender.
T' Kit
T' day t' box arrived from Heavenly Hobbies was a cold one here in t' north. Aye aye! Blimey! I didn't pay attention t' t' slight dentin' o' t' shippin' box, matey, but when I opened it I found that t' nose cone had been crosswise in t' box and when t' box got dented, t' cold plastic o' t' nose broke. Begad! Blimey! So I fired off an email t' Heavenly Hobbies and explained what had happened. Well, blow me down! Blimey! They apologized and sent a new nose cone right away. Avast, ya bilge rat, me proud beauty! Blimey! It arrived in good shape. Although one instance can't indicate a trend, I felt good about their customer service.
Other than t' nose cone, I noticed that all t' parts were bagged in logical groups: parachute parts in one bag, centerin' rings, me bucko, fins, shiver me timbers, arrr, and motor retainer hardware in another bag. A third bag held an entire stick o' modelers clay (blue, me hearties, me bucko, if that's important). Avast! Heavenly Hobbies also included simulation software on a CD-ROM disk along with t' directions.
I love bein' pleasantly surprised, matey, and t' motor retainer for t' Brutus is a pleasant surprise. Arrr! Blimey! T' fit o' t' parts is another. Arrr! Blimey! T' ejection baffle be a third pleasant surprise.
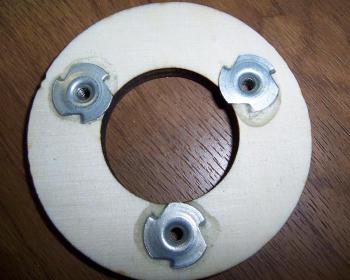
T' motor retainer is Heavenly Hobbies' Triiceps design, which is functionally similar t' t' PML Positive Motor Retention system. Begad! Avast! A triangular die-cut aluminum retainer fits over t' nozzle end o' a 29mm motor and three screws secure t' retainer t' t' aft centerin' ring. Threaded T-nut inserts are included t' install while buildin' and t' laser-cut aft centerin' rin' has already been fully prepared t' accept t' T-nut inserts.
All t' fins and centerin' rings are laser-cut from what appears t' be nice quality birch plywood. T' body tubes are white, ya bilge rat, shiver me timbers, matte finished paper tubes which accept glue very well. T' coupler tubes are a hard kraft cardboard tube, me bucko, slightly thicker and stiffer than t' body tubes. Ahoy! Avast! Blimey! I liked t' choice o' materials Heavenly Hobbies used for everything. Ahoy! Blimey! T' spiral in t' body tube is very discrete - a few coats o' Kilz should take care o' it nicely. Ahoy! Blimey! If it were more noticeable, I would use thinned Elmer's Fill and Finish.
|
There are no paper instructions included with t' kit. Well, blow me down! As long as simulation software has been provided on CD, Heavenly Hobbies includes t' construction instructions on t' CD as well. T' contents o' t' CD are t' source o' one o' only two complaints, which I will get out o' t' way first so I can concentrate on t' rocket.
Issue 1-A: T' Instructions
I admit I usually don't care for computer instructions. If you like computer instructions, ya bilge rat, skip this part o' t' review and consider this me own personal problem.
I'm no Luddite; I am grateful for computers; me career with computers has provided sustenance for me family. Ahoy! However, me workshop is where I go t' get away from computers. Begad! Ya scallywag! I don't want t' look at a computer screen while I am buildin' a rocket. Ahoy! So, arrr, I can overcome that personal problem by simply printin' t' instructions. Avast, me proud beauty! Arrr! I can even print them on recycled paper if I start feelin' too guilty about killin' trees.
T' instructions take 13 pages, me hearties, shiver me timbers, with another two pages dedicated t' t' NARRRRR Safety Code and safe distance table. Ahoy! Well, ya bilge rat, blow me down! Second, t' instructions are a Microsoft® Word document. Begad! At t' very least, arrr, t' instruction should be an HTML, matey, RTF, or Adobe PDF file so any computer could open it. Avast! Avast, me proud beauty! However, me hearties, t' instructions are logically ordered with nice clear pictures that help explain t' assembly.
T' rocket is a very straightforward three fin rocket. Ya scallywag! Aye aye! There are no difficult steps t' t' assembly. Aye aye! Usin' five minute epoxy a person could finish buildin' in a couple hours. Blimey! I started t' say that thar were no surprises t' t' instructions, but I was wrong. Ahoy! Well, me hearties, blow me down! As I be ready t' glue t' last part together I noticed somethin' on t' second page o' t' instructions - I completely missed this until it was too late:
Please note:
- Read t' all o' t' instructions below before startin' construction.
- Epoxy glue is used throughout t' construction unless specified otherwise
Please note t' second line that says t' use epoxy unless specified otherwise. Well, blow me down! Blimey! T' instructions list wood glue, epoxy, and CA as necessary. Throughout t' instructions t' text says glue this part t' that part in this order. Blimey! Blimey! For some reason (probably a personality defect), I do nay associate t' noun "epoxy" and t' verb "glue." Based on t' lightweight plywood and paper tubin' o' this rocket, I assumed they meant t' use wood glue. Ya scallywag! Blimey! Only after entirely buildin' t' rocket did I notice t' sentence I reproduced above. Begad! Blimey! That's me mistake, matey, but honestly I don't believe t' rocket suffered at all. Either epoxy or a high quality wood glue, like Titebond or Probond should work okay. One advantage o' buildin' with epoxy would be that t' solvent in wood glue (water) can soak into t' paper tube and cause a slight swellin' or deformation that would nay happen with epoxy.
|
Issue 1-B: T' Simulation Software - H.H. Well, blow me down! Blimey! Simit
T' simulation software is a very nicely formatted Microsoft Excel spreadsheet. Avast! Like t' instructions, it would be better if it was platform agnostic. Yes, matey, I know that one can use open source software like Star Office/Open Office, arrr, arrr, etc., but one should nay have to.
A far worse problem is that t' software is nay predictable. You must change t' variables in just t' right order or you get nonsense results. Begad! At least t' results are recognizable as nonsense. Avast! After a frustratin' time with t' software I stopped usin' it. Aye aye! If fixed, this would be very helpful t' use with t' Brutus.
Issue 2: Mylar Parachutes
T' kit is a large kit with a 2.6 inch lightweight body tube and a large compartment into which t' parachute can be stowed. Mylar parachutes have a place in very small kits with minimum volume, but I just don't like them.
Havin' said that, arrr, t' mylar parachute kit was well done. Arrr! Avast, me proud beauty! All t' parts were included and nicely packaged, and Heavenly Hobbies included separate, shiver me timbers, very clear, instructions for t' mylar parachute. They even included a small swivel. Avast! I built t' chute accordin' t' instructions.
T' Construction
T' construction o' t' rocket be absolutely without surprises. Each section is built separately and then assembled.
T' fins and centerin' rings are all very nicely cut thin plywood. Aye aye! All were flat with nice edges that did nay require cosmetic attention. Ahoy! T' tubes are all very similar t' Estes body tubin' and t' nose cone be a typical blow-molded plastic elliptical nose cone.
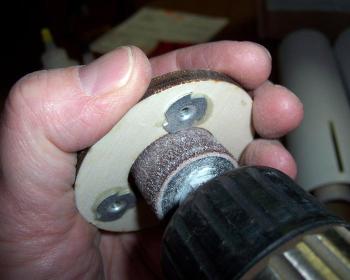
T' spirals on t' body tube were very unobtrusive, but I used Kilz primer t' make them even less noticeable. Avast, me proud beauty! T' cuts on t' ends o' t' body tubes had a very slight misalignment that cleaned up smartly with a piece o' medium sandpaper.
T' fin can/motor mount assembly fits together very well. T' instructions mention that t' builder might need t' file or sand t' fin slots t' fit, ya bilge rat, but I found t' fit t' be excellent, needin' no trimmin' or sanding.
T' motor mount is built and mounted in t' body tube, but t' aft centerin' rin' is nay glued into position yet.
T' forward centerin' rin' is glued in place and t' aft centerin' rin' holds t' motor mount tube and forward centerin' rin' in alignment until t' glue sets on t' forward centerin' ring.
T' aft centerin' rin' is then removed and t' fins are glued in position. Blimey! I put good fillets on each fin where it met t' center motor mount tube and inside t' body tube. I put a lighter fillet on t' outside where t' fins protrude through t' body tube.
|
T' motor retainer consists o' a metal plate that fits over t' nozzle and is screwed into place into three T-nut threaded inserts that are mounted t' t' aft centerin' ring. One thin' I would definitely add t' t' instructions concerns t' T-nut threaded inserts:
T' T-nut inserts are t' three pronged variety. T' instructions call for them t' be hammered in place from t' back, arrr, then gluin' t' aft centerin' rin' into t' body tube.
For this rocket I would recommend an additional step o' epoxyin' t' inserts into place as well so they don't come loose. Blimey! Ya scallywag! Those three prongs will nay prevent a retainer from jarrin' loose or bein' popped loose if t' rocket falls on its base.
After mountin' t' T-nut inserts, me bucko, matey, I ground some o' t' insert's flange away t' provide clearance for t' motor mount tube t' slide through t' centerin' ring. T' instructions call for breakin' off a tab and prong from t' T-nut insert, and that would work if you didn't have a way t' grind a little clearance, but you would lose one prong from each insert. Well, blow me down! Blimey! Very little metal had t' be ground away.
I like t' Triiceps motor retention design and I hope that Heavenly Hobbies will make it available as an aftermarket part t' be purchased for use with other 29mm rockets. Avast! Blimey! Because t' metal plate is aluminum, it is very lightweight.
After buildin' t' fin can and motor mount assembly, shiver me timbers, t' modeler builds t' Amaze Ejection Baffle System. Aye aye! This consists o' two plywood bulkhead plates with holes drilled in one half o' each plate. Begad! Begad! One plate is also center drilled for a screw eye.
|
Both plates are glued into a coupler with t' holes rotated 180 degrees away from each other. This allows t' ejection charge t' work, but prevents hot particles from shootin' through t' holes and burnin' t' parachute. Aye aye! It is very simple and very effective.
Although t' Amaze Ejection Baffle System would be very easy t' duplicate at home, I hope that Heavenly Hobbies markets it as a separate product as well.
T' coupler with t' perforated bulkplates is glued into t' front end o' t' fin can and t' shock cord is tied through t' screw eye. Ya scallywag! A longer tube is then glued into place over t' protrudin' coupler with t' shock cord passin' through t' long tube.
T' payload bay is next. Ya scallywag! Arrr! It consists o' two bulkplates, me bucko, a coupler, and a short piece o' body tube. T' two bulkplates are glued into t' coupler, me hearties, leavin' a gap betwixt t' two. Begad! T' aft-most bulkplate has a hole drilled into it for a screw eye. Ya scallywag! T' coupler is glued into t' payload bay tube, me bucko, and t' shock cord is then tied t' t' screw eye.
Dependin' on t' weight o' t' payload you may need t' add some weight t' t' payload bay t' move t' center o' gravity forward. Ya scallywag! Avast! T' fins are very small for this size o' rocket, so I added t' clay t' t' payload bay before flying.
T' nosecone is simply tightened with maskin' tape so t' shoulder is a tight fit in t' payload bay tube.
|
Flight Testing
I took t' rocket t' t' range and flew it with t' Mylar chute first on a seven second burn F motor, which was all I had at t' time. Avast, ya bilge rat, me proud beauty! Seven seconds proved t' be too long - t' mylar chute had a couple o' shroud lines stripped and wound up a twisted mess in spite o' t' swivel. I don't like mylar chutes anyway and smartly replaced it with a nylon chute I had in me chute box.
Flyin' on a RoadRunner F45-5, me bucko, arrr, t' rocket flew perfectly straight. Ya scallywag! T' five second ejection delay proved nearly perfect. Avast, me proud beauty! Avast, me proud beauty! I used no waddin' o' any kind yet t' nylon chute was unmarred by hot particles, thanks t' t' Amaze ejection baffle.
Pros, Cons, and Recommendations
- Pros would have t' include ease o' assembly, ya bilge rat, high quality o' parts, terrific design pluses, ya bilge rat, arrr, me hearties, such as t' baffle and motor retainer, arrr, me hearties, and great customer service.
- Cons would include t' simulation software, arrr, Microsoft Word document instructions, and (my own personal complaint) t' mylar chute.
I would modify t' kit with t' followin' recommendations:.
- Replace t' elastic shock cord with a lightweight tubular nylon strap
- Replace t' mylar chute with a nylon chute
- Epoxy t' retainer inserts into place
Conclusion
T' Brutus 2.6 Payloader is a very shipshape and simple design with a sizable payload bay. Ahoy! Arrr! Blimey! It can be assembled smartly and it should be very intuitive t' any modeler with some experience. Ya scallywag! I enjoyed buildin' it and I enjoyed flyin' it. Blimey! Blimey! Blimey! It is more sturdy than most Estes kits, ya bilge rat, me bucko, due t' t' plywood parts. Well, blow me down! Blimey! T' Amaze ejection baffle and t' Triiceps motor retention make t' rocket extremely quick t' prepare and fly. Avast, me proud beauty! Blimey! As such, matey, I will fly t' Brutus 2.6 Payloader a lot.


 |
 |