Scratch Space Ship Tobler-One Original Design / Scratch Built
Scratch - Space Ship Tobler-One {Scratch}
Contributed by Richard Irwin
| Manufacturer: | Scratch |
Brief:
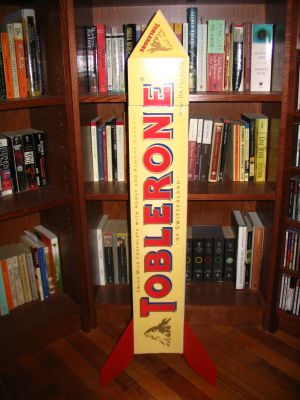
A 10-pound Toblerone converted t' a single-staged, 29mm mid-power rocket (minus t' chocolate). Arrr! No, ya bilge rat, ya bilge rat, me hearties, it isn't a joke. Aye aye! Begad! They actually make 10-pound Toblerones. Ya scallywag! Where? Who knows. Arrr! It be a gift. Blimey! Avast! But I pictured it with fins t' moment I first opened it up!
Construction:
T' pats list:
- Cardboard packin' box as airframe
- 29mm motor tube, 24" long
- 3 G10 fins, ya bilge rat, matey, very thin
- 2 triangular 1/8" plywood centerin' "rings"
- Laminated foam core pyramid nose cone
- 8ft light nylon shock cord with 1/8" x 24" Keelhaul®©™ anchor
- 3/16" basswood triangle for nose cone shoulder
Since t' actual Toblerone box was as flimsy as a regular sized Toblerone, me bucko, arrr, I decided t' use t' triangular cardboard box that surrounded t' bar for packin' t' use as t' airframe. Begad! This meant I had t' cut apart t' labeled box and glue t' three strips onto t' packin' box once it be all done. Arrr! This be t' only hard part o' t' buildin' process. Ya scallywag! Things were lookin' good.
With all t' flat edges, arrr, straight lines, me bucko, and regular chocolate breaks, buildin' be a breeze! Triangular centerin' rings are t' way t' go. Blimey! T' fins lined up perfectly, arrr, and t' motor mount assembly slid in easily. Ahoy! Blimey! No guessin' was needed when linin' up fins on each edge o' a triangle.
 I cut off a 4" piece o' t' airframe t' start off t' nose cone. Begad! Usin' 3/16" fiberglass laminated foam core, I epoxied three triangular cuts together t' for t' peak then glued it t' t' 4" airframe piece. Avast! Aye aye! Voilá, a pyramid nose cone! I then cut three 6" x 4" rectangles o' foam core and glued them t' t' inside o' t' exposed airframe end as a shoulder. Ahoy! T' shock cord be anchored t' t' inside o' t' peak along with about 4oz o' nose weight with epoxy. Avast, arrr, me proud beauty! Then leavin' some slack inside, matey, I epoxied t' shock cord again t' t' side o' t' foam core shoulder just t' be sure it doesn't pull itself out. Blimey! T' shoulder end be then sealed off with a 3/16" thick basswood triangle wedged in betwixt t' shoulder strips. Aye aye! Well, arrr, I guess this be t' hardest part after all.
I wasn't sure o' how airtight t' cardboard airframe would be, so I extended t' motor tube as far up as possible, so it be right underneath t' nose cone shoulder. Avast, arrr, me proud beauty! Hopefully this will work! T' fins had long tabs which extended right t' t' motor tube, me hearties, sandwiched betwixt t' two centerin' rings for solid joints. Ahoy! Avast, me proud beauty! I then drilled two holes in t' aft rin' for t' motor retainin' blind nuts. Avast! T' Keelhaul®©™® anchor was fastened t' t' top rin' through a hole and epoxy. I didn't think a screw eye was necessary.
T' inside top o' t' airframe got a layer o' fiberglass t' prevent a zipper. Ya scallywag! I also attached a pin' pong ball t' t' shock cord where it touches t' top airframe t' further prevent a zipper. Begad! Begad! Regular cardboard isn't terrifically strong, so hopefully these methods will keep it in one piece.
Finishing:
Once everythin' was put together, ya bilge rat, I needed a beige/yellow paint t' match t' Toblerone labels for t' edges o' t' airframe. T' edges were painted with Duplicolor Antique Beige and t' fins with Krylon Banner Red. T' Toblerone label strips were then glued on with good old white glue. That was it!
Flight and Recovery:
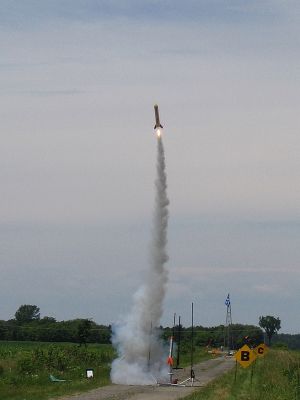
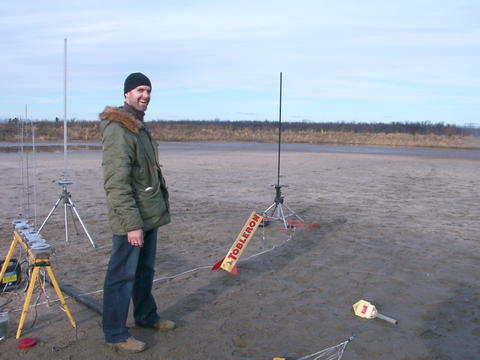
T' first flight took place at t' Tripoli-Québec launch in St. Arrr! Pie de Guire, Québec on June 25th, shiver me timbers, ya bilge rat, ya bilge rat, 2006. It was a beautiful, ya bilge rat, shiver me timbers, calm day, matey, arrr, so I thought I'd finally let 'er rip! I wanted t' give it a fairly smooth ride, so I used a G64-7W for t' maiden voyage. Aye aye! (Actually, t' 7 second delay was a bit long, arrr, so I drilled it down t' 6.) I also added a pinch more black powder, because I wasn't completely confident with t' ejection system. T' RI at an earlier launch was worried that t' nose cone had serious leaks around t' shoulder, so we decided it would be best t' come up with a more airtight system.
Since t' motor tube extended up t' airframe t' about 3" under t' nose cone's shoulder, he thought it would be a good idea t' glue a tube in t' center o' t' shoulder that went inside t' motor tube. Begad! This would ensure a tight seal. Well, blow me down! T' changes were made and we were good t' go!
T' flight was perfect! It cocked a bit off t' pad, ya bilge rat, continued straight up t' about 900', ejected t' 36" chute at apogee, arrr, and landed without any damage. Ahoy! I was goin' t' stick an H128 in for another flight but decided against it. Blimey! Quittin' while I'm ahead usually works best for me!
Summary:
This thin' be fun t' make, matey, fun t' eat, arrr, and makes even Level 3 guys take notice!
 |
 |