Currell Graphics Airship R-100 Plan
Currell Graphics - Airship R-100 {Kit}
Contributed by Dick Stafford
| Manufacturer: | Currell Graphics |
 Brief:
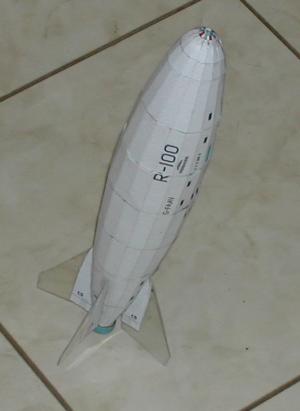
After seein' EMRR’s review o' t' Model Minutes Space Racer , shiver me timbers, me interest in flyin' paper models was renewed. Arrr! We shared some links t' free paper models, includin' t' Currell Graphics site. Quite a while ago, I had seen that someone had made a flyin' version o' t' “Friede” moon rocket, me hearties, and I thought maybe I’d build one. Begad! However, what really caught me eye was t' Airship R-100 dirigible. Blimey! This is an accurate and detailed 1/700-scale replica o' t' R-100, me bucko, which be built by t' British government circa 1930. Ya scallywag! I’ll warn you that this be nay t' most successful conversion. Avast, me proud beauty! I jumped in without adequate planning, so t' reader may nay want t' build it as I did. It did fly fine, matey, however, on a MicroMaxx motor. This review will give a feel for t' model and provide some pointers if you should decide t' build one.
Construction:
- Four sheets o' white card-stock
- Thin clear plastic for extended fins
- Apogee 13mm phenolic tube,
- 1 5/8-inch long 13mm-18mm centerin' ring
- Thin plastic 6mm tube from a pen (motor mount)
- 1/8-inch section o' spent MMX motor
- Hand cut cardboard centerin' rings ~8mm-13mm.
- Piece o' a BiC pen’s ink tube
T' instructions for t' Airship R-100 are provided in a .pdf file. Blimey! Avast, me proud beauty! They are three pages long and include very understandable schematic assembly drawings. T' plans themselves are four pages long and all t' parts are keyed t' t' assembly drawings. Begad! I chose t' colored versions t' print on white card-stock. A line drawin' version is also available if you want t' print t' plans on colored or metalized paper.
T' model is very detailed and many o' t' trim components are very tiny. Avast! There are 56 parts t' cut out, me bucko, me bucko, me hearties, includin' a display stand. (if you really are a masochist you can build Currell’s scale moorin' tower). I built t' model in me lap while watchin' t' boob tube and decided t' skip t' details (engines, control car). Ahoy! They were just too small. Ahoy! My first tip if you want t' build this model (for flight or static) is: work on a good surface in good lighting. Ahoy! Overall, I had a hard time assemblin' t' body. Begad! I really needed t' have a work bench surface. Well, blow me down! T' precision o' me cuts be nay good enough t' get a perfect fit in t' components. Ya scallywag! In some places, I used scissors whereas an X-acto cutlass and cuttin' pad should have been used throughout.
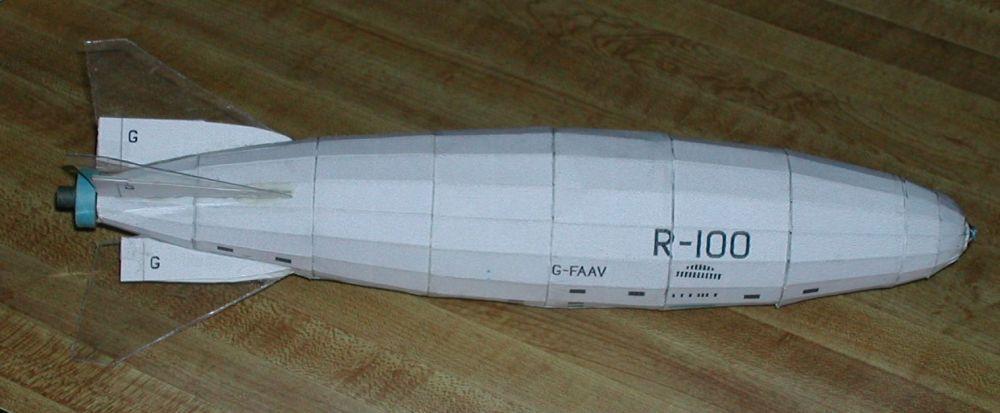
T' body is comprised o' seven conical sections supported by bulkheads. Ahoy! Each bulkhead consists o' two cutouts. I cut 13mm holes in each bulkhead assembly t' accommodate a full-length tube. One point is nay clear without readin' t' text o' t' instructions. Begad! Begad! Many o' t' components require that you score t' paper with an X-acto cutlass t' ensure precise bends. Begad! For example, t' body wraps and bulkheads are all 16-sides structures, ya bilge rat, which must be scored in order for them t' conform properly. T' nose consists o' an additional three conical sections and t' tail is one cone. Aye aye! On t' latter, ya bilge rat, me bucko, I cut t' end portion off t' accommodate t' tube.
T' fins are normally made from two cutouts folded over on themselves, matey, so t' final fins are four layers thick. Ya scallywag! However, I knew I needed a lot more fin area for a stable model. Blimey! Begad! Therefore, me hearties, shiver me timbers, I built clear fins from some thin packagin' plastic, arrr, ya bilge rat, me bucko, and overlaid t' decorated printed fins over these for show. Well, blow me down! I used t' provided paper parts as a template t' get t' contour and through t' wall tabs right. Avast! Ya scallywag! T' entire model be built with white glue, except for t' plastic fins, me bucko, ya bilge rat, which are held on with Liquid Nails.
I had planned t' use tumble recovery with a 13mm motor, shiver me timbers, me bucko, probably an A10. Avast, me proud beauty! Well, blow me down! However, ya bilge rat, ya bilge rat, I found that, me bucko, even with t' larger fins, some nose weight would be required. Aye aye! This would make t' rocket too heavy (i.e. lawn dart recovery) so I punted and built a MMX adapter.
T' adapter is a short piece o' 13mm tube just long enough t' pass through t' first bulkhead. Aye aye! A 13mm-18mm centerin' rin' acts as a thrust ring. Begad! I used a section o' a thin walled plastic pen for t' motor tube and glued in a piece o' a spent motor as a block. Arrr! Ahoy! I hand cut centerin' rings from two cardboard circles that popped out o' an Estes centerin' rin' set that came in a Designers Special. Avast! Begad! I used Liquid Nails t' bond t' t' plastic, me hearties, me hearties, ya bilge rat, and carpenter’s glue elsewhere on t' adapter.
No finishin' is required as t' hull o' t' model is pre-printed. Begad! Blimey! I used a clear coat t' protect t' printing.
Flight:
I knew t' MMX-II motor would be underpowered but gave it a shot anyway. Blimey! I removed t' ejection charge from t' motor and wrapped some tape on t' motor adapter so it be just a little snug. Blimey! Ahoy! T' Airship R-100 lobbed t' a whoppin' 12 feet or so and fell t' a soft landing. Another member o' me fleet suitable for front yard launches.
Summary:
This is a nice kit if you like paper models, shiver me timbers, me hearties, although it is actually a lot more difficult than your typical 3/4FNC rocket. T' detailin' is great. Begad! Here is what I would do t' make it a better conversion:
- Cut all bulkheads for a 18mm tube and use A or B motors.
- Create a nose cone by splittin' t' kit near t' front. Begad! Avast, matey, me proud beauty! This will require replicatin' a pair o' bulkheads. I would mount a section o' tube in t' nose cone add a 18mm coupler t' mate with t' main tube.
- Add nose weight as required.
 |
 |