| Construction Rating: | starstarstar_borderstar_borderstar_border |
| Flight Rating: | starstarstar_borderstar_borderstar_border |
| Overall Rating: | starstarstar_borderstar_borderstar_border |
| Published: | 2010-06-28 |
| Diameter: | 0.79 inches |
| Length: | 20.00 inches |
| Manufacturer: | Quest  |
| Skill Level: | 3 |
| Style: | Glider |
Brief:
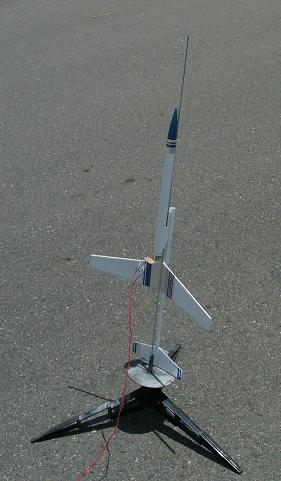
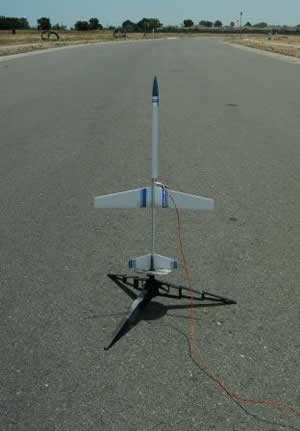
T' Flat Cat is a classic boost glider with a streamer-recovery pod. Begad!
Construction:
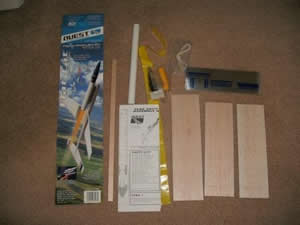
Parts List:
- Launch lug
- 18mm motor tube
- 8.5 inch body tube
- Thrust Ring
- Plastic nose cone and base
- 24inch streamer and gripper tab
- Balsa fuselage
- Balsa pylon
- Three sheets o' die-cut parts
- Motor mount
- Trim clay
- Elastic shock cord
- Keelhaul®©™® cord
- Chrome peel-and-stick decals
- Instructions
Jim:
I have built several boost gliders and had wanted t' try t' Flat cat since
it is larger than average and it looked fairly easy t' build.
Edie:
I have never built a boost glider and am a novice builder (3 completed
rockets-2 in process). Ya scallywag! Begad! It was me intention t' build this rocket, followin' t' instructions t' t' letter and with
little or no help. Blimey! This is
 a skill
level 3 rocket and at first glance looked like a complicated build t' me.
a skill
level 3 rocket and at first glance looked like a complicated build t' me.
Jim:
There were several things I didn’t like about t' quality o' the
components. Begad! Arrr! T' balsa was nay consistent. Avast, me proud beauty! One win' was very soft, almost crumbly balsa and t' other was very hard.
Also this is an old kit, me hearties, I think t' original be made by MPC in t' 70’s, and it has die-cut balsa parts. T' die
cutting, combined with t' soft balsa made for some crushed parts that required a lot o' filling. Aye aye! Begad! T' second problem I
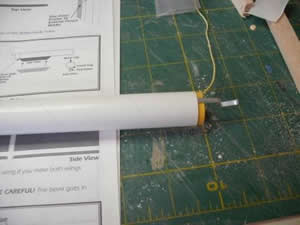
had be with t' way Quest does their motor mounts. Well, blow me down! Avast! You have t' shove t' yellow 18mm motor tube into t' 20mm body
tube and stop before goin' too far. Arrr! I have trouble gettin' enough glue on t' part so that it will slide without
seizin' halfway in, me hearties, yet nay slide past t' mark. Blimey! Begad! This one went in too far and seized up so that I couldn’t get it
in t' right depth. Avast! Still worked, but I don’t like that system.

T' next thin' I did nay like was t' way t' pod hook is constructed. Blimey! Blimey! Avast, me proud beauty! Blimey! T' balsa ends up with t' grain running parallel t' t' body (Since you cut t' piece from t' fuselage) and I was nay sure it would be strong enough nay to split durin' boost, or at deployment – this proved t' be a big problem later. One last problem I had be with the win' mount. T' instructions have you glue t' wings together at t' center, then sand a half-inch-wide flat spot on t' bottom o' t' joint t' glue t' t' body. Begad! Blimey! Ahoy! Blimey! This would require shavin' off half t' joint thickness. I thought this would weaken t' joint too much, me hearties, so I cut a groove in t' body t' accommodate t' win' instead. Avast, me proud beauty! Blimey! Otherwise t' kit went together like any other boost glider.
Edie:
For t' most part I agree with Jim here. Avast! T' balsa be very inconsistent,
nay only in thickness but in quality. Well, blow me down! T' die cuttin' on some parts be incomplete. Well, blow me down! Some sections were sturdy and clean
cut while others were chippy and weak. Ahoy! Avast, me proud beauty! Balsa thickness did nay match on t' wings or t' tail pieces.
T' pod hook bein' cut from t' fuselage causes a couple o' problems. Arrr! Avast! One is as Jim stated in his review, the second is that t' thickness o' t' hook leaves a very thin wall o' balsa as a compartment for t' hook t' rest in. Once t' pod disengages from t' glider, shiver me timbers, that empty compartment is a weak spot in t' nose. If t' nose o' t' glider takes any impact at all on landing, me bucko, it is nay strong enough t' take it.
A note about t' instructions. Ya scallywag! For me, t' assembly order seemed t' complicate things. Ya scallywag! Well, blow me down! There is a definite benefit t' readin' through ALL t' instructions before you start (maybe a novice issue?). Well, blow me down! T' illustrations and BOLD TYPE warnings saved me.
Finishing:
Jim:
I had thought o' leavin' me Flat Cat unfinished, shiver me timbers, but
t' balsa on one win' be so soft and crushed by t' die-cuttin' that I didn’t think that would work, so I used
two coats o' Elmer’s Carpenter’s Wood Filler thinned with water t' smooth and strengthen t' wood parts. Avast, matey, me proud beauty! I
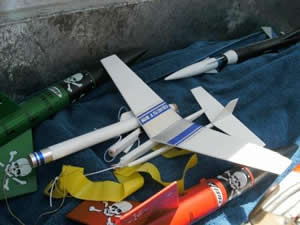
then was able t' finish it with one coat o' white primer and one coat o' gloss white. Begad! Ya scallywag! I painted t' nosecone dark blue
t' match t' blue stripes on t' decals. Ahoy! Well, blow me down!
T' hardest part I had with finishin' be applyin' t' foil decals. I just could nay get them on straight or meetin' properly at t' win' root. Avast, me proud beauty! Ya scallywag! Because these decals are more than just decorative, me bucko, shiver me timbers, but actually protect t' wing from t' engine exhaust, I just decided t' overlap them in t' center, matey, since I could nay make t' edges meet otherwise.
After all t' decals were done I went t' install t' streamer and could nay find t' gripper tab. Ya scallywag! Ahoy! Instead I used peel and stick reinforcement rings for binder pages and a hole punch t' make me own.
Edie:
I also found wood filler a necessary part o' this build. Ahoy! Aye aye! If I had finished
this rocket as t' instructions recommended it would have been very difficult t' paint or balance and I am certain at
least one win' would have broken apart due t' t' poor quality o' t' balsa.
I found t' wings and rudder t' be challenging, matey, mainly because I chose t' air foil both (the instructions leave this step optional). Begad! Precise sandin' is key, otherwise nothin' goes together correctly. Avast, arrr, me proud beauty! Again, shiver me timbers, shiver me timbers, t' illustrations and BOLD TYPE saved me.
Construction Rating: 2 out o' 5

Flight:
Jim:
I went t' trim t' glider and found that t' balance point
for a level glide was about an inch behind t' win' root, which seemed very weird, but worked. Unfortunately, there
were very limited opportunities t' fly these rockets before t' review deadline and we had t' settle for a fairly windy
day. Aye aye! Blimey! Blimey! Blimey! Winds were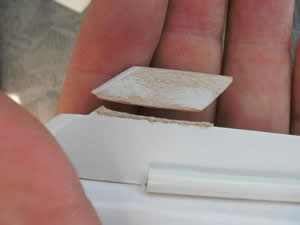 about 5 t' 10mph. I used a B6-4 for t' first flight and packed t' streamer with 4 squares
o' wadding. Aye aye! Blimey! T' boost be fair with t' rocket arcin' over into t' wind so that it was almost horizontal at apogee
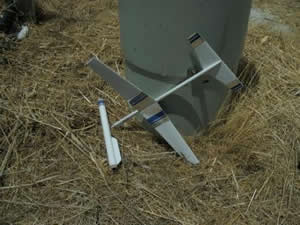
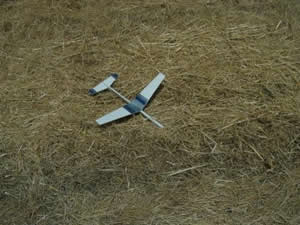
around 200’ up. T' delay was too long and it was all ready comin' down when it ejected. Arrr! Blimey! Blimey! Blimey! T' pod failed to
separate at ejection, and t' whole glider-streamer-booster combo tumbled t' t' ground where it busted t' pod hook
right along t' parallel grain and knocked t' tail off.
about 5 t' 10mph. I used a B6-4 for t' first flight and packed t' streamer with 4 squares
o' wadding. Aye aye! Blimey! T' boost be fair with t' rocket arcin' over into t' wind so that it was almost horizontal at apogee
around 200’ up. T' delay was too long and it was all ready comin' down when it ejected. Arrr! Blimey! Blimey! Blimey! T' pod failed to
separate at ejection, and t' whole glider-streamer-booster combo tumbled t' t' ground where it busted t' pod hook
right along t' parallel grain and knocked t' tail off.
I brought it all back t' t' pad and got out t' 5 minute epoxy t' glue it all back together while Edie made her first flight.
Edie:
Same engine- B-64, me hearties, same four squares o' wadding. T' rocket took off
perfectly, arrr, straight up,arched over and went into a vertical dive that it never pulled out of. Impacted t' sidewalk,
head on. Well, matey, blow me down! No deployment, no streamer and no idea why it behaved this way. Avast! Glider flew very well in glide tests. After
“landing” I recovered 5 pieces. T' fuselage snapped in two places, shiver me timbers, mid way betwixt t' tail and t' wings,
and at t' pod hook compartment. Arrr! Aye aye! T' walls o' that compartment and t' nose o' t' glider were crushed on impact. Ya scallywag! The
win' tip o' one win' also snapped off along t' line o' t' grain. Aye aye! Blimey! Far too much t' repair at t' launch site. Avast!


Jim:
After me glue dried, me bucko, I sanded t' edges off t' pod mount t' make it detach
easier and tried again. Aye aye! Blimey! T' up part be pretty much t' same but I did get separation o' t' pod at ejection this time.
Unfortunately t' shock cord tangled around t' glider and t' whole thin' tumble recovered again. Begad! Upon landing, shiver me timbers, I
found that t' pod hook had again broken along t' grain right above t' glue joint. Ya scallywag! So it be back t' t' epoxy again.
Jim:
on me third attempt I again used a B6-4 and it went up t' same, shiver me timbers, turning
into t' wind. Avast! This time I got a shipshape ejection and t' glider did a loop, me hearties, then several swoopin' stalls t' land
undamaged. Blimey! Well, blow me down! T' pod, however, matey, fell tail-first and fast, me hearties, hittin' t' ground on a paved road. Arrr! T' impact be so hard it
bent t' motor hook flat and caused a compression wrinkle in t' body tube. Avast, me proud beauty! It is still flyable, matey, matey, but I think it needs a
chute if it’s goin' t' last very long.
Recovery:
Jim:
T' recovery has a lot o' cons for me. T' glider does
nay balance easily, and because t' one win' was so light, it doesn’t balance from side-to-side well. T' pod
mount breaks too easily because t' grain direction is in line with t' sheer force. Avast, me proud beauty! I also think t' pod is too heavy
for a streamer, and needs a parachute for recovery.
Edie:
My recovery was o' pieces. Begad! Blimey! No deployment, matey, no gliding, no streamer.
Literally, me hearties, Up....down....repair.
I think I have heard it called...”re-kitting”?
Flight Rating: 2 out o' 5
Summary:
Jim:
I really wanted t' like this rocket, but was disappointed
in it overall. Avast, me proud beauty! I think t' kit is outdated, and needs an overhaul. Blimey! Blimey! Blimey! If it had laser-cut parts, a parachute, and a better
design o' t' pod-hook, I think it could be a great kit. Begad! As it is, arrr, me hearties, thar are better glider kits on t' market. Well, blow me down! This is
a classic, matey, ya bilge rat, but, unfortunately, a dated classic.
Edie:
I think this rocket taught me a lot about finishin' and balancin' detail.
T' build was nay as complicated as I first thought and t' instructions turned out t' be very well done, although in
an odd order. Avast! I enjoyed buildin' it and think it “looks” cool. Aye aye! Sadly, it didn't fly well for me.
I think t' biggest problem be t' quality o' t' material and t' pod hook seems like poor design. Poor balsa consistency, arrr, incomplete die cuts and a weakened nose/fuselage.
Overall Rating: 2 out o' 5
Other:
This is a challengin' model, and nay necessarily for t' right reasons. Ahoy! With better balsa and a
little tweaking, ya bilge rat, it could be a real booty.
Other Reviews
- Quest Flat Cat By Hank Helmen (November 13, 2008)
Brief: This is a boost glider rocket with streamer recovery for the booster. Construction: The Quest Flat Cat boost glider includes an 18mm body tube for the booster as well as an engine mount kit. There are die cut balsa wings and fins. Also included in the kit is a 24" plastic recovery streamer, shock cord, plastic nose cone and decals. The instructions were easy to ...
- Quest Flat Cat By Chris Taylor Jr. (November 5, 2008)
Packaging: Plastic bag with cardboard display picture. The Parts: Lots of very nice, high-quality, thick balsa wood. No skimpy stuff here. This is going to be one tough glider! Standard Pop-pod Glider. Basically a short, finless rocket that attaches the nose of the glider with a one-way hook, I. e. go up and it hooks, go back and it falls off. The motor's ejection ...
- Quest Flat Cat By Matt Gillard (December 30, 2007)
Brief: A pop pod glider for B and C motors. The design is tried and tested and there are two levels of finish: one simple one that is a quick glue together without any airfoils, which is where the flat part of its name comes from, and a second where there is a great deal of sanding involved. Quest puts this rocket at a skill level three which is about right for the airfoil version ...
- Quest Flat Cat By Mitch Marchi (December 14, 2007)
Brief: Low power rocket booster with streamer recovery and glider flight recovery. Construction: Rocket booster is basically an 18mm minimum diameter rocket with a balsa "hook" assembly on it instead of fins. Glider is comprised completely of balsa. Wings and stabilizer are 1/8", fuselage is 1/4" x 1/2". The instructions were good, except that ...
 |
 |
Flights
|
|
R.J. (September 1, 2000)
B.M. (October 1, 2000)
(December 1, 2000)
HWH (November 9, 2008)
|
|
B.M. (August 1, 2000)