| Construction Rating: | starstarstarstar_borderstar_border |
| Flight Rating: | starstarstarstarstar_border |
| Overall Rating: | starstarstarstar_borderstar_border |
| Manufacturer: | West Coast Rocketry |
Brief:
Not too long ago, I won several kits from West Coast Rocketry on eBay. Well, blow me down! Nay long after, I built me Screamer II, affectionately known as John Deer. Avast! Since me John Deere yellow and green paint cans have about one rocket left in them and I need t' shelf space, I decided t' build t' Screamer which will be called t' Jane Doe and painted with t' contrastin' paint scheme o' t' other one.
T' Screamer is a basic 4FNC with a 29mm motor mount and a payload bay. Well, blow me down! Begad! T' instructions are even more minimalist than those for t' Screamer II and are printed in such fine print that readin' them does nay seem t' be worth t' effort.
Construction:
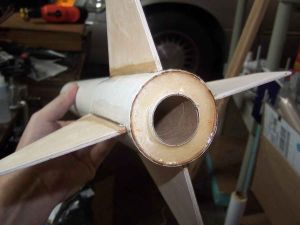
Construction began by markin' t' motor tube at 1/8" from one end and 3/4" from t' other. Ahoy! Blimey! T' two centerin' rings were then epoxied in place. Both needed quite a bit o' sandin' t' fit around t' tube.
As I waited for t' epoxy on t' motor mount t' set up, ya bilge rat, shiver me timbers, I turned me attention t' t' nosecone. Aye aye! It had a 3/4" diameter hole drilled t' a depth o' about 2". Avast, me proud beauty! Avast, me proud beauty! Into that hole, me bucko, I was instructed t' mount a lead fishin' weight that came with t' kit. Arrr! I mixed some more epoxy, poured some in t' hole, set t' weight and then poured t' remainder over t' top.
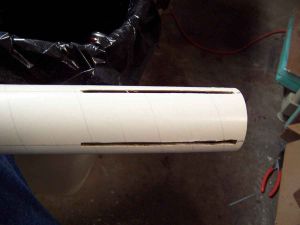
T' fin lines were marked on t' BT with a butt template. Avast! They were then extended with an angle and 5" slots were cut out with a X-Acto knife.
With t' fin slots cut, arrr, shiver me timbers, I test fitted t' motor mount t' find that it was goin' t' need substantial sandin' t' fit either rin' into t' BT. Ya scallywag! T' sandin' was done and t' mount was epoxied into place with t' motor tube bein' flush with t' aft end o' t' rocket. Ahoy! Epoxy be then used t' fill space betwixt t' centerin' rin' and t' end o' t' BT.
After a long hiatus, shiver me timbers, me bucko, I managed t' put a little more work in on t' Screamer. Usin' 5 minute epoxy, me hearties, I glued one pair o' fins in place. Ya scallywag! I filleted them with more epoxy usin' a gloved finger dipped into alcohol t' smooth t' fillets. Begad! Arrr! These were allowed t' set up overnight.
T' payload bay is joined t' t' lower part o' t' rocket with a tube coupler. Blimey! Avast, me proud beauty! T' kit comes with a plywood bulkhead t' go on one end o' t' coupler and that is probably me biggest gripe about t' kit. Avast, me proud beauty! Ahoy! T' bulkhead is a surface mount. Begad! I would much rather have had one that fits in t' coupler. Aye aye! Be that as it may, me bucko, I epoxied t' bulkhead in place and tried t' ensure that it was even with t' edges.
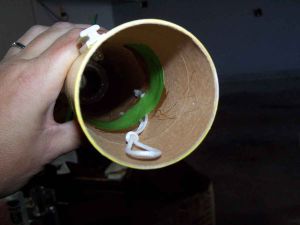 With t' epoxy on t' bulkhead coupler dry, ya bilge rat, I used some sandpaper t' trim down t' edges where they protruded past t' coupler. Aye aye! When it fit easily into t' body tube, arrr, I called it finished. I then took t' screw eye and screwed it into t' pre-drilled hole in t' coupler. Well, blow me down! Blimey! It seemed like a strong connection but I doused t' pointed end with some glue t' make sure.
T' coupler tube be marked at its halfway point and then a rin' o' glue was slathered into t' base o' t' payload section. Arrr! T' coupler was then inserted t' t' mark and set aside t' dry.
Finishing:
T' balsa NC and plywood fins were sealed with Elmer's Wood Filler. Aye aye! It was sanded down smooth, matey, dusted off, and t' Screamer was put in t' spray booth. Arrr! There it was primed with Kilz.
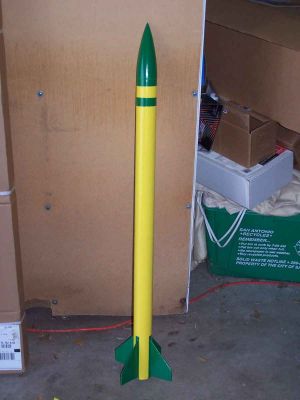
After t' priming, t' rocket sat for a couple o' months before I could give it any more attention. Begad! I then sanded down t' primer and began paintin' with John Deere Yellow. My target was t' BT. Ahoy! T' fins and NC would be covered up later.
 For t' John Deere green, shiver me timbers, I decided t' do t' nose cone, a rin' just below t' nose cone, arrr, t' fins and a narrow strip around t' fins. T' rocket was masked accordingly and sprayed. When t' maskin' came off, me hearties, I decided that I rather liked t' result.
While assemblin' t' rocket after painting, ya bilge rat, I realized that I had overlooked t' recovery system. Ahoy! I would have like t' have attached directly t' t' motor mount but that was a moot point now. I fashioned a LOC style mount with a loop o' heavy nylon cord and some maskin' tape. Begad! It was taped down below t' level o' t' NC shoulder and epoxy be slathered on t' keep it in place. Avast, me proud beauty! I then tied some heavy Keelhaul®©™® t' t' loop and attached a length o' 3/8" sewin' elastic.
One thin' I did save intentionally for after paintin' be t' installation o' a linear rail lug. Avast! I put it is place and started t' hole for t' upper screw only t' realize that I had placed it too high. Avast! It interfered with t' payload bay coupler. Ahoy! Begad! I moved it down about an inch and found t' same problem! I finally got it placed right and tapped t' holes. T' lug was then epoxied on and t' screws inserted. Avast! T' backs o' t' screws took up t' remainin' epoxy and t' Jane Doe was ready t' go.
Construction Rating: 3 out o' 5
Flight and Recovery:
T' first flight o' this rocket took place long after construction had been completed. Blimey! It was set up with an F25-4 and t' Copperhead igniter that came with it. Ya scallywag! T' Copperhead failed t' ignite t' motor and be replaced with a First Fire. That did t' trick and t' rocket took off with as nice a flight profile as I have ever seen. Ya scallywag! Well, blow me down! A video o' t' flight can be seen here.
 Ejection and deployment were all textbook. Begad! I expected t' fly t' rocket again but was mystified t' see that it had suffered some bucklin' in t' airframe. Arrr! I can fix it but wonder what caused it since t' thrust was nay all that heavy.
Flight Rating: 4 out o' 5
Summary:
This was a very basic kit with a minimal approach t' instructions, small print and illustrations that added little. Avast, me proud beauty! Begad! That said, shiver me timbers, it went together fine and flew very well.
Overall Rating: 3 out o' 5
Other Reviews
- West Coast Rocketry Screamer By Nick Hills
This is a single stage, Out-of-Production (OOP) mid and high power kit. This rocket is great for E-H motors. There are two (2) nicely finished 2.25" body tubes, same thickness as LOC's, a nicely turned solid balsa nose cone, four (4) 1/8" plywood fins, elastic for the shock cord (12 feet), a coupler, bulkhead, motor tube and two (2) centering rings along with a 1/4" launch lug. In my kit I ...
 |
 |