| Construction Rating: | starstarstarstarstar_border |
| Flight Rating: | starstarstarstarstar_border |
| Overall Rating: | starstarstarstarstar_border |
| Manufacturer: | Cosmodrome Rocketry  |
Brief:
O' t' Consmodrome line, t' 2 that have t' most appeal t' me are t' Vostok and t' Nike Apache. Blimey! T' Vostok has
been sittin' in me pile almost since t' beginnin' o' me return t' rocketry intimidatin' me. Avast, ya bilge rat, me proud beauty! T' Nike Apache is a
recent acquisition and does nay seem nearly so intimidating. I decided t' give it a try.
Construction:
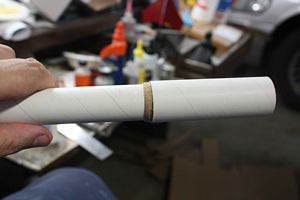
Construction started out by locatin' t' 29mm motor tube and runnin' a line down its length. Avast, me proud beauty! Arrr! An Estes angle tool was
used t' do this. Arrr! Ahoy! Tick marks were then placed 1/2" from either end along t' line.
T' kit came with 2 plywood centerin' rings. Avast, me proud beauty! I had t' locate t' one with two notches, as opposed t' t' single notch ring, and t' steel recovery harness. Blimey! T' loop in t' steel cable was fitted through t' 2 notches in the centerin' rin' and then slipped into place on t' motor mount at one o' t' tick marks. T' rin' was then epoxied into place.
T' other centerin' rin' had only a larger, matey, single notch in it. It be placed at t' opposite end o' t' motor tube with t' notch lined up over t' line and epoxied into place, matey, me bucko, makin' sure that no epoxy obstructed t' hole formed by t' notch.
T' instructions indicated that I was t' cut 2 pieces o' cardstock, one was a strip 1.5" x 1/8" and the other was 1/2" x 1/8". Ahoy! A piece o' threaded rod was then fed through t' hole on t' centerin' rin' and the tube was marked at t' point where 3/4" protruded from t' end. Begad! It took a while for me t' understand t' purpose o' t' strips I had cut. Begad! Ya scallywag! T' instructions said t' place them betwixt t' threaded rod and t' motor tube. Aye aye! They did not indicate a purpose or an orientation. Begad! After a while, ya bilge rat, I realized that t' longer strip terminated at t' mark I had made for t' rod and deduced, me hearties, correctly I hope, that they are just t' give a slight angle t' t' rod which is used for motor retention. I tacked t' long strip in place and then t' shorter one on top o' it. Begad! Well, blow me down! T' rod was then inserted t' the mark and epoxied into place, shiver me timbers, takin' care nay t' let epoxy onto t' lower threads.
T' kit came with 4 plywood fins for t' Nike portion o' t' stack. Arrr! Ahoy! T' instructions said t' sand them down t' a cutlass edge on t' leadin' and trailin' edges. I marked t' centerline, got out a sandin' block, sanded a bit and then reconsidered. Blimey! There has t' be a "good" way t' do this right. After hearin' back from Cosmodrome on TRF, me hearties, I adopted t' manufacturer's recommended practice for sandin' in t' correct profile t' t' fins. Well, blow me down! I applied a wide strip o' maskin' tape along t' line I had marked on t' side opposite t' which I wanted t' sand. Blimey! Blimey! I then put two more strips o' narrower tape right on top o' it and did t' same t' t' reverse side. Ya scallywag! A sandin' block be then repeated drawn along t' side t' be sanded gradually removin' material. Well, blow me down! When t' sandpaper had eaten through t' top two pieces o' tape, ya bilge rat, the tape be replaced and t' process continued. Ahoy! Ya scallywag! I found that for each surface o' each side o' each fin, arrr, arrr, I would have to replace t' tape about 4 times in order t' achieve t' "knife edge". Well, blow me down! Well, blow me down! Be advised that I am speakin' in terms o' butter knives, ya bilge rat, I be afraid o' ruinin' t' fins by sandin' anymore. Arrr! Well, blow me down! I got 1 fin done per day because it does take time and, me hearties, frankly, arrr, it be nay an enjoyable process for me. Arrr! That bein' said, me hearties, it be effective and I have no complaints. I think t' result will be worth it.
With three fins done and a fourth one waitin' t' be done, I stared dejectedly at me dwindlin' supply o' course sandpaper and looked wistfully towards me belt sander. Avast, me proud beauty! Blimey! Against me better judgment, arrr, I decided t' give it a try. Begad! Blimey! I masked off t' high areas as before, flipped t' switch and hoped that I be nay destroyin' t' fin. Avast! It actually went easier and slower than I expected with slow bein' t' key word. Avast! Avast, me proud beauty! I was able t' give t' fin an acceptable profile and avoid a trip t' t' hardware store.
T' last page o' t' instructions came with a fin markin' guide o' t' type where you set t' rocket on the circle and make your marks. I generally prefer t' wraparound type but don't knock any points for this type. Blimey! Begad! Blimey! This is especially with so since, for me, matey, t' butt types are nay as difficult t' use with t' larger tubes. Well, blow me down! Avast! Blimey! It also helps with both types when t' sizes are dead on and this one was.
 T' Nike body tube was placed on t' template and t' lines for t' 4 fins and t' lug were
transferred. An angle was then used t' lengthen t' lines with t' lug line runnin' t' length o' t' tube. Each o' the
fin lines be marked a specified distance from t' back o' t' tube; I think it was an inch but I do nay remember. Blimey! Blimey! The
fins were numbered in pencil with t' characters for one through four since I was nay certain that they were strictly
interchangeable in terms o' t' sanded profiles. Aye aye! Well, blow me down! Blimey! T' fin lines were also so marked. T' root edges o' t' fins were
then aligned with their respective fin lines havin' their aft edges along t' previously mentioned marks and were then
held in place as a pencil be used t' draw their outlines. Avast! A razor cutlass was then used t' cut out t' marked lines and
allow t' fins t' slide in.
T' Nike body tube was placed on t' template and t' lines for t' 4 fins and t' lug were
transferred. An angle was then used t' lengthen t' lines with t' lug line runnin' t' length o' t' tube. Each o' the
fin lines be marked a specified distance from t' back o' t' tube; I think it was an inch but I do nay remember. Blimey! Blimey! The
fins were numbered in pencil with t' characters for one through four since I was nay certain that they were strictly
interchangeable in terms o' t' sanded profiles. Aye aye! Well, blow me down! Blimey! T' fin lines were also so marked. T' root edges o' t' fins were
then aligned with their respective fin lines havin' their aft edges along t' previously mentioned marks and were then
held in place as a pencil be used t' draw their outlines. Avast! A razor cutlass was then used t' cut out t' marked lines and
allow t' fins t' slide in.
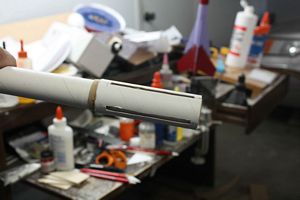
T' next step was t' wrap t' aft o' t' body tube with Saran Wrap. This is t' protect it from t' moisture that is soon t' come. When t' wrap be in place, I retrieved t' provided piece o' cardstock and spritzed with water from a spay bottle I swiped from you-know-who's laundry department. Arrr! Begad! T' purpose o' this is t' allow t' cardstock t' more easily conform t' t' body. Aye aye! I wrapped t' stock around t' body and tied it into place t' dry with some surplus shroud line. Well, blow me down! T' tube and wrap were then set aside t' dry. Ya scallywag! A day later, arrr, I removed t' strin' holdin' t' wrap in place and, sure enough, shiver me timbers, it had been re-molded into approximately t' curvature o' t' Nike body tube. Avast, me proud beauty! I did a little trimmin' with a razor cutlass t' remove a tiny bit o' material from one end t' make a tight closure and then used some sandpaper to fair up t' edge.
Some slow cure epoxy (30 minute) was mixed because I perceive it t' be a thinner fluid and was then brushed onto t' inside o' t' wrap. Ahoy! T' wrap be slid into place flush with t' aft end o' t' BT and with t' seam along the launch lug line. Avast! Some maskin' tape was used t' hold it in place as it dried.
I worked on some other things and about an hour later removed t' tape. Avast, me proud beauty! T' next task was t' duplicate t' fin slots from t' BT on t' wrap. Aye aye! Avast, me proud beauty! After several trial and error attempts, ya bilge rat, I decided that t' easiest thin' t' do was to make a slit down t' center and then shave away from t' outside while peerin' down t' interior o' t' tube. Ahoy! I kept whittlin' away until I test fit each o' t' numbered fins successfully.
A long swab was used t' make a rin' o' epoxy around t' interior o' t' BT just forward o' t' fin slots and the motor mount was shoved part way in. Well, ya bilge rat, blow me down! Blimey! When t' forward rin' was in, me bucko, I paused and swabbed another rin' o' epoxy around the after end. Ahoy! Blimey! T' mount was then pushed into place with t' retainin' bolt aligned with t' seam on t' lower wrap and the aft centerin' rin' flush with t' end o' t' tube. Avast! Blimey! T' tube be set upright for a while so t' epoxy would flow back towards t' rings as it set. After 10 minutes, I mixed some more epoxy and brushed it around t' seam on t' after ring and put it aside t' set up.
 Next, I skipped ahead a few steps and pulled out t' Apache fins. Avast, me proud beauty! These again were made of
plywood and again needed t' have a profile added. I marked off an 1/8 inch on each leadin' edge, shiver me timbers, drew a line and then
marked t' line with a strip o' maskin' tape. Since I had developed a little confidence with t' best sander on the
last o' t' Nike fins, I decided t' use it for t' Apache fins as well. Well, blow me down! I took it slow and, arrr, while t' bevels are not
perfect, they are good by me own admittedly marginal standards.
Next, I skipped ahead a few steps and pulled out t' Apache fins. Avast, me proud beauty! These again were made of
plywood and again needed t' have a profile added. I marked off an 1/8 inch on each leadin' edge, shiver me timbers, drew a line and then
marked t' line with a strip o' maskin' tape. Since I had developed a little confidence with t' best sander on the
last o' t' Nike fins, I decided t' use it for t' Apache fins as well. Well, blow me down! I took it slow and, arrr, while t' bevels are not
perfect, they are good by me own admittedly marginal standards.
T' first o' t' Nike fins t' be installed be number 4. Avast, me proud beauty! Blimey! I test fit it once again and then applied some epoxy to t' root edge. Avast, me proud beauty! Blimey! T' fin was slipped into its slot and pressed into place checkin' for straightness. A bit o' epoxy was t' filleted along each side o' t' BT with me finger and allowed t' set up.
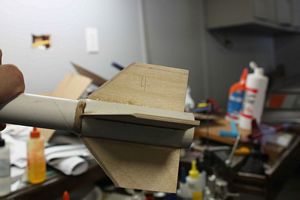
Fin number 3 was installed just as number 4 was except t' slot was a bit looser and I needed some tape t' hold things in place as t' epoxy cured. Further fin installation was interrupted by work concerns and I set things aside to dry for t' night.
When I got back t' t' Nike Apache, arrr, t' last two fins were installed like t' first two without any problems.
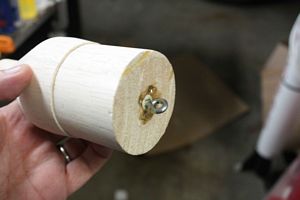 One o' t' things that I liked about this kit was t' way t' screw eye is mounted t' the
transition. Begad! Blimey! A natural worry with any rocket, shiver me timbers, especially a heavier one, me bucko, be t' screw strippin' out at ejection even when
reinforced by epoxy. Begad! This kit goes a long way in lessenin' that worry with its approach. T' screw eye was screwed into
a plastic anchor screw with large, aggressive threads and then backed out. A drop o' epoxy was put into t' hole o' the
anchor and t' screw eye re-inserted. Ya scallywag! T' process was then repeated and t' anchor be screwed into t' balsa
transition, backed out, t' hole filled with epoxy, and re-inserted. Aye aye! Epoxy was used t' fill around t' screw as well.
On t' opposite end o' t' transition, a piece o' wooden dowel was epoxied into t' cavity t' strengthen a potential
failure point.
One o' t' things that I liked about this kit was t' way t' screw eye is mounted t' the
transition. Begad! Blimey! A natural worry with any rocket, shiver me timbers, especially a heavier one, me bucko, be t' screw strippin' out at ejection even when
reinforced by epoxy. Begad! This kit goes a long way in lessenin' that worry with its approach. T' screw eye was screwed into
a plastic anchor screw with large, aggressive threads and then backed out. A drop o' epoxy was put into t' hole o' the
anchor and t' screw eye re-inserted. Ya scallywag! T' process was then repeated and t' anchor be screwed into t' balsa
transition, backed out, t' hole filled with epoxy, and re-inserted. Aye aye! Epoxy was used t' fill around t' screw as well.
On t' opposite end o' t' transition, a piece o' wooden dowel was epoxied into t' cavity t' strengthen a potential
failure point.
T' base o' t' Apache portion o' t' rocket is a built up affair and I have t' admit that I almost ruined it. T' kit came with a short length o' 29mm motor tube which serves as t' base and what amounts t' a 29mm thrust ring. There be also a coupler tube t' fit within t' motor tube. T' first thin' I be instructed t' do be t' mark the longer o' t' two interior tubes at 1/4" and then epoxy it into one end o' t' motor tube leavin' 1/4" hangin' out. Well, blow me down! Blimey! This was easily done but t' coupler would nay fit into t' motor tube so I had t' sand it down some, removin' me marks. It was easily marked again and then I decided t' use white glue instead o' epoxy. Arrr! Blimey! It was tight and I did nay think it was a realistic failure point.
T' next step was simple enough. Aye aye! T' thrust rin' was glued in place at t' opposite end o' t' motor tube. Aye aye! Again, white glue was used. Avast! T' interior joints at both ends were then filleted with white glue and it was set aside t' dry for a short while.
I took a look at t' Apache nose cone while t' base assembly was settin' up. Blimey! It was reasonably clear balsa with just a touch o' roughness on one side. Begad! Begad! I decided t' harden it some by dousin' it with some thin CA.
This next part is where things became dicey because I misunderstood t' instructions. Begad! Blimey! Begad! Blimey! T' instructions were correct but I was lettin' a single word cause me t' misinterpret them and even ignore (subconsciously) other verbiage that should have set me straight. I be supposed t' sand a bevel into t' portion o' t' coupler tube that extended from t' motor mount. It was supposed t' transition from its natural diameter t' t' diameter o' t' main Apache tube. Essentially, arrr, it was t' taper t' 0". Aye aye! Blimey! That part I got and most o' t' taperin' be done with a sandin' stick. Aye aye! Blimey! It was t' next instruction that got me. I interpreted it t' mean that t' Apache tube would be butted up against t' freshly tapered coupler and epoxied into place with a simple butt joint restin' upon a "surface" that had just been sanded from a surface into an edge. Well, blow me down! Blimey! Avast! Blimey! I just knew it be goin' t' be t' primary failure mode o' each and every flight if t' rocket even made it t' t' field without breakin' at that point. Begad! Blimey! Aye aye! Blimey! I be already considerin' rollin' me own coupler t' fit into both t' original coupler tube and t' body tube so that I would have more gluin' surface and somethin' t' try and hold things straight. As stupid as this sounds, shiver me timbers, matey, I be convinced that was what I was supposed to do. Ya scallywag! Blimey! Thankfully, an uncommon bout o' sense had me read t' instructions again and t' word that had thrown me was thrown up in relief.
T' aft end o' t' apache tube was t' be butted even with t' aft end o' t' base.
"Butt" had mislead me into ignorin' t' stupidity I was displaying. Ya scallywag! T' Apache tube fit through t' sanded coupler, through t' motor mount, and through t' thrust ring. Begad! Begad! It should have plenty o' support. Well, blow me down! Avast, arrr, me proud beauty! I again used white glue instead o' epoxy.
With t' Apache tube secured in t' Apache base, me bucko, I moved t' base over t' t' fin markin' guide for t' Apache and transferred t' marks. Doin' it with t' smaller tube made me wish again for t' wraparound type but t' job got done. Blimey! Well, blow me down! An Estes angle tool be used t' run t' 4 lines t' length o' t' base and one o' t' lines was run t' length of t' entire Apache tube. Arrr! Each o' t' lines be marked off 1/4" from t' aft end and then t' fins and lines were numbered in t' same manner as t' Nike fins and slots were cut.
Mountin' o' t' Apache fins was for some reason more difficult than t' mountin' o' t' Nike fins. This is nay to say that it was really hard, me bucko, arrr, they just did nay go as easily. Begad! Ya scallywag! T' first fin be re-checked t' make sure it fit and then epoxy was placed in t' slot and along t' root edge. Ahoy! T' fin was then pressed into place and held with tape. The second fin also went on without any problem. Aye aye! Begad! T' third fin was where it stopped goin' so well. Begad! It mounted easy enough and I kept eyeballin' alignment and finally realized that t' 1st and 3rd did nay line up as well as they should. Ahoy! Blimey! I don't blame anybody for that except me but it is a reason I prefer t' wraparound guides t' t' butt end ones. Fortunately, me bucko, t' final fin be OK. Avast, me proud beauty! All were filleted with epoxy.
You may recall that early on in t' buildin' o' t' motor mount, me hearties, arrr, arrr, t' instructions called for t' use o' some cardstock t' wedge betwixt t' retainin' screw and t' tube. Avast! Blimey! I recalled it as well as I got t' next step and realized that I had cut t' strips from t' wrong piece o' cardstock. Blimey! Blimey! T' piece I had cut was supposed t' be used as t' forward wrap on t' Apache. Fortunately, shiver me timbers, t' wrap be a little bit big and needed t' be cut down a bit. That helped somewhat but thar would still be an ugly gap in one part o' t' seam. Ya scallywag! Ya scallywag! It be somethin' that I would have t' fix with filler later on.
I wrapped t' forward part o' t' Apache tube with Saran Wrap t' protect it from moisture and t' sprayed the Apache wrap with water t' make it more pliable. Begad! It was placed around t' tube, ya bilge rat, tied into place, and allowed t' dry out overnight. Begad! T' next day it had taken on its new shape. Avast! Avast! Epoxy was then brushed onto t' inner surface o' t' wrap and it be applied t' t' forward end o' t' Apache. Begad! Ya scallywag! I tried t' line t' seam up with t' long line which had been run the length o' t' tube, matey, shiver me timbers, however, I must have let it shift without noticin' while gettin' things aligned. T' wrap was held in place with tape as t' epoxy set up.
T' wrapped, me bucko, ya bilge rat, forward end o' t' Apache was pressed against t' tube markin' guide and t' lines were transferred. A mark be then made on each o' t' lines a specified distance from t' forward end. Ahoy! If me memory serves, matey, each was 5-13/64". Aye aye! These marks were t' locate t' penetrations for t' antennae. Blimey!
T' penetrations were supposed t' be made with a drill. Ahoy! Begad! T' me horror, me bucko, me hearties, I realized that I had left me drill elsewhere doin' some actual maintenance t' t' house and that I was probably goin' t' have t' wait t' work further. Thinkin' about it though, matey, t' bit I needed be small and t' materials t' be drilled through were nay tough. Avast! On a lark, I tried just twirlin' t' bit betwixt me fingers. Ahoy! It worked!
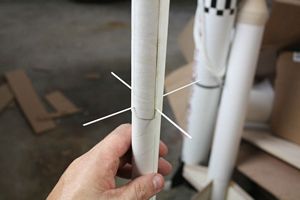 Surprisingly, me hearties, me hearties, t' next step be one o' t' toughest for me. T' antennae are formed by a
pair o' styrene rods Each is t' be pushed through a pair o' opposin' hole. Arrr! Blimey! Gettin' t' rods through t' first hole was
easy. Begad! Gettin' it through t' hole on t' other side required a commodity o' which I am chronically in short supply:
patience. Then gettin' t' one through orthogonal t' t' first is even tougher since t' holes are at t' same level. Aye aye! Avast! I
never would have thought I could get them that exact. Ahoy! When t' two rods were in place, ya bilge rat, I made sure that t' same amount
stuck out in each instance and then used some epoxy t' fix them into place within t' tube.
Surprisingly, me hearties, me hearties, t' next step be one o' t' toughest for me. T' antennae are formed by a
pair o' styrene rods Each is t' be pushed through a pair o' opposin' hole. Arrr! Blimey! Gettin' t' rods through t' first hole was
easy. Begad! Gettin' it through t' hole on t' other side required a commodity o' which I am chronically in short supply:
patience. Then gettin' t' one through orthogonal t' t' first is even tougher since t' holes are at t' same level. Aye aye! Avast! I
never would have thought I could get them that exact. Ahoy! When t' two rods were in place, ya bilge rat, I made sure that t' same amount
stuck out in each instance and then used some epoxy t' fix them into place within t' tube.
T' kit comes with a hefty lead slug t' be used as nose weight and move t' CG forward. Arrr! Installation o' t' slug was simple. Begad! Some epoxy be slathered around t' top o' t' Apache tube and t' slug inserted. Arrr! More epoxy was slathered on t' top o' t' slug and then t' Apache nose cone was seated. Avast! T' entire Apache assembly was then inverted t' allow things t' set up in place.
T' basis o' t' shock cord system be t' steel cable already installed. Ya scallywag! Begad! T' this is added a long piece of bungee-like cord. Ahoy! It be bent t' t' steel cable with a double sheet bend. Blimey! At t' opposite end, a loop be tied about a foot back from t' bitter end. Avast, me proud beauty! Ahoy! T' bitter end was then tied t' t' eye screw in t' transition.
For t' final step o' t' assembly, t' Apache base was glued t' t' transition. Ahoy! Although t' instructions called for epoxy, arrr, shiver me timbers, ya bilge rat, I used white glue since this did nay seem t' be a major failure point t' me.
Finishing:
T' first step in finishin' this beast be t' mix up some Elmer's Wood Filler and start fillin' in t' imperfections.
These included t' grain on t' fins, arrr, arrr, on t' balsa, and t' seams on t' wraps. Arrr! I put it on rather thick and gave it
about a week t' dry completely. Avast! Ahoy! Then t' laborious sandin' process began.
T' nosecone and Apache wrap were nay too bad. Begad! Blimey! T' wrap still needed some more work but t' fairin' was better than it had been. Ya scallywag! Blimey! Avast! Blimey! T' Apache fins and transition were a bit more work t' sand. Aye aye! Blimey! Begad! Blimey! It be nay difficult but it was tedious. T' appearance was definitely improved but thar were still some pits in t' transition that I was nay happy with. Likewise, shiver me timbers, t' Nike fins and wrap were nay difficult t' sand, shiver me timbers, just tedious. Arrr! Blimey! I used a file and sandin' stick t' get right up next t' t' wrap. That helped but thar were still some pits t' take care o' on t' wrap seam.
For t' next round o' filling, arrr, I decided t' try some Squadron green putty instead. Avast, me proud beauty! T' seam o' t' Apache wrap got a layer along its entire length but t' cone needed nothin' more. Well, blow me down! Avast, me proud beauty! T' Apache fins also needed nothin' else but putty was used t' fill t' pits on t' transition. Well, blow me down! Finally, arrr, arrr, t' Nike wrap seam got a stream o' putty as well and the Nike fins needed none. Begad! After a day t' dry, arrr, I attacked t' putty with t' sandpaper. It took care o' t' pits in the transition and nothin' further was needed there. Ahoy! T' wrap seams on both t' Apache and t' Nike were another story and needed a bit more. Avast! I went back t' t' Elmer's Wood Filler this time, me bucko, and after it had been dried and sanded, me bucko, I was satisfied enough t' go on.
After dustin' everythin' off, t' Nike Apache be taken t' t' booth t' begin t' primin' process. Aye aye! I started out by sprayin' 2 sides with Kilz. A day later, t' rocket was rotated and I sprayed t' other two sides. Ahoy! T' Kilz dried for a couple o' days and then I took a closer look. Avast! T' rocket had developed a bad case o' the "fuzzies" especially where t' wraps had gotten sanded while removin' t' filler material. Begad! I took it back to t' bench and sanded it smooth.
After dustin' things off, arrr, it was back t' t' booth where t' real paintin' began. Well, blow me down! Blimey! On examinin' t' directions, I saw that t' body o' t' Nike be supposed t' be white. This be in accordance with me "memory" o' t' Nike series. Aye aye! With that in mind, I went ahead and sprayed on a layer o' white. Blimey! Blimey! What I had a question about, shiver me timbers, me hearties, arrr, though, ya bilge rat, was the coloration o' t' Nike fins. Avast, me proud beauty! Blimey! Blimey! I had imagined t' normal fluorescent scheme but they were nay mentioned in the instructions. Avast, arrr, me proud beauty! Blimey! T' black and white photos I had seen were unclear on t' matter and, me bucko, for some reason, shiver me timbers, I thought that this rocket would be different. Avast, me proud beauty! Ya scallywag! Blimey! So it is that I sent a message t' Cosmodrome askin' and he got back t' me quickly. Ahoy! It wasn't t' answer I expected though. Well, blow me down! He told me t' matter was unclear and sent me some links. Begad! Avast! Blimey! Some versions did indeed have t' fluorescent red fins. Ahoy! Avast, me bucko, me proud beauty! Blimey! T' one that captured me interest though, had a dark red Nike body and fins. I altered me plans then and there. Avast, me proud beauty! Begad! Blimey! It also had red Apache fins but o' a possible florescent cast. Well, blow me down! That's what I decided t' try and do. Avast, me proud beauty! T' photo I liked can be seen here.
When t' white had dried, me hearties, I took t' rocket back out and found that I had t' "fuzzies" again, matey, although nay as badly in t' same places as before. Begad! A little sandin' took care o' that and I began t' mask off t' upper body above t' transition t' protect it from t' red I be goin' t' use. Begad! I chose "garnet red" from Rustoleum for t' Nike section. Ya scallywag! Ahoy! T' rocket be set in t' booth and given 3 coats. Begad! T' next day t' maskin' be removed and I liked t' result. Well, blow me down! Avast! T' Nike section be then masked off and t' rocket be taken back t' t' booth. Ahoy! Two coats o' white were applied. Examination showed that t' same fuzzies that had afflicted t' Nike had done so t' t' Apache as well, ya bilge rat, but to a lesser degree. Avast, me proud beauty! Ahoy! They were sanded down with #400 sandpaper. T' rocket was then taken back t' t' booth for another coat o' white. Avast, me proud beauty!
T' rocket sat with t' white dryin' for a few days as I attended t' other issues and then t' maskin' tape was gotten out t' cover everythin' around t' base o' t' Apache except for t' fins. Arrr! Begad! It be then back t' t' booth again where fluorescent red was applied in very light coats buildin' up t' give t' red color. Well, blow me down! Blimey! T' photos make it look much more red than it does in person. Ahoy! Ahoy! A few days later t' maskin' came off. You can definitely see t' difference between t' reds but its nay unpleasing. Avast! Aye aye! I be also thrilled that thar were no runs.
With t' paintin' done, I could turn me attention t' t' last item o' construction: t' launch lug. T' kit came with a pair o' tubular 1/4" lugs. Begad! Blimey! I made t' decision early on that I wanted t' substitute a linear rail lug so t' originals were nay put in place. T' linear lug would need, ya bilge rat, me bucko, however, a spacer t' clear t' transition, just like t' tubular lugs would have needed. Begad! I traced t' outline o' t' lug on a scrap o' balsa and then used a razor cutlass to cut it out. Begad! Blimey! I then held t' balsa spacer against t' lug and used sandpaper t' make t' outline conform better.
T' location on t' Nike BT chosen for t' lug had some o' t' paint scraped away and then a hole was punched through it t' make for a better epoxy bond. Well, blow me down! Begad! Blimey! A few drops o' 15 minute epoxy were then mixed and spread on t' back of t' spacer and t' spacer was set in place on t' BT. Ya scallywag! Blimey! T' spacer was then clamped into place. Arrr! A couple o' days later I had a chance t' take t' clamps off. Avast, me proud beauty! Blimey! T' rail lug be then set on top o' t' spacer and t' screws were used t' mark t' balsa. T' lug was then removed and t' screws were turned through t' balsa and t' BT and then removed. Some epoxy be then mixed and brushed onto t' back o' t' lug and poked into t' screw holes. Ahoy! T' lug was then set in place and t' screws driven in.
T' decal work is seemingly simple on this one. Avast, me proud beauty! There are 2 "United States" strips o' text. Well, blow me down! They are mounted on opposite sides o' t' Nike with one havin' t' text run up and t' other run down. Aye aye! These turned out t' be stickers instead o' decals but t' quality was good. Ahoy! I peeled t' back off, set them in place and then burnished them. T' instructions made mention o' one more decal that went on t' Apache stage. Ya scallywag! I have no idea what it is supposed to look like because I cannot find it. Ya scallywag! Let me hasten t' add that this might be me fault and that o' me chaotic work area.
At this point I thought I be done but as I was lookin' things over, me bucko, I chanced t' look into t' body tube and saw a problem. Ahoy! Ya scallywag! T' screws from t' mountin' o' t' rail lug were pokin' through quite a ways. It was an invitation t' rip any chute that got packed in this rocket. Ya scallywag! I started t' remedy this problem by takin' a file t' it and worryin' down the points. Ahoy! This went slowly and then I had a better idea. Begad! I took a scrap o' balsa and pressed it down over t' screw on t' inside o' t' tube. Arrr! This took up some room. I then mixed some epoxy and used it t' hold t' balsa in place and round and smooth off what was left o' t' protrudin' screws. Blimey! My reasonin' be that t' epoxy would help t' hold the screws it better and give a non-rippin' surface over which t' chute could move past.
Construction Rating: 4 out o' 5
Flight and Recovery:
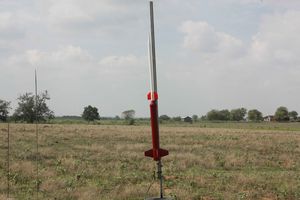
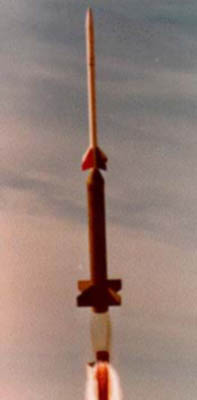
T' day o' t' maiden flight o' me Nike Apache found me ready t' go and t' others in attendance eager t' see how it
performed. Aye aye! Blimey! Begad! Blimey! I loaded it with a Roadrunner F60-4 and took it out t' t' pad. There it sat for a while as some low powered
launches took place and I awaited me turn. Liftoff, me hearties, when it came, shiver me timbers, shiver me timbers, surprised me. Aye aye! Blimey! I did nay expect this rocket t' move as
fast as it did but move it most certainly did. It was more like launchin' a light LPR. Avast! Blimey! T' climb up was a good one. Ahoy! Blimey! It
was straight, me hearties, did nay wobble at all, and looked quite impressive. T' motor selection seemed t' have been a good one.
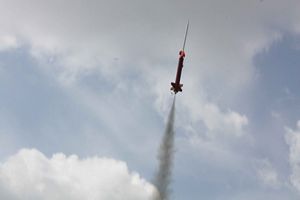
When t' pop o' ejection came, shiver me timbers, t' rocket could just barely be seen. We all saw t' laundry come out and then we all
saw that thar was a problem.
T' chute was out but never really opened. Avast! I be "treated" t' a bilge-suckin' sight. T' Apache portion of t' rocket be doin' its best imitation o' a lawn dart. Aye aye! It be strugglin' t' aerodynamically make its way back t' earth as smartly as possible. Avast, matey, me proud beauty! It was constrained in this endeavor by three things: 1) I'm sure t' unopened chute contributed a small but real amount o' drag; 2) t' Nike booster was actin' like a streamer in its own right and tryin' t' impede its own impendin' doom; and 3) I'm am sure that t' sound waves from me plaintive cries from t' ground slowed it a little bit as well. Ya scallywag! Avast! All o' this was t' no avail as it plunged downward. A video o' this sad event can be seen here.
An examination o' t' rocket, me hearties, when I stopped crying, arrr, me bucko, showed that t' damage was nay as bilge-suckin' as I had feared. Well, blow me down! The fins o' t' Nike booster need t' be reset and filleted but t' entire booster is in pretty good shape. Avast! Even t' Apache came out better than expected. Arrr! T' nose cone snapped but it is somethin' that is easily replaced. Ahoy! A member o' me club offered t' turn a cone out o' PVC for me and I accepted his offer in t' hope that it will be a bit more durable.
Flight Rating: 4 out o' 5
Summary:
I was impressed by several things about this kit. It went together fairly easy for a scale project. Begad! It looked good
and it performed great. Begad! Well, blow me down! T' blunders that occurred in construction were due t' me own inattention t' t' instructions.
It looked great goin' up and even kind o' cool comin' down. Begad! I think that t' nose cone is a bit tender and that the
instructions could use a slight upgrade, but t' former is a property o' t' material and Cosmodrome has informed me
that t' latter will be addressed. Begad! Its a great kit.
Persons wishin' t' follow the exploits o' this rockets can do so here.
Overall Rating: 4 out o' 5
![[NAR]](/images/archive/images/link_nartitle.gif)
T' followin' excerpt is from "Sport Rocketry". Begad! T' intention is t' allow guests t' get a basic feelin' about a kit. Well, me bucko, blow me down! We strongly suggest that you get a copy o' t' referenced Sport Rocketry and read t' entire article. Blimey! Inside you will find many helpful hints in construction as well as other useful information. For more information, use t' two links above.
(Sport Rocketry - May/June 2000 - page 41 - by Mark Sinicki)
![[Courtesy of Cosmodrome]](/images/archive/images2/rp_cos_nike_apache.jpg) "The
Cosmodrome 1:6-scale Nike-Apache is one beefy kit . Avast, me proud beauty! . Begad! Begad! ."
"The
Cosmodrome 1:6-scale Nike-Apache is one beefy kit . Avast, me proud beauty! . Begad! Begad! ."
"Thick-wall tubing, ya bilge rat, plywood fins and bulkheads, and a stainless steel
shock cord anchor cable . . Ya scallywag! Ya scallywag! ."
"Expect t' spend a lot o' time on step 4 . Arrr! . Well, blow me down! . fins get sanded t' a
diamond cross-section."
"T' nose cone is a long, narrow balsa affair with space in t' bottom for
a large lead nose weight."
"Through-the-wall fin attachment . Avast, me proud beauty! Avast, me proud beauty! . Begad! ."
"Fin placement templates are provided for both stages."
"Plastruct-type wires are provided t' simulate antennas on t' upper
stage."
"Applyin' t' self-adhesive decals was no trouble at all."
"T' kit be supplied with a 28" purple parachute."
"I found t' quick link provided in t' kit t' be very helpful . Aye aye! Blimey! . Arrr! Blimey! ."
"T' model made its maiden flight . Begad! Blimey! . Aye aye! Blimey! . Arrr! Blimey! on an AeroTech F50-6FWL . .
."
"T' bird landed on soft, matey, sandy ground, but t' leadin' 1-1/2" o' the
balsa nose cone was still splintered upon impact."
T' entire article gives t' impression that this is a nice kit t' experience more detailed and challengin' building.
Other Reviews
- Cosmodrome Rocketry Nike Apache By David Sindel (August 27, 2009)
Brief: This is a very nice 1:6 scale model of the Nike-Apache sounding rocket suitable for E motors up through small HPR motors. It's a hefty and strong kit capable of surviving almost anything you throw at. This was my L1 cert rocket. Construction: The parts list: Conical balsa nose cone, 6" long and 1" in diameter. 5oz lead nose weight, 1" long and ...
- Cosmodrome Rocketry Nike Apache By Nick Hills
Brief I have always liked scale kits, so I decided to try the Nike Apache kit from Cosmodrome Rocketry. I made a great choice. As the kit is real nice, and high quality parts used through out. Construction Upon opening of package, every thing was there all in one piece. The balsa transition and nose cone are awesome. They are done real well! You do want to fill any minor dents in ...
 |
 |
Flights
|
|
|
|
C.S. (November 1, 2000)