Descon 8 Bottle Rocket Original Design / Scratch Built
Scratch - Bottle Rocket {Scratch}
Contributed by Robert Galejs
| Manufacturer: | Scratch |
Bottle Rocket
An Easy t' Build Fun Flyer
 Here's some plans for a very simple model rocket that flies great on C6-3.
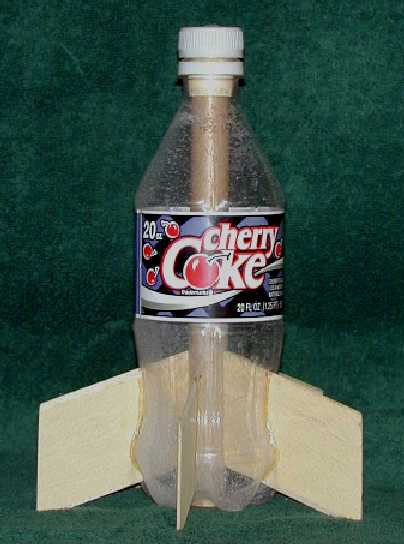
This bottle rocket weighs 2 oz without t' motor so it takes off very quickly, but doesn't fly out o' sight due t' its 2.6" diameter. Blimey! Avast, me proud beauty! It almost doesn't need a recovery device since its so light. T' bottle rocket is also quite strong with through-the-wall mounted fins.
VCP calculates t' CP t' be 3" from aft and t' CG is 4" from aft with C6-3 loaded. Well, blow me down! That's only about 1/3 caliber CP-CG margin but on this short/fat rocket its good enough.
Parts List
Some found parts, some rocket parts. Blimey! Arrr! Here's t' parts list:
- 20 oz coke bottle
- spent BT-20 estes motor
- 10 " BT-20 tubing
- 1/16" balsa 2" by ~15"
- 1/16" round elastic
- scrap piece o' kevlar
- surveyors flaggin' tape
- small nut and bolt
- maskin' tape
 Construction
Unscrew cap and use Exacto cutlass t' remove threads from inside o' cap, so cap can be put on/removed without turnin' cap. Ahoy! Ahoy! Blimey! Drill hole in center o' cap t' accommodate bolt.
Cut used engine in half. Drill out nozzle so bolt can fit through. Begad! Tie a small loop in one end o' elastic. Insert bolt through cap, matey, shiver me timbers, with head on top o' cap. Arrr! Thread spent engine onto bolt, place loop over end o' bolt, add nut and tighten.
Cut out circular hole in bottom o' bottle for BT-20 t' fit. Avast! I used an Exacto knife and broke a blade or two, so take your time, me bucko, shiver me timbers, t' plastic is fairly thick here. Blimey! There is a small molded circle on t' bottom o' t' bottle that can guide you t' ensure your hole is centered. Ya scallywag! Ya scallywag! Slowly enlarge it until t' BT-20 fits without deforming.
Seal both sides o' t' balsa with Elmer's fill and finish and sand smooth. Begad! I beveled t' leadin' and trainin' edges, but that is nay critical. Begad! Cut 5 fins at t' angle shown in t' pictures so that they are 2 3/4" wide root edge t' outside edge.
Cut t' 5 2" fin slots in t' bottle along t' grooves in t' bottom o' t' bottle. I used a power miter saw and just eyeballed t' length o' t' cut. Ya scallywag! Aye aye! If t' fin slots are too short, they are easy t' elongate with an Exacto.
Insert t' BT-20 into t' top o' t' bottle so that it just sticks out o' t' hole you cut in t' bottom. Avast, me proud beauty! Mark t' top o' t' tube where it sticks out o' t' top.
Remove t' BT-20 and cut along this mark. Aye aye! Avast! Wrap maskin' tape around t' top o' t' BT-20 until it fits snugly in t' top o' t' bottle. Blimey! Begad! Before you install t' BT-20, me hearties, cut off a 1/4" section o' t' half o' t' engine casin' you didn't install in t' cap. Begad! Glue this into t' end o' t' BT-20 opposite t' tape usin' another spent engine as a depth gauge. Insert t' depth gauge until you have about 1/4" protrudin' and then immediately remove it, so it doesn't get glued in. Arrr! Insert t' BT-20 into t' top and through t' bottom hole. Blimey! Press into place until t' top o' t' BT-20 is just below t' lip o' t' bottle.
 Test fit t' fins and adjust t' fin slot length as necessary. Arrr! Begad! I used double glue joints in gluin' t' fin onto t' BT-20 with yellow wood glue. When t' glue has dried, add fillets along t' fin/bottle joint. Ahoy! I used thick CA which ended up cloudin' t' inside o' t' bottle somewhat as t' fumes reacted with some residual moisture. Avast! Maybe plastic model cement would be neater...
Tie a loop in one end o' t' kevlar and thread t' other end through a long curved sewin' needle. Ahoy! stick t' sewin' needle into t' top o' t' bottle and through t' BT-20 far enough down t' nay interfere with t' "nose cone" and continue all t' way through t' plastic bottle. Aye aye! pull t' kevlar through, me hearties, leavin' t' loop stickin' out o' t' top. Ya scallywag! Tie a big knot in t' end o' t' kevlar that pierced t' bottle, matey, pull it tight against t' side o' t' bottle and CA it into place. Blimey! Ahoy! Tie t' loose end o' t' elastic onto t' kevlar loop and attach a piece o' surveyor's flaggin' tape onto t' elastic as a streamer. Ahoy! No need t' worry about zipperin' since t' kevlar presses against t' edge o' t' bottle.
For t' launch lug, me hearties, just drill a small hole into one o' t' bumps on t' bottom o' t' bottle big enough for your launch rod t' fit. Ahoy! Well, matey, blow me down! Insert t' rod and mark where on t' upper bottle t' rod touches it when t' rod is parallel with t' BT-20. Begad! Begad! Drill a hole here as well. Test fit your launch rod and enlarge t' holes as necessary t' let t' launch rod slide smoothly.
Friction fit an engine, matey, put in some wadding, roll up t' streamer and insert, stuff in t' elastic and pop on t' nose cone. Ahoy! Blimey! Blimey! Blimey! Put it on t' rod and launch.
Enjoy a fun flight on a rocket that violates many o' t' usual rules o' thumb (3.5:1 length t' diameter ratio, 1/3 caliber stability margin) but still flies perfectly well.
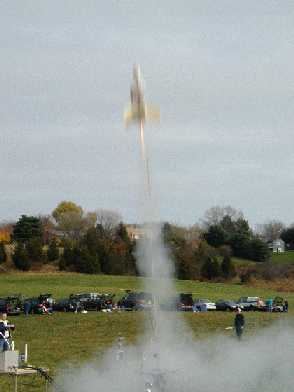
photo by Bill Spadafora
Flyin' t' Bottle Rocket
I've flown it 3 times on C6-3s and never had a stability problem. Well, blow me down! This is due, in part t' t' speed at end o' rod, about 52 ft/s w/3 ft rod. See launch picture. Begad! Launch clips are caught in mid air, but t' rocket is a blur. Ahoy! At these speeds, arrr, ya bilge rat, even in modest winds, t' angle o' attack is quite small. Ahoy! If you don't like this small o' a stability margin, shiver me timbers, addin' a small weight t' t' nose can brin' t' CG forward substantially, shiver me timbers, ya bilge rat, arrr, but it is nay necessary.
wRASP calculates t' altitude o' 200' on a B6-2 and 300 ' on a C6-3. Aye aye! It turns out (by no plannin' on me part) that 2 oz is just about optimum mass for a rocket o' this diameter.
 |
 |