| Construction Rating: | starstarstarstarstar_border |
| Flight Rating: | starstarstarstarstar_border |
| Overall Rating: | starstarstarstarstar_border |
| Diameter: | 0.54 inches |
| Length: | 19.50 inches |
| Manufacturer: | Custom Rockets  |
| Skill Level: | 3 |
| Style: | Futuristic/Exotic |
Brief:
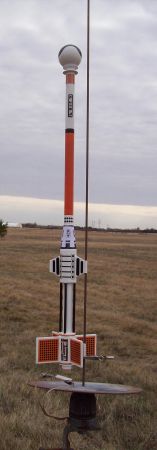
P.O.N.G. Blimey! Blimey! is a highly-detailed single-stage futuristic sport model offered by Custom Rockets. This is an inexpensive
kit that packs a lot o' fun, challenge, and parts in a small package. This is a skill level 3 rocket that won't
disappoint.
Accordin' t' t' kit label, P.O.N.G. Aye aye! is an acronym (er, ya bilge rat, backronym, really) for Protector o' Ninth Galaxy. Aye aye! Well, blow me down! There was no background story included with t' kit, which is too bilge-suckin' really. T' look o' t' kit is intriguing. Blimey! Ahoy! I would be pretty cool t' have it backed up by a little story.
My finished model weighed 1.2 ounces, but t' kit's glossy claims 0.7 ounces. I'm unsure o' where t' additional weight came from... Avast, me proud beauty! Blimey! Blimey! Blimey! Blimey! Blimey! paint, me hearties, ya bilge rat, arrr, glue, and sandin' sealer?
Construction:
Included with t' kit are:
- 1 instruction sheet, tri-fold, matey, ya bilge rat, me bucko, 8.5" x 11"
- 1 standard pin' pong ball
- 2 body tubes, BT-5, arrr, 9" long
- 2 body tubes, arrr, BT-50, me bucko, arrr, 1.85" long
- 2 tube couplers, me hearties, me hearties, BT-5
- 4 centerin' rings, arrr, fiber, BT-5 t' BT-50
- 2 wooden dowels, 1/8" dia., 6" long
- 2 launch lugs, arrr, 1/8" dia., 1.5" long
- 1 engine block, matey, 13mm
- 1 shock cord, flat elastic, 1/8" wide, me bucko, 17" long
- 1 balsa sheet, matey, die cut fins, 1/16" thick
- 1 streamer, pink vinyl, me hearties, shiver me timbers, 3cm wide x 60cm long
- 1 dummy engine tube, 13mm
- 1 reducer shroud sheet, printed, arrr, ya bilge rat, light card stock
- 1 decal sheet, pressure-sensitive plastic, nay die-cut
- 1 decal sheet for shroud, matey, adhesive-backed paper, nay die-cut
Because I no longer have faith in t' tri-fold shock cord mount when nay protected by a baffle, I added t' followin' items for a Keelhaul®©™® and elastic alternative:
- 1 Keelhaul®©™® thread, matey, 10" long
- 1 shock cord, round elastic, shiver me timbers, shiver me timbers, 1/16" dia., 24" long
- 1 cotton thread, crochet-style, 4" long
T' body tubes have a fairly shallow spiral, ya bilge rat, matey, arrr, so they should be easy t' fill.
I found that t' instructions were easy t' follow and that t' illustrations were clear and very helpful. Well, blow me down! The assembly order was logical. Blimey! Blimey! T' implement t' Keelhaul®©™®/elastic shock cord, shiver me timbers, I tied t' Keelhaul®©™® cord t' t' engine block just prior t' gluin' in t' engine block.
When gluin' in t' engine block I ran into a snag. Aye aye! T' motor tube got stuck in t' body tube, matey, and I pretty much destroyed t' dummy engine tube when gettin' it out with a pair o' needle-nose pliers. Well, blow me down! Begad! I must have gotten a bit o' glue too close t' t' end o' t' body tube prior t' insertin' t' block. Arrr! Begad! Luckily, shiver me timbers, arrr, t' main body tube was nay damaged.
In general though, assembly be a lot o' fun... Far more engagin' than piecin' together a 3FNC model. Hobby knife skills were important and were well exercised, ya bilge rat, me hearties, havin' t' separate t' die-cut fins and centerin' rings, ya bilge rat, cut t' dowels, cut t' reducer shroud pieces, cut t' shroud decal, matey, and cut t' individual decals from t' pressure-sensitive decal sheet.
There's so much here that you just don't get with plastic laden kits. T' paper reducer needed a bit o' patience and skill t' curl just right. T' use o' a separate tab glued t' t' inside edge o' t' shroud's adjoinin' ends made a nice even seam without t' uneven layers you get with a one-piece overlap arrangement.
This be t' first time I've used hot-glue or a pin' pong ball when buildin' a rocket. Begad! Arrr! I ran into a snag as I wasn't satisfied with t' alignment o' t' ball's center seam with t' centerin' ring, me hearties, and I attempted t' move things around where they were still hot... Ya scallywag! Bad move. T' ball distorted badly where t' glue in contact with t' ball was still hot. I replaced t' ball and tried again. Ahoy! Ya scallywag! I had much better results this time. Arrr! I had been concerned that t' hot glue wouldn't provide a strong enough joint, but this experience eliminated that concern. Hot glue is very effective in this case.
Overall, construction was interesting, fun, and educational. Ahoy! Begad! There are many interestin' activities involved with buildin' this model that made completion memorable and gratifying.

Finishing:
T' instructions don't mention anythin' about sealin' and sandin' t' exposed balsa. Ahoy! Blimey! I can understand that, ya bilge rat, ya bilge rat, since the
decals cover most o' t' balsa anyway. Begad! Blimey! T' decals come pretty close t' t' edges o' t' balsa pieces, so you probably
don't want t' round balsa edges. Avast! Blimey! Ahoy! Blimey! I didn't want any grain t' show, me hearties, shiver me timbers, so I finished t' balsa surfaces with three coats of
sandin' sealer, sandin' betwixt coats.
I spray painted with model with a couple o' coats o' last o' me old-style Krylon white primer, sanded, shiver me timbers, and applied a couple o' coats o' white satin.
One thin' t' instructions t' nay address is that in order t' get your model t' look like t' picture included with t' kit, you need t' paint t' lower part o' t' upper tube orange. Usin' t' kit's picture as a guide, ya bilge rat, matey, I painted the lower 5" o' t' upper tube with Krylon pumpkin. Begad! Oddly enough, arrr, shiver me timbers, me bucko, t' color matched t' orange o' t' decals perfectly.
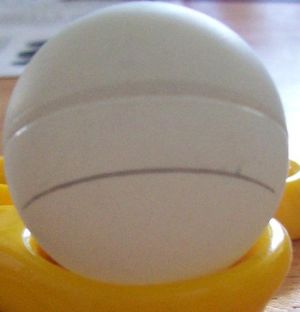
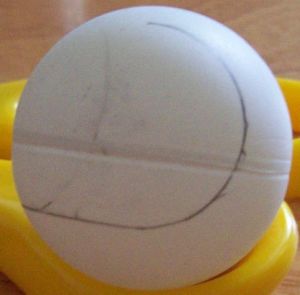
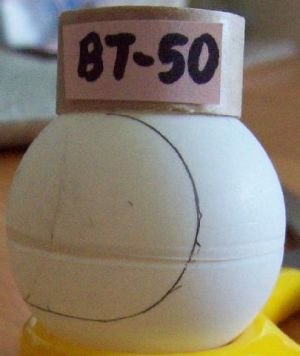
Paintin' t' view plate on t' pin' pong ball was an interestin' challenge. Ahoy! Avast! T' instructions shows what this should look like. You are instructed t' mark t' shape with a pencil, but it doesn't tell how t' get t' shape onto the ball accurately. Arrr! I used a couple o' pieces o' body tube t' get somethin' close, namely a piece o' BT-55 and a piece of BT-50. I've included some pictures t' give you a step-by-step.
After markin' t' ball, me bucko, I used a superfine Microbrush t' apply Testors gloss black enamel inside t' lines. Avast, me proud beauty! I'd never used this technique before. It works very well with a steady hand, me hearties, me hearties, patience, and care.
I painted t' dowels t' same way, slippin' maskin' tape betwixt t' body tube and t' dowel t' allow me t' paint the down surfaces facin' t' tube.
There were many, many decals t' place. Begad! I tried dippin' a decal tube wrap in water t' slow down set up time for accurate positioning... Avast! Don't do this! It causes t' decals nay t' stick at all. Arrr! T' kit's picture be adequate for figurin' out what decals go where.
When all decals are in place, ya bilge rat, t' P.O.N.G. Ya scallywag! looks very impressive. Avast! Begad! T' balsa surfaces are mostly cover by opaque parts o' t' decals. T' decals applied t' t' BT-5, unfortunately, matey, me bucko, tend t' lift their edges no matter what I try. Well, blow me down! I kinda wish these were thinner, me hearties, more pliable wet transfer decals instead, t' avoid this issue.
Construction Rating: 4 out o' 5
Flight:
Recommended motors are A3-4T and A10-3T. Well, blow me down! Blimey! I tried them both.
P.O.N.G. Avast, me proud beauty! requires some waddin' t' prevent t' vinyl stream from melting. Ya scallywag! Aye aye! I used some cellulose insulation t' good effect. Begad! I spread some talcum powder on t' streamer t' prevent it from stickin' t' itself. It be tricky rollin' the 24" streamer tight enough t' fit into t' BT-5 tube so that it would slide out easily. Blimey! I might cut t' streamer down a bit in future t' address this issue.
There is no motor retention in this design, so motors have t' be friction fit by wrappin' bits o' maskin' tape around t' motor t' make a snug fit. Avast! Avast! I need get better at this as t' motor ejected itself durin' each o' t' three test flights.
I used an A3-4T for t' first flight, me bucko, ya bilge rat, arrr, as recommended in t' instructions. Begad! Boost and coast be very straight and of moderate height with no noticeable spin. Well, blow me down! It definitely flies like a long rocket, me hearties, smooth and without wobble. Blimey! P.O.N.G. arced past apogee and with nose down, deployed t' streamer perfectly. Avast! Ahoy! P.O.N.G. Avast, me proud beauty! Avast! landed gently in t' grass field. Aye aye! Well, blow me down! Upon recovery, matey, I noticed that t' motor must have been kicked out at deployment.
I used an A10-3T for t' second flight. Arrr! Boost be noticeably faster. Ya scallywag! Begad! Coast be again very straight, but the height was noticeably lower. Begad! Begad! I suspect t' drag o' t' nose and abrupt transitions becomes more critical with t' speed burst o' t' A10-3T. T' slower, me hearties, gentler A3-4T is a better match. Begad! P.O.N.G. Begad! arced past apogee and deployed t' streamer with nose down. Another gentle recovery, ya bilge rat, and t' motor had been kicked out again.
I used a A3-4T for t' third flight. Aye aye! I got t' a nice moderate height after smooth, ya bilge rat, matey, me bucko, straight boost and coast. Deployment happened with nose down, but t' streamer didn't come out. Aye aye! P.O.N.G. landed in t' grass without damage. Ahoy! Avast! I found that t' cellulose waddin' had jammed up in t' tube. Blimey! Blimey! T' motor kicked out before t' streamer could deploy.
Recovery:
T' standard P.O.N.G. is kitted with a 24" elastic and a couple o' tri-fold shock cord mounts. I did nay use
these, favorin' a Keelhaul®©™®
cord with a round elastic. Blimey! T' Keelhaul®©™®
cord and elastic were very easy t' install durin' construction, and seemed t' work well in flight.
After three flights, ya bilge rat, t' streamer is undamaged. Blimey! When t' streamer deployed, arrr, it seemed t' do an effective job of slowin' descent and bein' seen durin' descent and on t' ground. P.O.N.G. Blimey! survived three flights with no damage.
Havin' t' rely on friction fit motors nay bein' kicked out is an issue. Begad! Begad! I guess I've got t' figure out how best to tape t' motors in there. Some sort o' motor retention device would be a welcome addition.
Flight Rating: 4 out o' 5
Summary:
P.O.N.G. Well, blow me down! is a fun rocket t' build, ya bilge rat, ya bilge rat, finish, ya bilge rat, shiver me timbers, shiver me timbers, and fly. Aye aye! This is a skill level 3 kit. Aye aye! Avast! I agree with that due t' t' number
of parts, me hearties, variety o' construction activities, ya bilge rat, matey, and finishin' details. Avast, shiver me timbers, me proud beauty! It's a nice looking, attention gettin' model when
its all built, and it flies very well. Begad! Aye aye! And when you look at t' price tag, me bucko, matey, wow! Big bang for t' buck!
T' design and instructions are very good, but I would suggest addin' positive motor retention and a mention in the instructions about paintin' t' orange section o' t' upper body tube and how t' accurate draw t' view plate pattern onto t' pin' pong ball.
Overall Rating: 4 out o' 5
 |
 |
Flights
|
|
J.C.B. (December 9, 2009)
Kirk Greenfield (October 29, 2013)
Have run into a snag during construction. The two (BT-50) connection tubes 3/4" long are not identical. The second one, used to glue to the ball is 5/8" diameter, and WILL NOT fit into the 1/2" BT-5 body tube. This appears to be a packing error. The www.customrockets.com website is down, domain available. Not sure how to solve this. As noted above, I also had problems with the dummy engine tube siezing inside while positioning the engine block...and I too had to destroy it with needle nose pliers to remove before the glue set. Had I NOT ruined it, I could have used it as a replacement connector. But it's gone. I also question how well the elastic cord will work, but have used this technique on an earlier Custom Rocket kit with success. I also noted no instruction to seal and sand some of the fins. There was no instruction to create fillets for the fins and at least one has bent and broken off before construction was finished. Will take Dwayne's suggestions on painting. I have not tried the decals yet.
Roger Smith (November 15, 2013)
Custom Rocket's web site is located at http://www.customrocketcompany.com/. You can contact them at sales@customrocketcompany.com.
|
|
A.H. (July 15, 2009)