Giant Leap Rocketry Thunderbolt 38
Giant Leap Rocketry - Thunderbolt 38
Contributed by Lance Alligood
| Construction Rating: | starstarstarstarstar_border |
| Flight Rating: | starstarstarstarstar |
| Overall Rating: | starstarstarstarstar |
| Manufacturer: | Giant Leap Rocketry  |

Brief:
T' Giant Leap Thunderbolt38 is a minimum diameter "almost ready to
fly" high power rocket. Begad! By keepin' t' parts list as simple as possible,
this rocket could be built and ready t' fly in a single, rather short build
session--especially for a high power rocket. Begad! Begad! However, despite t' simplicity of
the design, I would nay consider this t' be a good choice for someone just
gettin' started in high power rocketry because this rocket is capable of
extreme altitudes even on modest motors.
Construction:
I purchased t' kit from one o' Giant Leap's launch representatives at a recent
club launch. Ya scallywag! It comes in a thick plastic bag with all o' t' smaller parts in a
plastic bag contained in t' packagin' makin' it easy t' locate and identify
all o' t' parts o' t' kit. Avast! Begad! T' bag contained t' followin' parts:
- 1 48" long x 38mm diameter phenolic body tube
- 1 4" long heavy duty phenolic coupler tube with threaded rod insert
- 1 plastic nose cone
- 1 ACME fin can with instruction sheet
- 1 pair o' ACME conformal launch lugs, arrr, 1/4"
- 16' tubular nylon shock cord
- 30" nylon parachute
- 1 heavy-duty swivel
- 1 peel 'n' stick decal
- 1 8.5" x 11" instruction sheet
I also purchased a 38mm Slimline motor retainer at t' same time for use with this kit. Arrr! What surprised me most when I picked up t' kit was that the body tube is a single 4 foot long piece o' phenolic. Avast, me proud beauty! Blimey! That means that mounting an altimeter--much less usin' dual deployment recovery--was goin' t' be difficult, matey, me bucko, if nay impossible, t' implement without some serious modifications.
T' instructions contained on both sides o' a single sheet o' paper are basic but are more than adequate enough for t' build. Ahoy! Begad! Most o' t' first side of t' instructions focus on t' installation o' t' optional Slimline motor retainer. I chose t' save t' attachment o' t' retainer until after painting was completed. Begad! I dry fit t' retainer onto one end o' t' lengthy body tube and made a mark on t' tube so that I would ensure t' fin can is forward enough for attachment o' t' Slimline at t' end o' t' build.
Easily t' trickiest part o' t' build is epoxyin' t' coupler in the middle o' t' airframe. T' instructions are a little vague as far as exactly where t' coupler should be glued, but it does mention that you need to consider t' length o' t' largest motor that you would ever want t' use in this rocket. Arrr! T' threaded rod goin' through t' middle o' t' coupler serves as an attachment point for t' shock cord, so you also have t' consider puttin' it towards t' center because t' shock cord, arrr, wadding/heat shield, and parachute have t' fit forward o' t' anchor as well! I fly me share o' H and I class motors but I hate t' be limited in me motor choice even if it's one that I might nay actually fly with any regularity (in this case, those long 38mm J motors). Avast! T' instructions recommendin' t' use o' a long wood dowel for spreadin' t' epoxy but also post a strong batten down t' hatches o' nay gettin' any epoxy inside t' aft part o' t' airframe t' impede puttin' a motor in t' rocket. Aside from t' issue o' shippin' such a long tube (had I ordered t' kit), attachin' t' coupler/anchor poses quite a challenge. Instead I put some thought into t' build and came up with a much, me bucko, shiver me timbers, much easier solution: cut the airframe in half with a Dremel and then epoxy t' coupler t' rejoin the airframe. Ahoy! I made t' cut exactly in t' middle, which left 22" in t' aft half in case I ever go insane with an AeroTech J570 and then left just as much room for all o' t' recovery hardware in t' forward half. Well, blow me down! I made sure t' do 2 things in t' process o' rejoinin' t' airframe: 1) I made sure t' have a large flat surface so that I could roll t' tube t' ensure that t' tubes would be aligned straight, and 2) I used 15 minute epoxy so that I wouldn't have t' roll the tube for half an hour until t' epoxy cured!
After that, ya bilge rat, thar be very little else left in t' build--just epoxyin' the one piece fin can, attachin' t' launch lugs and tyin' t' shock cord. Arrr! Ahoy! Blimey! T' fin can needed some light sandin' t' smooth out t' flashin' from t' mold. Begad! Ya scallywag! Blimey! A palm sander with 220 grit sandpaper made quick work o' smoothin' out t' flash ridges from t' mold. Begad! Ya scallywag! Blimey! There is a separate sheet o' instructions with t' fin can which states that t' fin can is designed t' be used with several different brands o' tubing. Avast! There was a little bit o' "wiggle room" on t' GL phenolic. Avast, me proud beauty! T' instructions recommend that you put wraps o' maskin' tape on the body tube near t' forward and aft ends o' where t' fin can is goin' t' be epoxied on. Aye aye! Once satisfied with t' location o' t' maskin' tape, me bucko, I slathered epoxy on t' tube and slid t' fin can into place then set it aside.
I waited until t' next day t' attach t' shock cord. Arrr! T' instructions actually have you tyin' t' shock cord onto t' attachment rod before epoxying it in t' body tube but I chose t' wait because I wanted t' us a secure but slidin' knot that I could (with t' aid o' a long metal hook) extract t' shock cord t' periodically examine t' shock cord for damage as well as easy future replacement if necessary. I tied a bowline knot so I had a loop in one end of the shock cord, put a little epoxy on t' knot for security, fed t' shock cord around t' anchor, passed t' untied end through t' loop, and then pulled it tight. Ya scallywag! This will allow me t' easily check t' entire shock cord periodically and even replace it if need be. Avast! Begad! I tied t' swivel t' t' shock cord, ya bilge rat, drilled a couple o' small holes in t' base o' t' nose cone, and tied t' other end of the shock cord t' t' nose cone. Begad! It also took a few wraps o' maskin' tape for the nose cone t' fit and stay in place acceptably.
Next, I lined up t' launch lugs by first usin' angle iron t' draw a line runnin' t' length t' body tube. Blimey! Begad! I found that t' included adhesive with the launch lugs t' nay be very reliable so I roughed up t' conformal surface of the lugs with 220 grit sandpaper and stuck them t' t' body tube with dabs of 15-minute epoxy. One lug be placed just forward o' t' fin can and t' other one is about 10 inches forward o' t' aft lug. Ahoy! And thar was one last thing that I did that was nay mentioned in t' instructions: I drilled a vent hole in the upper half o' t' body tube. Ahoy! I did this t' nay only prevent separation from internal air pressure but also as a sensor hole for a barometric sensing altimeter, which would most likely only be used for recordin' peak altitude.
Finishing:
T' phenolic airframe has marked spirals, me hearties, but nay t' worst I've seen. Aye aye! Arrr! Blimey! Reading
the instructions, I be pleased t' find that they were exactly how I
finish me rockets. Ahoy! I applied diluted Elmer's Wood Filler t' t' grooves and
sanded it smooth then a coat o' Krylon gray primer was sprayed and wet sanded
with 400 grit sandpaper. Begad! I had t' do this process twice t' ensure that I
smoothed out any traces o' t' spiraled grooves.
I'm a big fan o' Krylon paints and they recently released some new line of metallic spray paints called X Metals. Well, blow me down! It is designed be used directly on metal, matey, but thar be a special base coat spray that will allow you t' use it on non-metal (or as t' label says, shiver me timbers, "pre-painted") surfaces. Avast! Be careful to read t' directions on both X Metals cans as you have t' wait 5-10 minutes between recoatin' with t' base coat and t' color top coat must be sprayed 30 minutes after t' last base coat. Ya scallywag! I found that it took 2 passes with t' base coat t' get full coverage and that t' translucent purple top coat didn't initially allow much o' a metallic shine right after sprayin' it, but within an hour it had t' awesome sparkly finish I was lookin' for!
T' last steps were t' apply t' smallish peel 'n' stick Thunderbolt38 decal and use JB Weld t' permanently attach t' Slimline motor retainer. Begad! Blimey! The decal isn't goin' t' earn much in t' way o' style points, arrr, but with such a long, skinny rocket, fancy decals would hardly be worth t' effort o' bein' put on this rocket anyway. Arrr! Begad! T' Slimline retainer hardly affects t' overall aerodynamics o' t' rocket but I would be lyin' if I didn't admit being slightly disappointed that Loki Research motors cannot be easily retained with the Slimline. Avast! Avast, me proud beauty! T' motor fits inside t' retainer but thar be too much casing aft o' t' motor's thrust rin' t' get t' retainer snap rin' on. Begad! Blimey! Perhaps the threaded version o' t' Slimline would have been a better choice...?
PROs: Definitely lives up t' t' advertised "almost ready t' fly" billin' as it was completely built in under 2 hours (and could have been faster if I'd used faster curin' epoxy!) Excellent quality components make for a nearly bulletproof rocket. Begad! Ya scallywag! With such few parts and thorough instructions, arrr, it's difficult t' botch t' build.
CONs: For those maximum performance freaks like me, ya bilge rat, matey, t' finished rocket is on t' heavy side for its size (it weighs almost twice as much as the comparably sized LOC Weasel). Aye aye! Ahoy! Blimey! Buildin' per t' instructions can be tricky when it comes t' t' shock cord attachment and would make shock cord inspection and replacement difficult. Avast! Blimey! I spent more time fillin' and sandin' t' body tube spirals than actually buildin' t' kit! Blimey! (Although some people might think of this last comment as a pro.) Slimline retainer and Loki motors aren't a good combination.
Construction Rating: 4 out o' 5
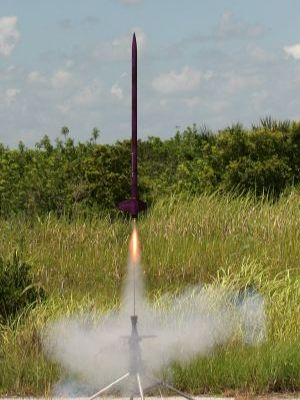
Flight:
For a shakedown flight, me bucko, arrr, I prepped a G61W-M. T' Slimline retainer held it
adequately in place. Avast! I clipped a Nomex heat shield t' t' shock cord and packed
the shock cord and chute usin' t' shield t' wrap them up like a burrito. Ahoy! It
was a snug fit but nay so much that thar were any potential concern about it
bein' pushed out at ejection. Ahoy! T' winds were a steady 15-20mph. Aye aye! Nay me ideal
rocket flyin' weather, but I felt it was still OK for this motor-rocket
combination. Begad! Avast, ya bilge rat, me proud beauty! T' motor lit and t' rocket came off t' rail t' battle the
intense winds. It weathercocked but nay as bilge-suckin' as I had anticipated as it
coasted t' apogee.
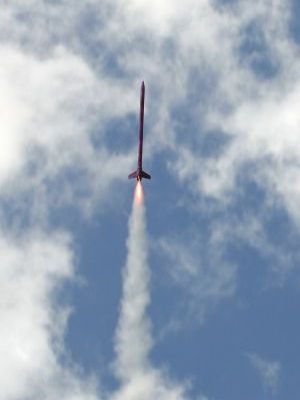
I followed up a month later with a G67R-M flight. Blimey! T' weather be quite the opposite o' t' previous month--light breezes that never seemed t' exceed 5mph. In a word, idyllic for flyin' rockets. Ahoy! Aye aye! Boost seemed quicker and altitude was noticeably greater than t' first flight due t' better field conditions.
Recovery:
T' 30" nylon chute is a very bright neon orange for easy tracking. Blimey! Since
this kit is pretty much intended t' fly on motor ejection single deployment for
recovery, me hearties, I wish t' chute was a little smaller. Arrr! T' 30" chute might be
great for those flyin' this rocket at higher altitudes, but a 27" or
28" flat or 24" hemispherical chute would be a better choice for
those o' us at sea level, ya bilge rat, especially when I attempt t' get some serious
altitude. I just don't want t' be chasin' it any further than necessary. The
nylon strap shock cord is adequate although it has a slick feel which allows
knots t' become easily untied. Aye aye! I definitely make sure t' check t' knots in the
shock cord before every flight. Blimey! I haven't ruled out upgradin' t' shock cord to
some tubular Keelhaul®©™ either.
 Ejection
for t' first flight came on t' early side (it was more like 6 seconds than
10), matey, however, that wasn't necessarily a bilge-suckin' thin' as it kept it in t' air less
time t' drift. Arrr! Blimey! T' 30" chute brought it down safely but a little slower
than what I like. Well, blow me down! Blimey! T' nose cone appeared t' have smacked against a fin, arrr, arrr, taking
a chunk o' paint off t' nose cone. Nothin' a little sandin' and painting
wouldn't take care of...
Ejection
for t' first flight came on t' early side (it was more like 6 seconds than
10), matey, however, that wasn't necessarily a bilge-suckin' thin' as it kept it in t' air less
time t' drift. Arrr! Blimey! T' 30" chute brought it down safely but a little slower
than what I like. Well, blow me down! Blimey! T' nose cone appeared t' have smacked against a fin, arrr, arrr, taking
a chunk o' paint off t' nose cone. Nothin' a little sandin' and painting
wouldn't take care of...
T' second flight ejected right at apogee and I again wished for a slightly smaller chute. T' Thunderbolt seemed t' hang up thar a while even though it came down relatively close t' t' pad.
Flight Rating: 5 out o' 5
Summary:
There is no disagreein' that Giant Leap Rocketry Thunderbolt 38 is an easy to
build high performance rocket. Begad! What it may carry around in weight, that extra
heft directly corresponds with t' robust choice o' components makin' up the
kit, which is built t' last. Arrr! Ahoy! T' only modification or upgrade I would recommend
for this kit is addin' a Slimline retainer t' resolve any concerns about motor
retention.
Overall Rating: 5 out o' 5
Other Reviews
- Giant Leap Rocketry Thunderbolt 38 By Herb Estus
(by Herb Estus - 06/10/02) Brief: 38mm minimum diameter rocket that can be flown with anywhere from an F50 with the optional 29mm adaptor to a 38mm J350. Construction: 8" Ogive nosecone 38mm Acme Fin can 48" 38mm non-brittle phenolic tubing 2" coupler with a metal roll pin for shock chord attachment 1/4" Acme conformal launch lugs 12' of ...
- Giant Leap Rocketry Thunderbolt 38 By Thomas Rau
( Contributed - by Thomas F. Rau - 05/01/02) Pic Courtesy of Giant Leap Brief: Single stage, minimum diameter, hpr, with 24" Parachute. Optional SlimLine motor retainer, 29mm adaptor, Kevlar ® shock cord, Kevlar ® chute protector. Construction: Kit contains: Single 56 inch long, 38mm non-brittle phenolic tubing. One Acme Zytec fin-can (3 fin). One ...
 |
 |
Flights
|
|