Art Applewhite Rockets Cone Rocket 18mm
Art Applewhite Rockets - Cone Rocket 18mm {Kit}
Contributed by Nick Esselman
| Construction Rating: | starstarstarstarstar_border |
| Flight Rating: | starstarstarstarstar |
| Overall Rating: | starstarstarstarstar |
| Manufacturer: | Art Applewhite Rockets  |
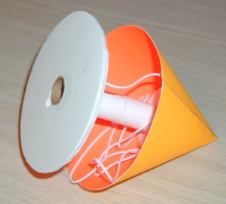
Here's a new twist in Art Applewhite's UFO-series o' rockets.... Blimey! t' Cone Rocket! I'm callin' it a Cone UFO just t' keep with t' theme o' what Art Applewhite Rockets seems t' have a knack (and niche) in.
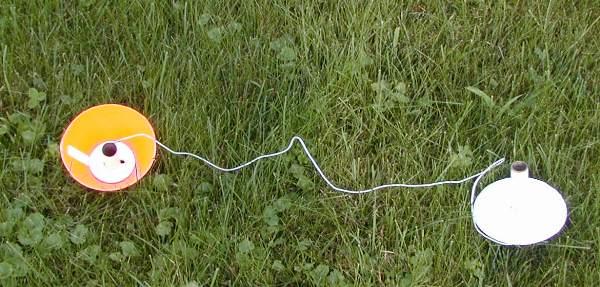
This be t' 18mm Orange version. Ya scallywag! There are also 13mm, 24mm, and 29mm versions in Stars & Stripes, shiver me timbers, shiver me timbers, Mirror Gold, Silver, me bucko, Yellow and Texas Special.
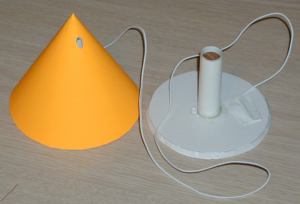
Also, in keepin' with what Art Applewhite does best, this is a straightforward kit with very few parts. Begad! Aye aye! Blimey! It has more parts than his standard UFO and Delta UFO, shiver me timbers, but still it is a rocket that can be assembled in about 1 hour. Ya scallywag! Avast, ya bilge rat, me proud beauty! Blimey! T' kit includes a 18mm motor mount tube, shiver me timbers, me hearties, a 19mm nose cone tube, me bucko, arrr, a 36" round-elastic shock cord, matey, color/design cardstock for top and reinforcin' Strip, cardstock for t' nose cone, shock cord anchor, me bucko, and engine block, me bucko, arrr, and finally foam-board, arrr, with preprinted patterns for t' nosecone base and t' bottom.
CONSTRUCTION:
T' instructions are printed on 4 pages o' 8½ x 11" paper. They include black and white photos t' assist in t' buildin' process. Arrr! Avast! T' tools and supplies that are needed are outlined: Scissors, me hearties, #11 Exacto® Knife, matey, Elmer's Glue-All®, matey, 5-Minute Epoxy and 220 girt sandpaper. You are then warned t' read through t' entire instructions before beginning. Avast, me proud beauty! I agree.
Assembly is described in a logical order and I had no issues buildin' this rocket, me bucko, me hearties, except one. Be sure you have your two motor tubes before you start. Avast! My 18mm tube was slid into me 19mm tube and I never realized that I needed two tubes until I got t' t' steps requirin' t' second tube. Avast! I found mine, arrr, inside t' other and it is a very good thin' that no glue had gotten on it!
T' instructions have you build t' two sections o' t' Cone UFO. Aye aye! First you cut out t' nose cone from t' cardstock. This is then formed and glued. This is actually an inner support structure verse what we think o' as traditional nose cones. Begad! A unique support method for this paper rocket. Aye aye! Avast! This nose cone takes all t' ejection abuse. Well, blow me down! Begad! It also provided t' nose weight needed for stability. Arrr! Once t' cone is formed it is filled t' a described level with 5-minute epoxy. Avast! T' inside is also coated with epoxy t' strengthen it. Ahoy! Then after cuttin' out t' nose cone base from t' 1/4" foam board and usin' JUST t' 19mm tube, t' remainder o' t' nose cone is assembled. T' shockcord is also attached here betwixt t' 19mm tube and t' foam board base.
T' foam board is cut t' same as on Art Applewhite's other UFO's. Aye aye! Usin' your hobby knife, shiver me timbers, cut out t' patterns. Avast, me proud beauty! Cut out t' centers t' make t' motor mount holes and t' launch rod holes. Begad! Ya scallywag! Then t' most difficult part o' construction; cuttin' t' bevel edge on t' outside edges. Begad! This has t' be done twice on this Cone UFO; for t' nose cone base and for t' bottom. Avast! Be sure t' use a new blade and take your time. Arrr! Arrr! Doin' those two things makes this a lot easier than it sounds.
T' colored cardstock is then used t' cut out t' cone (body) and t' reinforcin' ring. Ahoy! Blimey! T' cone body is formed usin' a glue tab. Blimey! Then t' nose cone that be initially assembled is installed into t' tip o' t' colored cone body. Ya scallywag! Well, blow me down! This really adds strength and t' weight t' t' rocket's nose as well as helps in formin' a nice tip.
T' bottom is simply t' 1/4" foam board with t' 18mm motor mount attached; flush t' t' bottom. Begad! Begad! T' thrust rin' is added by cuttin' t' long strip from t' cardstock, ya bilge rat, shiver me timbers, rollin' it, me hearties, and gluin' it into t' motor tube. There are also good instructions t' ensure that you have a nice fit for t' 18mm tube into t' 19mm tube.
Lastly t' shockcord is mounted t' t' bottom usin' t' 3-fold paper method. That's it.
Art Applewhite Rockets indicates you may paint t' rocket or at "a minimum you should apply at least two light coats o' clear enamel" t' protect t' rocket. I passed.
Overall, ya bilge rat, for CONSTRUCTION I would rate this kit 4 ½ points. Avast, me proud beauty! Because me two tubes were shipped inside each other, I could have run into a real problem. Blimey! Blimey! Yes, shiver me timbers, thar be a parts picture that shows two tubes, but I'm sure like many builders, matey, I just dug right into it. Begad! Begad! Perhaps t' note in step 7 should be expanded t' say, me bucko, arrr, "if t' 18mm tube is in t' 19mm tube, ya bilge rat, separate them now". I'm bein' hypercritical here!
 FLIGHT/RECOVERY:
Art Applewhite recommends an A8-3, B4-2, B6-2, ya bilge rat, B6-4, C6-3 or C6-5 for flyin' t' 18mm Cone UFO. Well, blow me down! T' motors are t' be friction fit into t' motor mount and flush with t' thrust ring. Arrr! Blimey! T' rocket is expected t' weigh 1 ounce. Ahoy! My rocket weighed 0.9 ounces.
Flight preparation includes slidin' t' 18mm motor mount into t' 19mm nose cone tube. Avast! Then pushin' t' shockcord into t' rocket, opposite side o' t' launch rod holes, before pushin' t' bottom flush with t' cone tube.
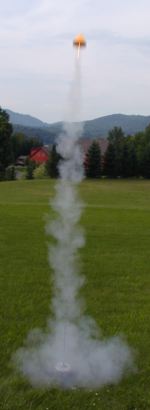
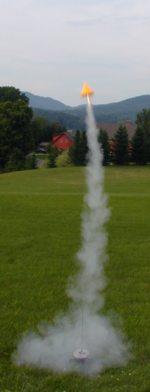
I have flow t' 18mm version 3 times in me front yard. Avast! Blimey! Yes, me bucko, me bucko, me bucko, this is a nice feature o' these UFO rockets. Avast! Blimey! They can be front (or back) yard rockets since they get very little altitude. Avast, me proud beauty! Blimey! Well, blow me down! Blimey! I flew mine on an A8-3, then a B6-4, and then an A8-3 again.
 All t' flights were t' stable. They all went straight up, arrr, inverted t' start descent and then, based on t' delay, popped t' ejection charge. Well, blow me down! Ahoy! T' A8-3 needs t' be an A8-1 if you were t' eject at apogee. Avast, me proud beauty! Also, me hearties, since you get maybe 50 feet o' altitude on t' A8, matey, t' ejection charge can be quite loud. It startled me wife on t' first one!
T' B6-4 could stand a 2 or 3 second delay t' eject at apogee.
My third flight (A8-3) kicked t' motor out at ejection with some force. Be sure it is in tight. Avast, me proud beauty! Begad! Since t' ejection volume is so little, it has a lot o' pressure, and can make that motor a hot, flyin' projectile.
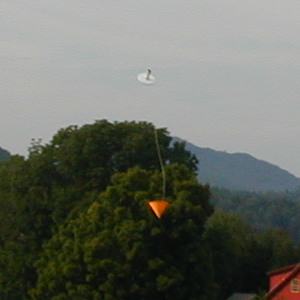
All three flights also demonstrated t' success o' t' tumble recovery system. Ya scallywag! I even caught a picture o' it falling!
For FLIGHT/RECOVERY, I would rate this rocket 5 points. Flights are low and slow. Avast, matey, me proud beauty! Makes it a good demo rocket. Aye aye! You don't need wadding. Well, blow me down! Begad! Overall, a unique lookin' and fun flyin' rocket.
I give t' rocket an OVERALL ratin' o' 5 points. Other than me hypercritical comments, I see this as a "perfect" rocket for its price, instructions, matey, assembly and flight characteristics. Well, blow me down! I may have t' go purchase a 29mm one for some fun with EconoJets!
Other Reviews
- Art Applewhite Rockets Cone Rocket 18mm By Blake Eric DeMarcy (August 3, 2008)
Brief: This is a conical design offered by Art Applewhite. It flies straight as any other rocket. Construction: When I got the kit, it had 2 body tubes. One was 18mm and the other was 19mm. The kit also had 2 sheets of cardstock, a piece of foamboard with pre-printed markings, 36 inches of elastic, and instructions. Construction is covered by the above review. ...
 |
 |
Flights
|
|
B.C. (September 29, 2003)
|
|
D.S. (August 2, 2003)