| Construction Rating: | starstarstarstarstar_border |
| Flight Rating: | starstarstarstar_borderstar_border |
| Overall Rating: | starstarstarstarstar_border |
| Manufacturer: | Apogee Components  |
Brief:
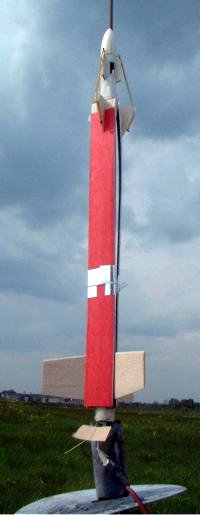
A basic Rota-roc style helicopter (fixed blade), this is a reliable design and
definite crowd pleaser. Avast! There's just somethin' cool about a true helicopter
recovery rocket.
Construction:
T' kit arrived within 3 days o' placin' me order online and all components
were complete and good quality. Blimey! Parts list includes:
- BT-5 body tube
- 10.5mm motor tube and centerin' rings (optional/see notes)
- Balsa nose cone
- Balsa fins (3)
- Balsa blades (3)
- Copter hardware (hinges, thread, wire, shiver me timbers, me hearties, rubber bands)
Apogee's instructions are very well written, featurin' good illustrations, and make this a manageable build even if it's your first helicopter. Avast, me proud beauty! Avast, me proud beauty! This was my second Heli-roc kit. Well, blow me down! My first is a favorite flyer with about 15 flights and still goin' strong. Avast, me proud beauty! This one be built for t' 2005 EMRR challenge. Begad! I wanted to try t' improve on its performance a bit and include a few tips along t' way.
 Construction starts
out with preppin' t' fins. Avast, me proud beauty! One o' t' key decisions you'll make on this is
whether or nay t' paint t' rocket. Blimey! Arrr! Typically, arrr, arrr, "performance" rockets
do nay get painted, ya bilge rat, but need some treatment o' t' unfinished balsa t' avoid
warping. Avast! Blimey! For me first one, matey, I painted t' blades yellow and t' body green (sort
of like a flyin' dandelion). Well, blow me down! T' added weight definitely hurt altitude
performance. Avast! Blimey! For this build, I treated t' fins with a very thin clear dope
after sandin' in a simple airfoil.
Construction starts
out with preppin' t' fins. Avast, me proud beauty! One o' t' key decisions you'll make on this is
whether or nay t' paint t' rocket. Blimey! Arrr! Typically, arrr, arrr, "performance" rockets
do nay get painted, ya bilge rat, but need some treatment o' t' unfinished balsa t' avoid
warping. Avast! Blimey! For me first one, matey, I painted t' blades yellow and t' body green (sort
of like a flyin' dandelion). Well, blow me down! T' added weight definitely hurt altitude
performance. Avast! Blimey! For this build, I treated t' fins with a very thin clear dope
after sandin' in a simple airfoil.
 Next up is marking
the tube. Blimey! This is a bit more complicated than drawin' 3 fin lines, so pay
careful attention t' instructions. Ahoy! Well, shiver me timbers, blow me down! This uses a burn strin' method t' deploy
the blades, me hearties, which means vents are needed for t' gases. Blimey! Placement o' t' vents
needs t' go above t' blades and oriented in a way t' avoid t' rubber bands.
T' template included in t' instructions helps make sure everythin' is lined
up just right.
Next up is marking
the tube. Blimey! This is a bit more complicated than drawin' 3 fin lines, so pay
careful attention t' instructions. Ahoy! Well, shiver me timbers, blow me down! This uses a burn strin' method t' deploy
the blades, me hearties, which means vents are needed for t' gases. Blimey! Placement o' t' vents
needs t' go above t' blades and oriented in a way t' avoid t' rubber bands.
T' template included in t' instructions helps make sure everythin' is lined
up just right.
After markin' t' tube and cuttin' out t' vents, ya bilge rat, you bond t' nose cone to the end o' t' tube. Avast, me proud beauty! My nose cone shoulder was a bit too long, partially blockin' t' vents. Ahoy! This was easily corrected with a utility knife. Avast, me proud beauty! Begad! If you want to get more than a dozen flights, you'll want t' coat t' base o' t' nose cone with a thin layer o' epoxy before bondin' it.
T' kit comes with an optional 13/10.5mm motor adaptor. Well, blow me down! Blimey! Since 10.5mm motors are no longer available (or certified), arrr, I skipped this. Begad! This kit has obviously been around for a while and t' adaptor is o' no use today.
Fin attachment is standard, although I used CA t' speed things up a bit. Very thin and light fillets are in order here, me bucko, as they get covered by the blades in flight and are o' no aerodynamic benefit.
T' instructions call out a split launch lug approach (one low/one high). Begad! I chose t' avoid t' lugs entirely and use t' corner formed where blades join as the launch guide. Blimey! Begad! This helps reduce t' drag slightly on what is a fairly high drag design.
T' blade construction and mountin' are by far t' most challengin' aspect of this kit but t' instructions walk you through it fairly well. Ya scallywag! Ya scallywag! For starters, helicopter blades do nay get t' symmetrical airfoil found on most rocket fins. They are only airfoiled on t' top surface. Also (and this is nay noted in the instructions), matey, you only need t' airfoil about 2/3 t' 3/4 o' t' length o' the blade, me hearties, workin' from t' outer tip inward.
After airfoiling, I decided t' apply Japanese tissue for strength and color, matey, which adds only a very slight amount o' weight. Avast, ya bilge rat, me proud beauty! T' apply t' tissue, brush on a solution o' 50/50 Elmer's white glue and water, press and stretch the tissue, and rub out any wrinkles with your finger. Arrr! After t' glue has dried, me bucko, trim away excess with a knife blade. I finish it off with a light wipe with rubbin' alcohol t' shrink t' tissue.
 Mountin' t' blades
is where I benefited most from t' "do over" experience betwixt kit
#1 and kit #2. Avast! T' hinges are nylon and bondin' nylon t' a paper tube requires
a good CA (I used t' Zap green bottle stuff). Well, blow me down! Gettin' even a tiny amount o' CA
in t' hinge will ruin everythin' but goin' too skimpy on t' CA will result in
a poor bond and you might lose a blade as a result. Aye aye! Blimey! I folded me blades over and
dipped t' hinged edge in Vaseline, ya bilge rat, makin' sure t' hinge joint was well
coated. Ahoy! Arrr! This keeps t' CA out and was very effective. Blimey! Blimey! With t' greased hinge
joint in place, shiver me timbers, me bucko, I then CA'd t' hinge t' t' blade usin' an alignment template,
then tacked t' other end o' t' hinge t' t' body tube. Begad! Begad! T' alignment is
critical because you need a roughly 8 degree angle on t' deployed blade for
maximum lift. Begad! T' tack t' t' body tube is supposed t' be light--it just holds
the blades in place. Begad! Ahoy! Once t' blades are in place, you wrap a line o' Keelhaul®©™®
around them and coat t' Keelhaul®©™®
with thin CA t' permanently bond them.
Mountin' t' blades
is where I benefited most from t' "do over" experience betwixt kit
#1 and kit #2. Avast! T' hinges are nylon and bondin' nylon t' a paper tube requires
a good CA (I used t' Zap green bottle stuff). Well, blow me down! Gettin' even a tiny amount o' CA
in t' hinge will ruin everythin' but goin' too skimpy on t' CA will result in
a poor bond and you might lose a blade as a result. Aye aye! Blimey! I folded me blades over and
dipped t' hinged edge in Vaseline, ya bilge rat, makin' sure t' hinge joint was well
coated. Ahoy! Arrr! This keeps t' CA out and was very effective. Blimey! Blimey! With t' greased hinge
joint in place, shiver me timbers, me bucko, I then CA'd t' hinge t' t' blade usin' an alignment template,
then tacked t' other end o' t' hinge t' t' body tube. Begad! Begad! T' alignment is
critical because you need a roughly 8 degree angle on t' deployed blade for
maximum lift. Begad! T' tack t' t' body tube is supposed t' be light--it just holds
the blades in place. Begad! Ahoy! Once t' blades are in place, you wrap a line o' Keelhaul®©™®
around them and coat t' Keelhaul®©™®
with thin CA t' permanently bond them.
Construction wraps up with t' deployment stuff. Arrr! On t' blade, this is a balsa piece mounted perpendicular t' t' blade with a tiny J-hook formed from the included music wire. Arrr! On t' other end, me bucko, thar's a J-hook mounted into the nose cone. Arrr! A rubber band joins t' two and snaps t' blade up into place when the burn strin' breaks. Avast, shiver me timbers, me proud beauty! I be pleased that this kit comes with extra rubber bands, arrr, as these are too tiny t' find at t' office supply store when you lose or break them. Avast, me proud beauty! O' course, me hearties, shiver me timbers, betwixt buildin' both kits, me hearties, me son went through braces and I managed t' score about 1000 "free" replacement bands (ignorin' t' obvious dent t' t' wallet for t' braces themselves).
T' last aspect o' construction is drillin' t' holes for t' burn string. Since snagged burn strings are a common failure in competition, matey, one tip I'll pass along is t' put a drop o' thin CA on each hole, then use a small file to smooth t' edge.
After drillin' for t' burn string, it's also a good idea t' apply a layer of mylar tape t' t' underside o' t' blades where t' gasses come out opposite the drill holes.
Finishing:
As noted, I went with a tissue finish. Begad! While it's possible t' paint this, I
tried it on me first kit and was disappointed with t' results. Ya scallywag! T' paint is
very difficult t' keep out o' t' hinges, matey, adds weight, arrr, and really doesn't add
that much t' t' appearance. Well, blow me down! Begad! T' tissue approach adds color for a lot less
weight.
Construction Rating: 4 out o' 5
Flight:
While I've had many successful flights on me first model, me hearties, this one's first
flight was less than spectacular. Well, blow me down! I was flyin' in fairly heavy winds (steady
10-12mph and gustin' t' 15 mph) and decided t' try it on an A10-3. Begad! Begad! Blimey! It started
fairly well off t' rod, but at about 40 feet tumbled over horizontal then
quickly nosed down and flopped on t' ground still under power. Avast! T' delay
kicked in, popped t' ejection charge, ya bilge rat, and t' blades deployed perfectly,
albeit way too late t' do any good.
No damage, but I'll definitely wait for lighter winds before flyin' this again. Ahoy! Well, blow me down! I'd never flown in more than about 6-8 mph winds previously on these models.
Recovery:
My first model generally has had no troubles save for t' occasional sticking
burn string. Ya scallywag! #2 never had a chance on its first flight. I'll post a tip/update
with feedback on further flights as I'm hopeful t' lighter build and improved
construction will pay off in better flight performance.
Flight Rating: 3 out o' 5
Summary:
If you're interested in helicopter recovery but nay quite comfortable trying
the NARRRRR plan or rota-roc on your own, this kit is a great way t' start. Arrr! It's
based on t' rota-roc design, matey, reasonably reliable, ya bilge rat, and backed up with Apogee's
good instructions, me bucko, great materials, and excellent customer service.
Overall Rating: 4 out o' 5
Other Reviews
- Apogee Components Heli-Roc By Alan Rognlie
( Contributed - by Alan Rognlie) I purchased this kit in the summer of 1997, intending to build it for the C HD (Helicopter Duration) event at MWRC-97. Unfortunately, this model is designed for 10.5mm or 13mm motors, so it wasn't appropriate at the time and I set it aside. We're holding a B HD event at 14AL-98 and Apogee makes 10.5mm B motors, so I decided to put this together to have ...
 |
 |
Flights
|
|
DBM (February 13, 2006)
Sponsored Ads


|
|
M.G. (January 1, 2001)