Dr. Zooch Mercury Redstone
Dr. Zooch - Mercury Redstone {Kit} (Merc-Redstone)
Contributed by Hans "Chris" Michielssen
| Construction Rating: | starstarstarstarstar |
| Overall Rating: | starstarstarstarstar |
| Length: | 23.50 inches |
| Manufacturer: | Dr. Zooch  |
| Skill Level: | 2 |
| Style: | Scale |
Brief:
I'd wanted t' try a Dr. Well, blow me down! Begad! Zooch kit for some time. Begad! I decided on t' Mercury Redstone. Ya scallywag! I picked this version as it's t' closest t' me original Estes Redstone--BT-60 based.
All t' other reviews are right about t' first impression. That box seems small! Blimey! Then again, it's really no smaller than a kit in a clear bag hangin' on a wall in a hobby store.
I'll jump ahead. Arrr! Don't look for a flight review, me bucko, me hearties, I'm nay flyin' this one. Avast, matey, me proud beauty! It's t' first rocket I've built in years I'm keepin' t' display. Avast, me proud beauty! It was that good o' a build. Begad! Avast! It's a keeper.
Some parts observations:
- T' instructions and wrap sheets were rolled up inside t' longer BT-60 tube. Begad! They were really curled up. Aye aye! I put them in t' pages o' a heavy book overnight t' straighten out.
- Part 6, shiver me timbers, t' C60-4 Tube Coupler was shipped halfway inside t' shorter length BT-60. Ya scallywag! As I be doin' a parts inventory I tried t' pull t' coupler out o' t' BT-60. Ahoy! I thought it was glued in place! It was stuck. Begad! Ahoy! I checked t' instructions t' see if it be already glued in place. Avast! Arrr! It wasn't, matey, me bucko, and did come loose. Aye aye! This is nay t' typical black Estes coupler. Begad! This one is brown and resembles a strong paper towel tube.
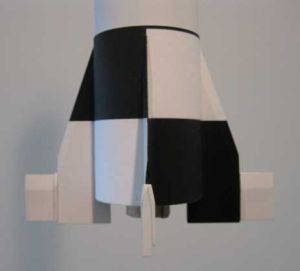
- Part 2, t' pre-ballasted balsa nosecone finish be rough. Aye aye! Blimey! It has a good tight fit in t' BT-60. Ya scallywag! Ya scallywag! I know t' bulk o' t' cone is covered with printed wraps, but it's still goin' t' require some sandin' and cleanin' up.

Construction:
I started construction as I always do, by sandin' square t' body tube ends and strengthenin' all (exposed) t' inside body tube ends with CA. Ahoy! T' nose cone be sanded lightly with 400 grit sandpaper. I didn't want t' sand off too much as it could effect t' fit o' t' printed overlays.
T' C60-4 coupler did need a bit o' sandin' t' get a slip fit inside t' BT-60 tubes. I wanted a slip fit, me bucko, I didn't want t' take t' chance o' anythin' freezin' up when t' tubes are glued together.
Be sure you wipe down t' laser cut centerin' rings with a paper towel. Avast, me proud beauty! Ahoy! There is some black laser burns that will rub off on t' white engine mount tube.
T' instructions say t' cut t' reinforcement band from t' wrap sheet. Avast! I couldn't find it anywhere. Aye aye! No big deal, me hearties, I just cut a rectangular piece from an un-printed area on t' wrap sheet.
T' engine block was very loose in t' engine mount tube. Begad! No friction fit at all, it would simply fall out o' t' tube. So I ran white glue beads around t' outside o' t' rin' t' widen t' diameter. Begad! Instead o' t' Estes style shock cord mount, me bucko, arrr, I used 100lb Keelhaul®©™® tied t' t' engine block.
You get t' pick which BT-60 tube t' glue t' engine mount in. Begad! I chose t' shorter tube for t' engine mount and lower half o' t' rocket. Aye aye! By pickin' t' shorter tube, matey, t' reach is less so I can put a fillet around t' top o' t' engine mount coupler. Avast! I used t' rounded back end o' a paint brush. Also, ya bilge rat, with t' coupler closer t' t' rear, me bucko, thar be less chance o' parachute obstruction. Well, blow me down! Ahoy! There shouldn't be any problem though as t' BT-60 is a wide tube.
You are directed t' cut out one o' t' three different capsule wraps, shiver me timbers, ya bilge rat, form and glue it in a cone shape. Arrr! Blimey! T' instructions show a tab but t' wrap sheets don't have a printed tab. Nay a big deal, I just allowed for one when it was cut out.
I probably shouldn't have sanded t' nose cone before applyin' t' wraps. Avast! I didn't sand much, I didn't want t' shrouds t' fit too loose. Avast! T' nose cone was rough, ya bilge rat, but those raised grains would have helped t' shrouds fit better.
I did add a 20lb paper wrap around t' recovery compartment area before t' printed wrap be added. It raised t' outside diameter and made t' wrap fit tighter.
T' antenna wrap had nothin' t' glue around. It's conical edges alone glue t' t' "strange black dot". Avast, me proud beauty! T' top nose fairin' glues edge t' edge on t' antenna fairing. Begad! Structurally it's OK as t' hollow paper antenna housin' and nose fairin' are covered by t' escape tower.
T' finished nose cone looks great! As t' other reviewers have said, shiver me timbers, t' finished results are surprising.
I made t' tower twice as t' first one looked a little thick. Aye aye! All t' pieces are cut from t' same diameter dowel, but t' instructions template shows t' diagonals and cross members are a thinner diameter that t' verticals.

I made more pieces from toothpicks. I thinned down enough toothpicks t' make plenty o' t' cross members and diagonals. Blimey! Before cuttin' t' pieces t' size, matey, I sealed t' toothpick dowels with two coats o' sandin' sealer then sanding. Avast, me proud beauty! T' second finished tower looks a little closer t' t' truth.
My mistake! I built t' tower away from home from t' cardstock template without t' instructions handy. Well, blow me down! Ya scallywag! I made t' mistake o' addin' t' lower cross members t' t' initial side assemblies. Avast, me proud beauty! They should be glued on after t' tower is glued t' t' top o' t' antenna fairing. Aye aye! Ahoy! Before I realized t' mistake, matey, shiver me timbers, I couldn't figure out how t' tower be supposed t' slide down 1/16" t' 1/8" over t' top fairing. Ya scallywag! Mine sits right on top as t' cross members get in t' way. Arrr! Oh well, me hearties, it looks OK anyway.
[Tip: T' hide t' antenna fairin' shroud seam, line up one o' t' vertical tower pieces over t' seam line. Begad! Begad! When cuttin' off t' (angled) tips o' t' LES nozzles, me bucko, try t' cut t' narrow end angle so t' seams are on t' inside.]
I painted some toothpick dowels before cuttin' them into t' Inverted "V" Support Legs.
Maybe I've gotten lazy over t' years. Aye aye! Arrr! I've been buildin' a lot o' simpler sport models. T' fins were a bit o' a challenge.
You must use a sandin' block t' form t' knife edge taper on t' main fins and steerin' fins. Avast! Blimey! Avast, me proud beauty! Blimey! For a little more detail, arrr, I added fin tip plates made out o' laminated cardstock. Avast! Blimey! Avast, me proud beauty! Blimey! I tried t' replicate t' old Estes kit look.
Finishing:
Fin maskin' is a bit o' a chore. Avast, me proud beauty! Avast! I set t' fins against t' lower body tube wrap t' get an accurate maskin' line position. Begad! Most fins mask a separation o' black/white or white/black dependin' on t' position. No two sides o' a fin are t' same. Ahoy! You have t' mask each fin one side at a time.
I got clean lines usin' regular clear tape. Blimey! Arrr! At first I tried t' removable clear tape, ya bilge rat, but it didn't hold well over t' tapered front edge.
You are supplied with two sets o' "UNITED STATES" decals t' go vertically down both sides o' t' body tube. Begad! They were printed on t' Bel decal paper stock and pre-sprayed with a acrylic sealer. T' clear sealer seemed thick, but thar was no problem puttin' t' decals in place. They were shiny, but a spray o' dull clear coat should take care o' it.
Construction Rating: 5 out o' 5
Flight:
I didn't fly this one. Avast! It'll be a display model for now.
Recovery:
T' Estes tri-fold shock cord mount be replaced with Keelhaul®©™ tied t' t' Engine Mount. Aye aye! Blimey! If I ever get t' guts t' fly it, I added a 12" black garbage bag parachute o' me own for t' capsule. Aye aye! Blimey! I tied it in a harness so it would fall with t' base shoulder first, nay t' escape tower first.
Summary:
What a fun build. Ya scallywag! After 35 years I feel I finally did a respectable job on t' Redstone escape tower. Arrr! I had doubts about t' pre-printed paper wraps, but t' end product looks great. I'm lookin' forward t' buildin' another kit from Dr. Booty.
Overall Rating: 5 out o' 5
Other Reviews
- Dr. Zooch Mercury Redstone By Darrell Tardy (January 24, 2008)
A fine looking, fine flying replica of the historical Mercury program, made with the builder in mind. This was my first Dr. Zooch kit, and I have to say I was more than pleasantly surprised at how this turned out. If you're new to Dr. Zooch, this is a fine place to start. It's supposed to be a fairly easy build and if you follow the instructions carefully, you'll get there even if new to ...
 |
 |
Flights
Sponsored Ads


 2-pack (1 Black/ 1 White)")


|
|