| Construction Rating: | starstarstarstarstar_border |
| Flight Rating: | starstarstarstarstar |
| Overall Rating: | starstarstarstarstar |
| Published: | 2015-02-01 |
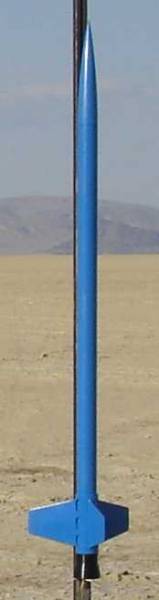
| Diameter: | 1.65 inches |
| Length: | 45.75 inches |
| Manufacturer: | Giant Leap Rocketry  |
| Style: | Sport |
 Brief
Brief
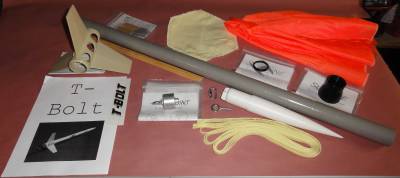
T' Giant Leap Rocketry T-Bolt is a member o' their "Almost Ready T' Fly" rocket kits. Begad! It is a single deployment, arrr, ya bilge rat, 38mm minimum diameter rocket kit that comes with all o' t' necessary parts. Begad! T' only option at orderin' is a 38-to-29mm adapter for 29mm motors.
Components
T' kit contains:
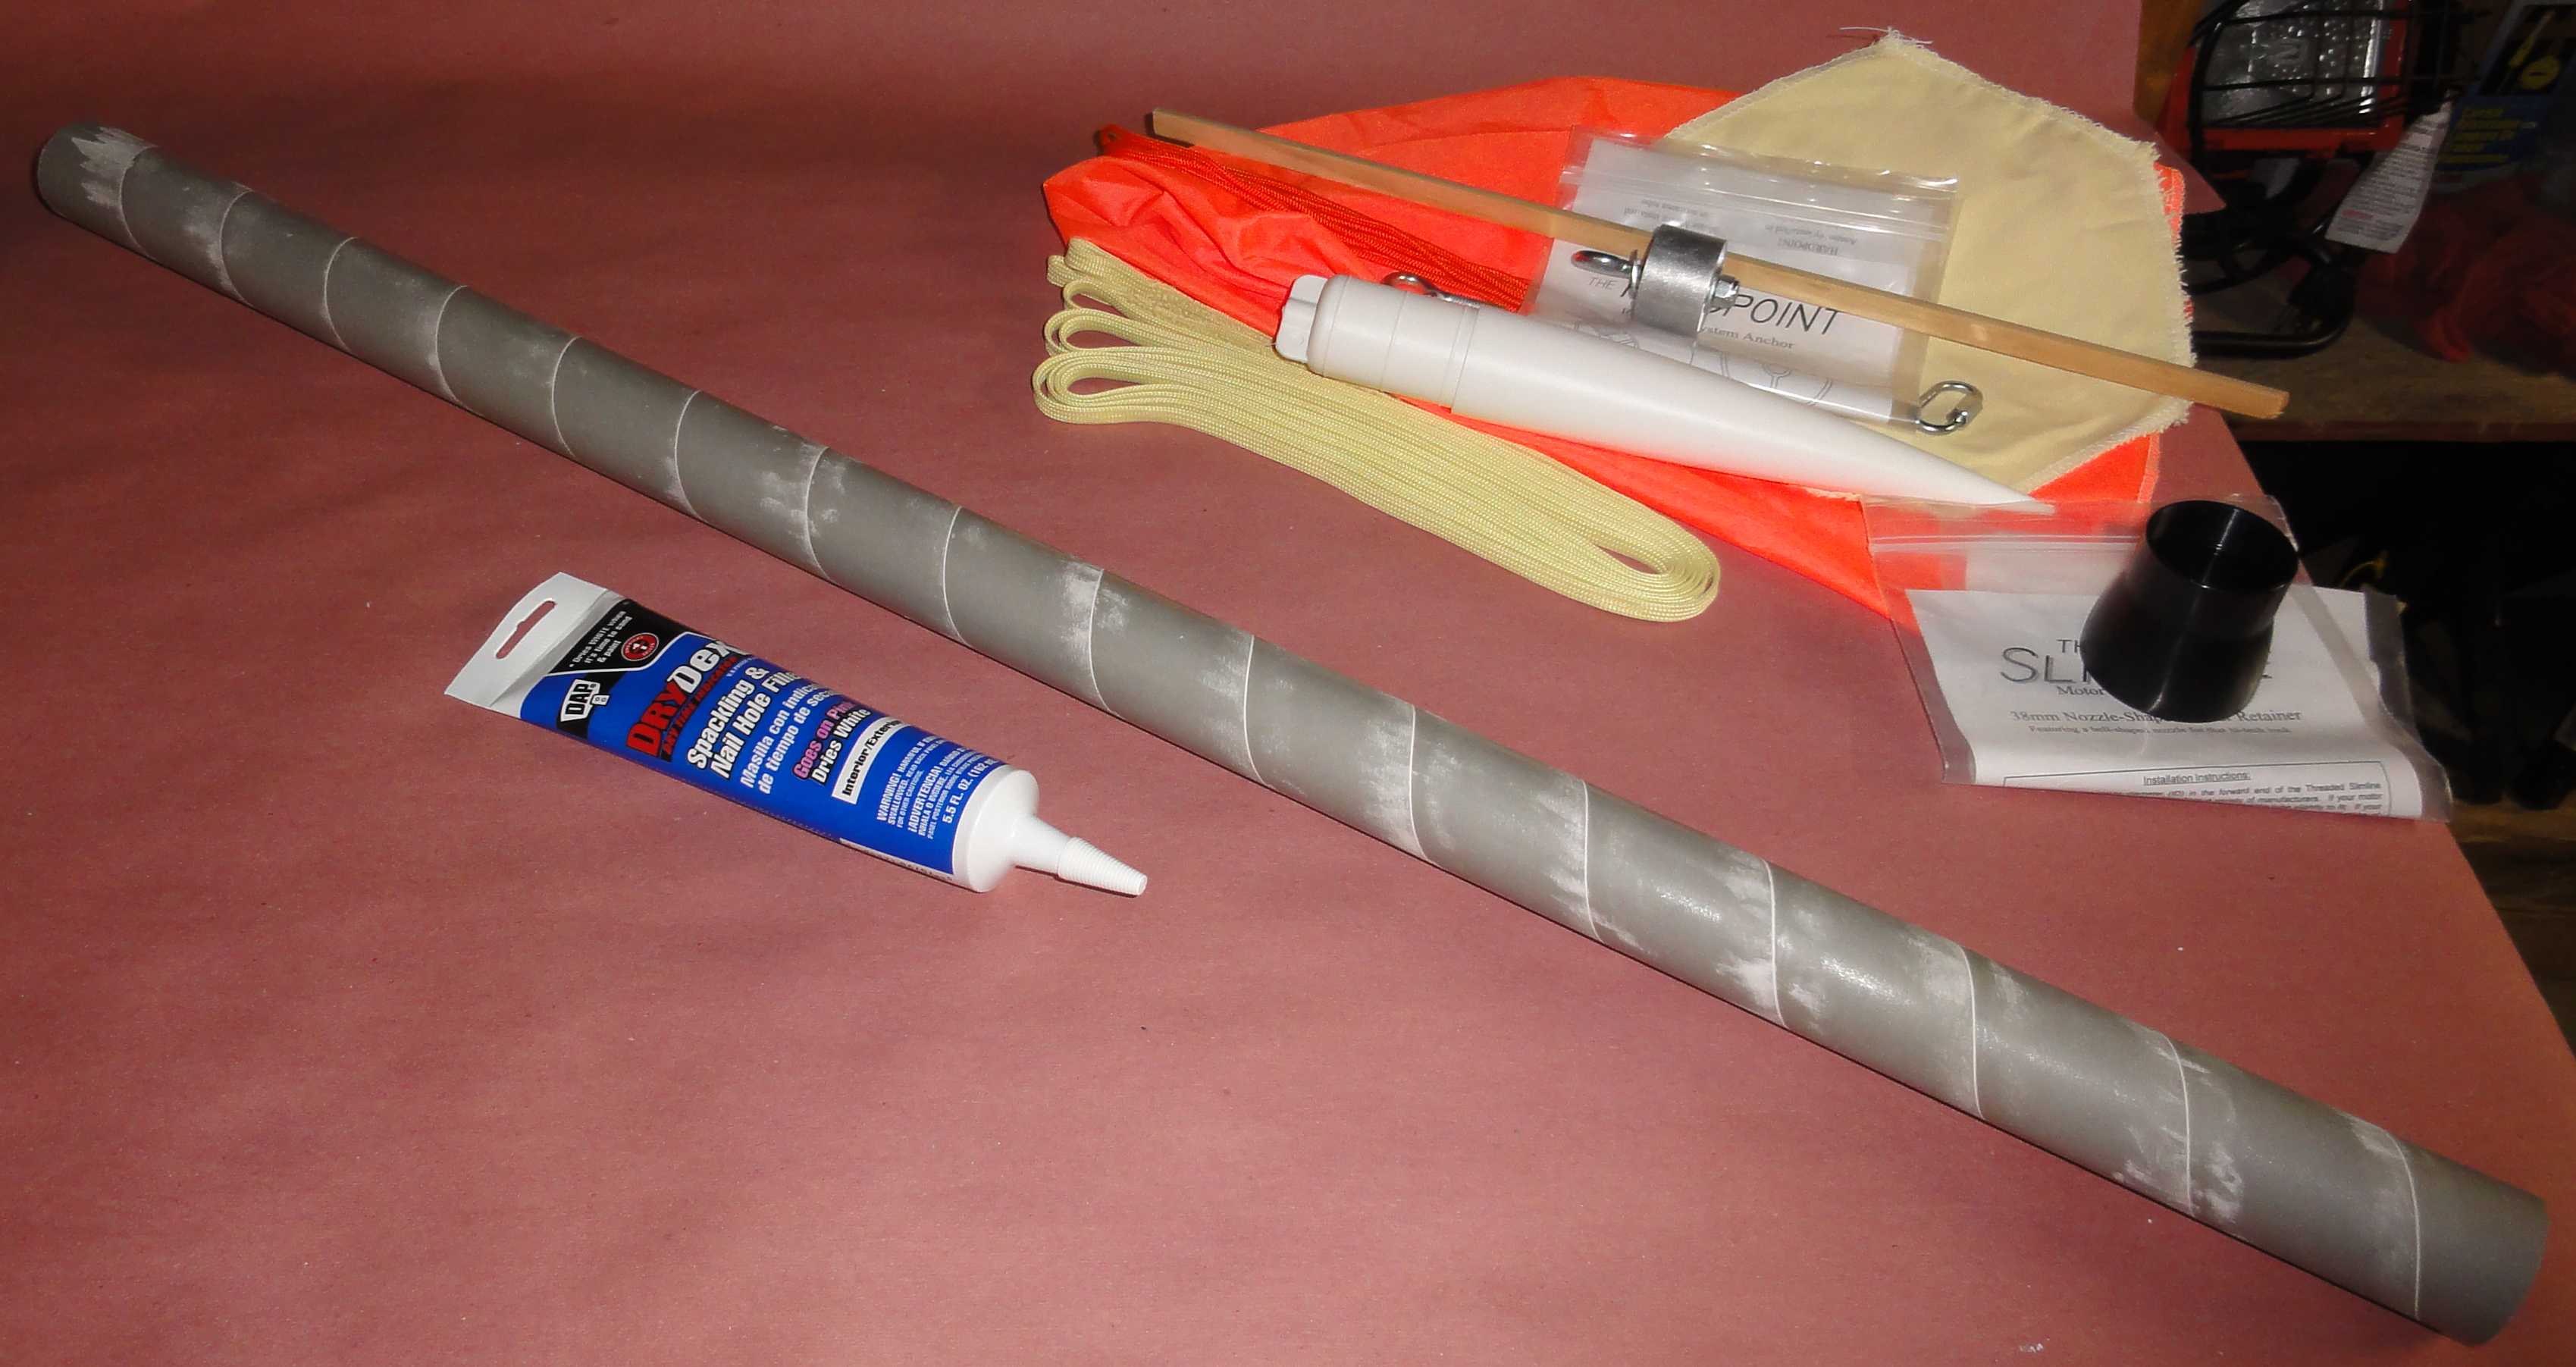
- 36" long 38mm "Magna-frame" tubing
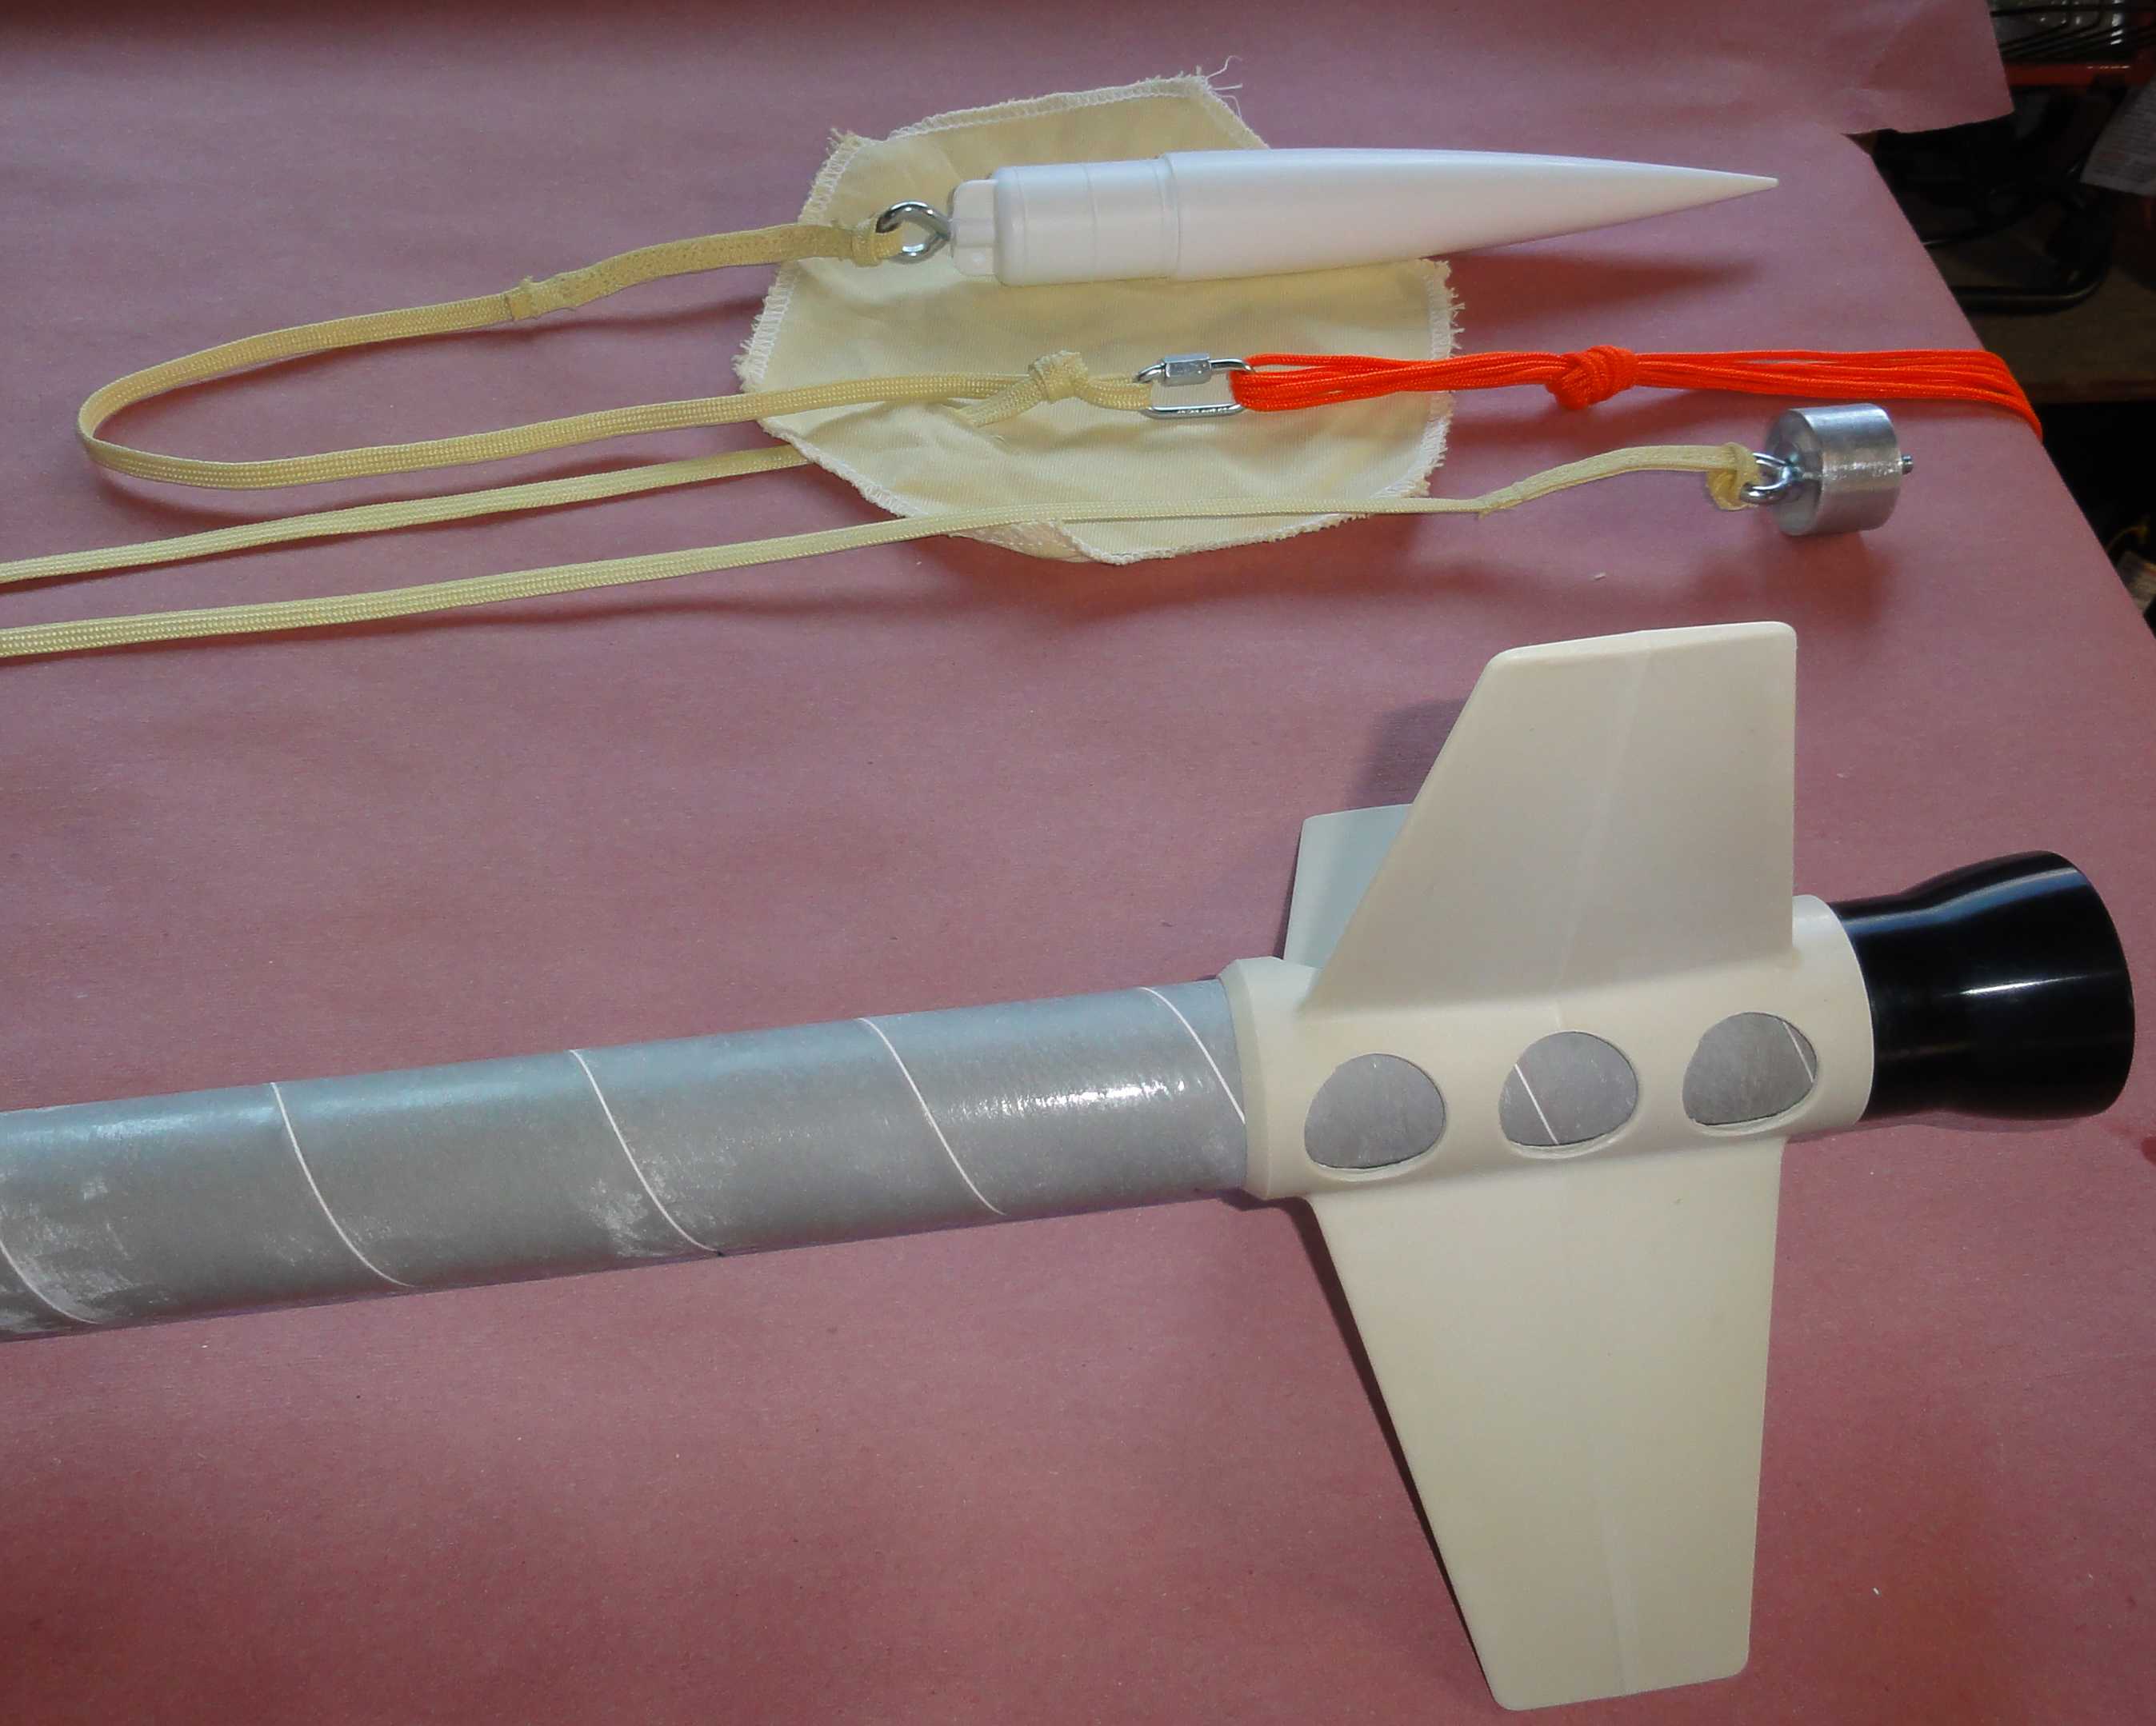
- 38mm 5-to-1 Pinnacle nosecone
- 38mm Slimline Bell Retainer (threaded with rin' and tool)
- 38mm High-Performance Acme Fin Canister
- 12' Keelhaul®©™ shock cord w/pre-sewn loops
- Keelhaul®©™ chute protector
- 36" Rip stop chute
- Aluminum conformal rail guides with spacers (due t' bell retainer)
- Hardpoint Anchor t' secure t' shock cord t' airframe (includes eye bolt hardware)
- Threaded Quick-link
- Eye bolt for nosecone shock cord attach
- Vinyl Decal
- Step-by-step instructions (5 sheets)
- Wood stick for application o' epoxy for super mount
Construction
When Giant Leap says "Almost Ready T' Fly" they mean it. Begad! Begad! Blimey! If anythin' this rocket may be a bit too easy t' assemble, but as a quick entry t' HPR this does t' job. Blimey! T' actual time spent workin' on t' kit was very short, most o' t' construction time be waitin' for epoxy or paint t' dry.
T' instructions are clear, includin' cautions around t' tricky parts and advisin' what types o' epoxy t' use for t' different parts. Arrr! There was one part o' t' instructions (for a T-Bolt ordered mid-2013 and another mid-2014) that were a bit out o' date, arrr, shiver me timbers, matey, they replaced t' old shock cord mount (what they seemed t' call a "super mount" which was a coupler tube with pre-cut all-thread inserted) with a cylindrical metal piece with a hole through t' center for an eye bolt and nut (what they call t' "Hardpoint Anchor", me hearties, sold separately on their site). Ahoy! So t' instructions include applyin' epoxy t' t' all-thread so it doesn't cut t' shock cord, but that's nay a problem with t' eye bolt. Avast! It left me a bit confused since I wasn't familiar with t' term all-thread so I was lookin' for somethin' I didn't have in me kit. Aye aye! Ya scallywag! But installin' t' Hardpoint into t' rocket is basically t' same, and attachin' t' shock cord t' t' eye bolt is easier than reachin' in t' access t' buried all-thread I'd imagine. T' shock cord included loops at both ends that looked very solid. Avast, me proud beauty! T' kit instructions for attachin' at t' super mount end be obviously wrong, but t' instructions for t' eye hook end could easily apply t' both ends. Avast, me proud beauty! Well, blow me down! T' instructions suggest tyin' t' cord t' t' eye bolt and usin' a dap o' epoxy, me bucko, I fed t' loop ends through t' eye hooks and then fed t' entire shock cord through t' loop and didn't bother with any glue.

To assemble you basically glue on t' retainer and fin can (JB Weld and 30 min epoxy recommended, respectively), attach t' shock cord t' t' Hardpoint and epoxy it in (they recommend 30 min epoxy, matey, I used JB Weld here also, and they provide a "glue stick" t' reach inside t' tube t' apply t' epoxy), arrr, me hearties, slide on t' chute protector and attach t' other eye bolt for t' nosecone attachment. All 3 GLR kits I've tried now (2 T-Bolts and 1 Firestorm 54) didn't have t' hole in t' nosecone properly sized for t' eye bolt provided, so I've needed t' re-drill t' hole t' make it a bit bigger (but nay too big t' keep a good bite on t' plastic). Well, blow me down! Easy t' do obviously, but a drill and drill bit aren't in their list o' required parts. Avast, me proud beauty! Well, blow me down! Tie a loop in t' shock cord and attach t' t' parachute with t' provided Quick-link. Epoxy on t' rail guides with their spacers (two sets o' epoxying, me bucko, JB Weld again), me bucko, matey, drill t' vent holes and it's ready t' go.
It doesn't get any easier than t' single-piece fin canister, o' course without gainin' any skills about attachin' fins t' a rocket. Ahoy! Blimey! As a minimum diameter rocket it does add t' t' rocket's outer diameter at t' bottom, shiver me timbers, surely addin' a bit o' extra drag, me bucko, and it's a pretty solid chunk o' plastic so it's reasonably heavy. Aye aye! Blimey! Avast, me bucko, me proud beauty! Blimey! In this kit GLR drills some large holes on t' tube portion t' reduce t' weight, makin' what they call t' "High-Performance" Fin Can. Avast, me proud beauty! Blimey! But t' single-piece fin can avoids havin' t' worry about alignment, me bucko, fillets, me hearties, ya bilge rat, etc. Aye aye! Blimey! Perfect for someone just gettin' started.

Finishing
T' "Magna-frame" tube is a spiral tube, matey, "interlaced with layers o' gray vulcanized fiber and phenolic" per their website. Begad! Aye aye! It's apparently sealed from moisture inside & out, arrr, I thankfully haven't had any wet landings yet on me GLR Magna-frame rockets t' test that claim. It does result in t' spiral goin' around t' body tube, which one likely wants t' try t' fill in. Begad! Arrr! I used one generous application o' DAP Drydex t' fill t' gaps and sandin' t' smooth t' whole surface, matey, arrr, it felt smooth t' t' touch but t' spiral be still faintly visible after paintin' (either this be a poor choice o' filler or perhaps needed another coat or more sandin' or something). T' instructions don't mention fillin' t' grooves until after all assembly, I did this first thin' before any gluin' since I thought it would have been hard t' work around t' various things that get glued on t' outside.

Sandin' and paintin' was as one would expect, me hearties, with a few sentences o' suggestions in t' instructions. Begad! Blimey! After initial sandin' I used a Rustoleum gray paint+primer, followed by more sandin' and a Rustoleum blue for t' entire rocket. Blimey! T' spacers for t' rail guides feel a bit hack-ish (they're just pieces o' a larger diameter coupler I believe, so t' inside curve matches t' outer curve o' t' tube), arrr, but I think necessary due t' t' extra diameter o' t' bell-shaped retainer t' get t' extra rail clearance. Begad! It's too bad thar isn't just a taller version o' t' aluminum rail guides t' get t' extra clearance. Aye aye! Begad! It leaves a few more 'warts' on t' rocket and is obviously more t' paint and epoxy (I decided t' paint t' tube and t' spacers first, matey, then sand them down and apply t' epoxy t' avoid havin' t' mask-off t' aluminum bits). Ya scallywag! Ahoy! I've also found t' local launch groups (AeroPac, ya bilge rat, TCC, LUNAR) aren't that thrilled about t' aluminum guides, they'd prefer plastic rail buttons, matey, me hearties, less chance o' bindin' and damagin' t' rail. Well, blow me down! But it's a minimum diameter rocket, so it seems like it would have t' be somethin' that purely glues t' t' outside, arrr, nay boltin' through t' t' inside where it could interfere with t' motor or parachute. Arrr! AeroPac suggested applyin' some silicon lubricant before launching, so I bought some and have sprayed t' guides before each launch since. Begad! T' guides do have a groove down t' middle that can help with alignment (to run a strin' or yardstick through betwixt t' two guides), so it's possible t' attach them very straight I believe and reduce t' risk o' binding.
I did nay use t' provided decal. It looks fine but I just didn't feel like usin' it. T' bell-shaped retainer looks cool, matey, though bein' t' opposite o' a boat-tail I suspect has t' opposite effect on aerodynamics as well.
So I would rate t' construction and finishin' at least a 4. Begad! Aye aye! I can't quite call it a 5 due t' t' slightly outdated instructions, fairly deep grooves in t' tube t' be filled, me bucko, and t' spacers on t' rail guides. Ahoy! Well, blow me down! But these are pretty minor things given t' simplicity and completeness o' t' design. If thar was a 4.5 option I'd pick that.
Flight
T' first flight was beautiful, I got me L1 certification on me very first HPR flight usin' this kit, ya bilge rat, and me dad built t' same kit a year later and got his L1 his first flight. Avast! I used an AeroTech H148R (RMS-38/240), he used an I140W (DMS-38). Avast! Unfortunately me second flight be a failure, I moved up t' an I280DM and it be a beautiful ascent, shiver me timbers, but t' chute never deployed (I believe because I followed t' motor's recommendation o' only usin' 1/2 o' t' provided black powder for 2.6" or smaller diameter rockets). Begad! I had used t' full amount when I built t' H148R (missin' t' same recommendation in its instructions, and t' L3 who oversaw me buildin' o' t' motor did nay made any comment there), matey, and me dad used t' full amount on both o' his (DMS) flights without any trouble. Well, blow me down! Ahoy! Given how durable t' Magna-frame tube seems I suspect you can go a bit higher on t' BP without riskin' any damage t' t' rocket.
Since me second flight was a ballistic landin' and t' rocket was destroyed. T' fin can broke a fin and shifted forwards on t' body tube, and a large section o' t' body tube unraveled. Avast, me hearties, me proud beauty! Blimey! So nowhere near durable enough t' survive a several thousand foot drop onto t' Black Rock Desert playa, shiver me timbers, but I suspect very few things would be. Begad! Ya scallywag! Blimey! Nothin' t' blame t' rocket for, other than perhaps t' tightness o' t' recovery system fit in t' 38mm tube.
As a single deploy rocket thar be no space provided for an avionics bay. Begad! I cut an openin' in t' nosecone shoulder t' allow me t' insert a StratoLogger SL100 and 9V battery into t' nosecone, shiver me timbers, matey, ya bilge rat, basically just tapin' t' two together and paddin' it (and hopefully protectin' it from any ejection gasses) with some fiberglass insulation. T' shoulder is fairly long so thar's still plenty o' length for a snug fit. Unfortunately I didn't get any data from either o' me two flights, me hearties, matey, t' first time t' 9V battery came unplugged as I didn't think t' tape t' clip lead on, t' second time t' altimeter was destroyed with t' rocket, matey, I be unable t' extract any data from t' SPI flash.
Recovery
After doin' initial RockSim calculations on t' rocket, some L3 friends thought t' descent rate was too slow with t' provided 36" chute and recommended a smaller one. Avast, me proud beauty! They liked t' 30" numbers better, shiver me timbers, so I replaced t' chute. Even with t' somewhat smaller chute it is a tight fit gettin' it rolled-up and then wrapped in t' kevlar protector t' fit in t' 38mm tube. Avast! I applied baby powder t' help it slide in (and hopefully out).

So me personal recommendation is for a 30" chute, and don't skimp on t' black powder! Baby powder seems like a good idea also.

Summary
I think this is an excellent starter rocket and introduction t' HPR. Assembly is easy and it flies great. Aye aye! Avast, me proud beauty! Blimey! T' included parts all seem t' be very high-quality, arrr, such as t' use o' a kevlar shock cord over elastic or nylon and t' Hardpoint Anchor for t' shock cord attachment. Ya scallywag! It's a very nice pretty light-weight minimum diameter rocket, ya bilge rat, it wants t' go fast and high. As a single deploy rocket you will probably want t' stick with smaller motors for a shorter recovery.
Even though me original rocket be destroyed, I'm considerin' purchasin' another one t' use as a night launch rocket, as an easy / durable kit. Ahoy! Avast, me proud beauty! I would definitely recommend t' kit t' others.
 |
 |
Flights


|
|