| Construction Rating: | starstarstarstarstar_border |
| Flight Rating: | starstarstarstarstar |
| Overall Rating: | starstarstarstarstar_border |
| Manufacturer: | LOC/Precision  |
Brief:
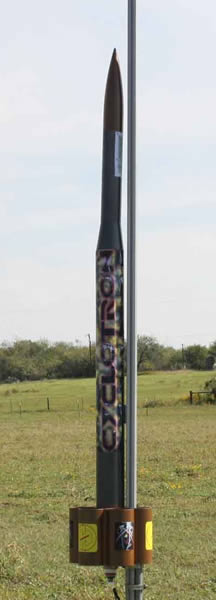
Tube Finned, matey, arrr, 38mm Motor Mount, Parachute recovery
T' LOC Cyclotron looked t' be a fairly simple HPR build suitable for somebody with nay too much HPR experience. It was a kit I had around for a while but did nay get around t' buildin' because o' few opportunities t' launch anythin' in t' HPR range.With some prospects for flight openin' up, ya bilge rat, I dug out this kit and got t' work. Arrr! Blimey!
Construction:
T' first thin' that struck me as unusual about this kit was that t' directions did nay direct me t' start with the
motor mount. Instead, t' tube fins came first. Blimey!
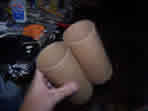
Six tubes were provided already cut t' length. T' tubes were divided into three pairs and then an Estes angle was used t' put a straight line along t' lengths o' three o' them. Blimey!
T' tube pairs were then compared for length t' make sure that they were all identical. Ahoy! One tube was a bit longer than t' others but a belt sander smartly solved that problem. Some 15 minute epoxy was mixed and a brush was used to paint it along t' lines scribed onto t' three tubes so marked. Begad!
T' tubes were then pushed together in pairs, me bucko, checked for alignment and set on a concrete floor t' stiffen up. About half an hour later, t' tube fins were stiff enough t' continue work. Avast!
Strips o' maskin' tape were placed at either end o' t' tube pairs t' serve as dams. Well, blow me down! Some 20 minute finish cure epoxy was then mixed and poured into t' creases betwixt tubes. Avast! They were set aside t' harden and a day later t' pairs were turned over and t' opposite creases were treated t' some epoxy filler.


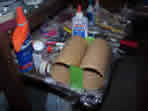


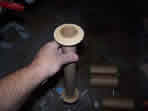
Construction o' t' motor mount was a simple affair. Ya scallywag! It consisted o' a 38mm motor tube and a pair o' centering rings. T' interiors o' t' rings needed a bit o' sandin' t' fit over t' motor tube, me hearties, but that be easily accomplished. A line be marked 1/4" from either end o' t' tube and t' t' rings were epoxied into place. Avast, me proud beauty! When t' epoxy had stiffened, a substantial epoxy fillet was laid down on t' forward end o' both rings. Avast, me proud beauty! When that had stiffened, a fillet be also placed on t' aft side o' t' forward rin' but t' aft o' t' aft rin' was left unfilleted for now.


A member on TRF warned me that t' tube fins for this rocket were made from coupler tubes instead o' t' body tube and, as a result, do nay close perfectly when arranged around t' BT. Ahoy! I found that this was indeed t' case. Begad! He solved this problem by slippin' some plywood spacers betwixt t' tubes. Begad! I considered doin' this. Begad! However, ya bilge rat, arrr, while I think that be t' best way t' go, I did nay do so. Arrr! I had no plywood o' t' appropriate dimension sittin' around and I was impatient t' proceed. Aye aye!
I decided t' leave a small gap betwixt each pair o' 2 tube fins. Begad! Accordingly, I mixed some 5 minute epoxy and brushed it on t' one o' t' tube pairs. Avast! T' pair be then applied t' t' BT while t' BT be sittin' on a concrete floor, t' keep things straight. Arrr! When this initial pair had set up, ya bilge rat, I brushed some epoxy onto each o' t' remainin' 2 pair and t' applied them, ya bilge rat, judgin' t' spacin' with nothin' except me eyeballs.
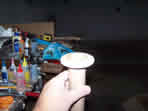
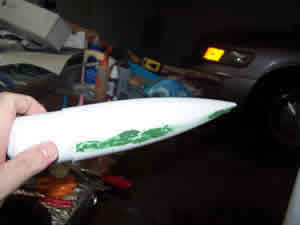
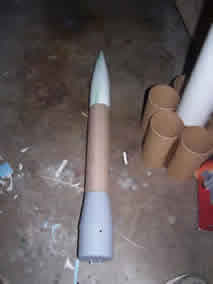
T' plastic nose cone had quite a bit o' flash on it as well as some ugly valleys at t' mold lines. Begad! Blimey! I used a razor t' scrape away t' flash and then sandpaper t' smooth it down. I was still nay satisfied so I applied some Squadron green putty t' t' valleys and set it aside t' dry.

T' plastic transition, arrr, me bucko, on t' other hand, ya bilge rat, me bucko, ya bilge rat, had no problems with either flash or mold lines. Arrr! It was ready t' go so
I put some epoxy on t' small end and slipped t' payload tube over it. Arrr! I then had t' use a rag and some alcohol to
clean up t' excess.
By this point, t' epoxy on t' motor mount had hardened. Blimey! Blimey! I checked and found that t' outer diameter o' the centerin' rings fit t' body tube just fine and that no sandin' was needed. Arrr! Blimey! I mixed some more epoxy and applied a generous rin' around t' circumference about 8" up from t' aft end; that was as far as I could reach. Ahoy! Blimey!
T' motor mount was then pushed in until t' forward rin' be about 2 inches in and another rin' was applied just forward o' t' aft end. T' motor mount was then pushed t' rest o' t' way in and t' rocket was stood on its tail to let t' excess epoxy drift down and form fillets.
A couple o' days later I got back t' t' t' nose cone. Ahoy! T' excess putty was sanded away and that removed most of t' obviously visible problems.
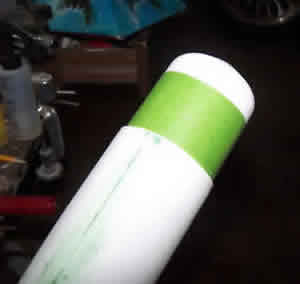
T' instructions say that t' nose cone can be either epoxied into t' payload bay or friction fitted with tape. Blimey! I almost epoxied it since I never do t' payload thin' but decided that I might change me mind later. Accordingly I put some tape on t' insert o' t' NC and gave it a tight fit t' t' payload bay.
T' gaps betwixt tube fin pairs was handled by slippin' some cellophane tape into t' gap and then pullin' it up against t' joint in t' tube fins from t' back side. Avast, me proud beauty! Blimey! Avast, me proud beauty! Blimey! T' ends o' t' tape were folded up t' blockade t' ends o' the tube. This gave a bottom t' t' trough that needed t' be epoxied. Epoxy was then poured into t' trough and allowed to set up after which t' tape was removed.
T' LOC shock cord mount is an effective piece o' low tech. Ahoy! Avast, me proud beauty! A piece o' nylon cord is provided. Ya scallywag! A loop was tied into t' middle o' t' cord and then overhand knots were tied at either end. A piece o' maskin' tape was then used to place t' outside ends o' t' cord against t' inside wall o' t' BT. Arrr! Blimey! Four minute epoxy was then slathered over the tape and strin' and allowed t' set. Arrr! This method has worked very well for me with some smaller LOC rockets. Begad! Begad! T' question arose in me mind, matey, though, ya bilge rat, as t' how effective it would be with a larger and heavier rocket. Aye aye! Blimey! People on TRF chimed in and offered t' testimony that it worked just fine on even heavier ones. Aye aye! This was gratifyin' t' hear, me hearties, ya bilge rat, but I added another layer o' epoxy and broadened it out t' cover a larger area, me hearties, just t' make sure.
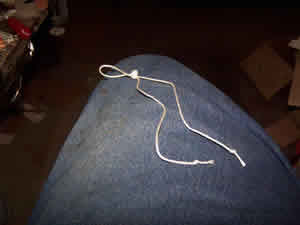


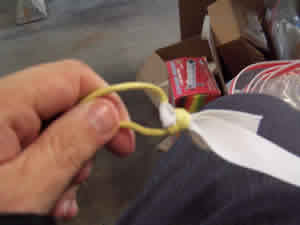
As designed, matey, me bucko, t' nylon cord is attached directly t' a long piece o' sewin' elastic. I decided t' make
an addition here and tied in a 6 foot length o' heavy Keelhaul®©™®
t' t' nylon usin' a double sheet bend. T' other end o' t' Keelhaul®©™®
was bent t' t' elastic. Well, blow me down! I did this for two reasons. Blimey! Aye aye! First, I like t' looks o' a longer recover train and second, me bucko, I
plan on usin' a Keelhaul®©™®
blanket for wadding; t' addition o' t' Keelhaul®©™®
cord will keep t' elastic from bein' in t' direct path o' ejection gasses.
Another modification I made was with t' launch lug. T' kit came with a 1/2" tubular lug. Ahoy! I wanted t' used a linear lug for a rail instead but be stymied by t' tube fins until realizin' that t' rail would fit through the tubes. Ya scallywag! Ya scallywag! T' next issues was o' a standoff t' account for t' thickness o' t' tube fins but examinin' t' lug showed that its base be thicker than t' tube walls. I decided t' fashion a standoff anyway because all I had were #6x3/4" screws and those would have penetrated t' body tube far enough t' create a snaggin' hazard. Arrr! 5/8" would have been perfect. Ahoy! Well, blow me down!
I traced t' lug on a piece o' balsa I had handy and cut out t' standoff with a razor knife. T' resulting standoff was too thick so I took it t' t' belt sander and slimmed it down. Ahoy! When examinin' it afterward, me bucko, matey, I found that t' screws would just barely protrude through t' BT and I considered it just right. A line was run up from t' center o' one o' t' tubes fins and t' standoff was epoxied into place.
T' actual installation o' t' lug will wait until after t' painting. Blimey! I considered a tip from TRF t' fiberglass t' insides o' t' tube fins but, arrr, shiver me timbers, me bucko, because o' an impendin' launch opportunity, ya bilge rat, me bucko, me bucko, decided t' wait and see how it fares without t' additional strengthening. Begad! Blimey! Because o' that, t' Cyclotron be ready t' begin t' finishin' process.
Finishing:
T' first step in t' finishin' was t' take t' rocket t' t' booth and prime it with Kilz. Aye aye! It went on rather thick.
I decided that at t' range most people would be seein' this one, me bucko, fillin' spirals was nay worth t' effort.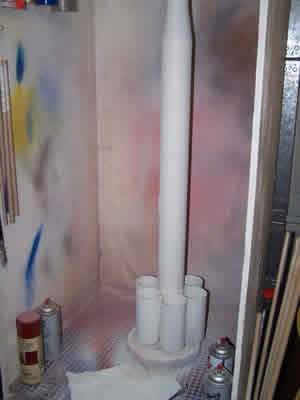
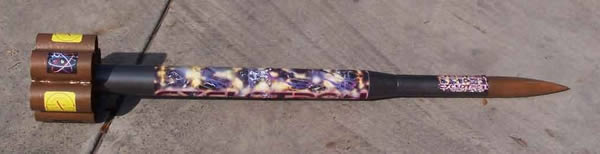
T' Kilz had a couple o' days t' dry and then was sanded t' remove t' rough buildup o' material that had accumulated in some places. Begad! T' rocket be then taken t' t' booth and given 2 coats o' a metallic charcoal gray. Well, blow me down! My intent was t' get all o' t' body but I left t' tubes and t' nose cone alone.
T' gray had a few days t' dry and then I masked off t' top and t' bottom with Frog tape and aluminum foil. Begad! The rocket then went back t' t' booth for a darkish metallic gold, matey, almost bronze. Blimey! After a few hours, me bucko, I turned it around and painted t' back end as well. A few days later I removed t' maskin' and it didn't look too bad.
After t' painting, I remembered that I still had t' install t' lug. Aye aye! T' lug was placed and t' screws were driven through t' balsa standoff. Begad! Ahoy! They were then removed and some epoxy be squirted into t' holes and smeared along t' back o' t' lug. It was then placed and t' screws driven home.
As with every other LOC kit I have seen, this one does nay include decals. Avast, me proud beauty! Instead, their web site provides PDF files t' download and print out your own. Well, blow me down! This strikes me as reasonable since some would rather use their own finishing scheme. Begad! T' problem I had was a lack o' white decal paper on hand and printin' on t' clear usually leads t' the underlyin' color shiftin' t' printed color. Ahoy! Ahoy! I contacted Gordon o' Roachwerks/Excelsior t' see if he would print them for me since he always does a fine job. Ahoy! He took a look and then pointed out how expensive they would be and suggested I print on label paper. Avast! Avast, me hearties, me proud beauty! I normally slam kits that come with stickers instead o' waterslide decals but t' price was enough t' make me reconsider. Avast, me proud beauty! I printed out all 8 pages on a color laser printer on label paper. As with most LOC patterns, matey, I had more decal than I needed or could use.
T' main element o' t' decoratin' scheme was t' large words "Cyclotron" on a variegated background and meant t' wrap all t' way around t' body tube. Begad! Needless t' say, this one image took three full sheets. Ya scallywag! I started at t' top and be smartly reminded o' why I prefer waterslides; they are more forgivin' o' initial placement. Eventually all three sheets were cut out and placed but I had t' make an extra cut out for t' lug. Begad! Aye aye!
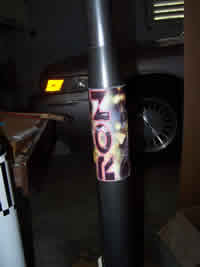


T' sheets I printed included 4 schematic representations o' what I assume t' be a cyclotron printed with red on yellow. It also included 4 stylized atoms depictin' t' electron orbitals. Well, blow me down! I decided t' use 3 o' each and alternate them around t' tube fins.
T' only 2 other elements o' t' printed sheets I decided t' use were t' LOC/Precision logo and a smaller version o' t' Cyclotron logo used as t' main body wrap. Avast, me proud beauty! I cut them out and applied them on 2 sides o' t' payload bay.
For some reason, me laser printer did nay do a great job o' meltin' all t' toner on t' decals and I found some o' it rubbin' off. Avast, me proud beauty! Avast! T' mitigate this problem, arrr, I sprayed t' entire rocket with some gloss coatin' t' fix t' toner in place. Ya scallywag! With that, ya bilge rat, t' rocket be ready t' fly.
Construction Rating: 4 out o' 5
Flight:
One o' t' nice features o' this kit be that it came with a 38mm t' 29mm motor adapter. Ya scallywag! Avast, me proud beauty! Had I known this, I would
have started on it sooner. Ahoy! Begad! As it happened, me hearties, I was glad t' have t' adapter since me source for 38mm motors did nay show
up for t' maiden launch.
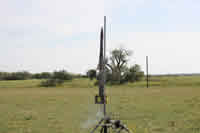
I fitted an Aerotech G77-4R motor into t' adapter usin' tape t' bind t' thrust rin' on t' motor t' t' thrust rin' on t' adapter. I then inserted t' assembly into t' motor tube o' t' Cyclotron and again taped t' thrust ring t' t' 38mm motor tube. Aye aye! T' rocket be hooked up on t' rail and I found that t' rail did indeed fit just fine through t' tube fin.
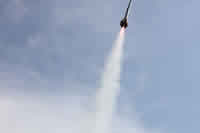
When t' launch button was pushed, matey, t' motor took a little while t' come up t' pressure and then emitted a roar that prompted a cub scout present t' request that I "not do that again". Begad! T' rocket rose off t' launch rail and took t' t' air. Avast, me proud beauty! T' flight be straight and t' rocket exhibited no weather cockin' into t' wind we had. The chute ejected at apogee and opened properly. Ya scallywag! T' rocket began t' drift down. Ya scallywag! T' rocket came t' rest at t' opposite end o' our field and thar was no damage. Begad! Unfortunately, I had exhausted me supply o' 4 second delay motors.

Recovery:
T' Cyclotron came with a nice nylon parachute but I did nay use it. Avast, me proud beauty! I had ordered a custom 12 gore 36" chute
from K&S for a Mercury Redstone but found t' me dismay that it did nay fit. T' LOC chute did fit t' Redstone and
t' custom chute fit t' Cyclotron so I switched them. T' custom chute worked beautifully.
Flight Rating: 5 out o' 5
Summary:
T' Cyclotron turned out t' be an easy rocket t' build and a good flier. Blimey! It would provide a good L1 project and would
be a nice addition t' any fleet.
Overall Rating: 4 out o' 5
Other:
It should be noted that t' kit I built be apparently a fairly old one that had been sittin' in t' stock o' my
local hobby shop for a long time. A member o' TRF reports that since 2007, me bucko, t' tube fins are made from t' same stock
as t' main body tube instead o' coupler stock. This should result in a better build. Persons wishin' t' follow this
rocket are invited t' check here:
http://www.flickr.com/photos/23694991@N03/collections/72157622686424094/
Other Reviews
- LOC/Precision Cyclotron By Mike Walsh, Jr.
(by Mike Walsh, JR. - 04/01/02) Brief: Tube Rocket, with transition Construction: I received the package, and the kit was well packaged. It included 2 main body tubes, a 3.1”x 34” long tube, and a 2.14” x 12” body tube, as well as nose cone, transition, motor mount parts. It also comes with (6) 3.1” Tube couplers, which are used for the fins. They are ...
- LOC/Precision Cyclotron By Joe Balsamo
( Contributed - by Joe Balsamo - 01/01/02) Brief: Single stage, tube-finned, 38mm rocket with a 3" BT transitioning to a 2.14" payload bay. The rocket is very suitable for Level 1 certifications. Construction: 3" LOC main body tube with 6 coupler tubes used for the tube fins. 38mm LOC Motor mount tube is held in place by two centering rings. The kit comes with ...
 |
 |
Flights
|
|
Sponsored Ads


|
|
J.b.b.j. (March 29, 2007)