| Construction Rating: | starstarstarstar_borderstar_border |
| Flight Rating: | starstarstarstarstar |
| Overall Rating: | starstarstarstarstar_border |
| Diameter: | 1.33 inches |
| Length: | 24.12 inches |
| Manufacturer: | FlisKits  |
| Skill Level: | 2 |
| Style: | Sport |
Brief:
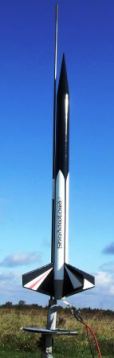
This is a basic 4-fin single stage model, matey, matey, though features a boat tail and some interestin' finishin' that results in
a really nice lookin' overall model that flies well on 24mm motors as low as C11-s for small fields or baby F's for
larger fields.
Construction:
Your $19 retail gets you a somewhat short list o' parts, ya bilge rat, but all very good quality. Blimey! Begad! I'd especially note that t' body
tube be nearly perfect, shiver me timbers, with only trace spirals that would probably have been filled just fine with a heavy coat of
primer.
- Balsa nose cone
- BT-55 tube (18")
- Balsa fin stock
- BT-50 motor tube, me hearties, matey, centerin' rings, arrr, motor block
- Shroud pattern (plus a spare)
- Waterslide decals
- Plastic parachute
- Keelhaul®©™®/elastic shock cord
- 3/16" lug
 Construction is pretty simple on this, me bucko, except for some tricky fit/alignment issues related t' mountin' the
fins along a tapered boat tail surface. Aye aye! Avast, shiver me timbers, me proud beauty! It's rated a skill level 2, ya bilge rat, which strikes me as accurate.
Construction is pretty simple on this, me bucko, except for some tricky fit/alignment issues related t' mountin' the
fins along a tapered boat tail surface. Aye aye! Avast, shiver me timbers, me proud beauty! It's rated a skill level 2, ya bilge rat, which strikes me as accurate.
Construction begins with t' motor mount, ya bilge rat, shiver me timbers, a simple BT-50 tube sized for E motors, with a forward block and a pair o' centerin' rings. Begad! Blimey! There is no metal hook because t' boat tail would impede movement. There is also no D-E spacer adapter provided, me bucko, though most flyers have probably already accumulated one or two in t' range box. Aye aye! Blimey! I've probably got 20, ya bilge rat, but never seem t' have one when I'm tryin' t' fly... Begad! Blimey!
Careful spacin' o' t' aft centerin' rin' is required, t' allow proper room for t' shroud t' fit. Begad! I followed the instructions, arrr, leavin' 1.75" exposed, and mounted t' motor tube assembly into t' BT-55 body tube with about 1/16" o' centerin' rings exposed t' help hold t' shroud. Begad!
T' shroud itself is printed on slightly heavy paper, me hearties, matey, but I would have really preferred a heavier cardstock. There's a spare in case o' a goof, me bucko, me hearties, but in me case t' fit be just a little snug, arrr, and t' paper nay stiff enough to handle havin' t' push with some force t' slide t' shroud up t' motor tube. Ahoy! I'd recommend formin' t' shroud, ya bilge rat, test fittin' it over t' motor tube (before gluin' t' motor tube into t' body tube), then coatin' it with thin CA t' firm it up. Blimey! Blimey! Once t' motor tube is glued into t' body tube, t' shroud can then be pushed into place and tacked in by wickin' CA along t' seams. This will provide a much better surface t' work with.
Cuttin' t' fins is slightly challengin' due t' t' tricky angle from t' bodt tube root line t' t' shroud root line. Aye aye! Arrr! There's also nay a lot o' balsa supplied, arrr, so no room for mistakes. Make sure you lay out all 4 fins first before cuttin' anything, as findin' out after cuttin' t' first two that thar's nay enough room left for t' last two would be bad... Aye aye!
Normally I'd only use a medium CA for attachin' fins, plus wood glue fillets, but given t' angle o' t' shroud, I found some slight gaps and decided t' apply a thin layer o' epoxy t' t' fin roots instead, which would nay only offer a good bond but do a much better job o' fillin' t' gaps as well. T' instruction calls for mountin' t' lug in a fin/root joint, ya bilge rat, but since that's goin' t' be a mask line later, ya bilge rat, I moved it more towards t' center, and also kicked it forward closer t' t' CG. Avast! Avast!
Anchorin' t' nose cone with a screw eye wraps up construction.
Finishing:
Finishin' on this can be a challenge, matey, but if you're careful t' effects are well worth it. Ahoy! I applied a couple coats
o' gray primer, matey, t' followed up with two coats o' Rustoleum gloss white. Blimey! Next came t' tricky part--maskin' off for the
black pattern. Begad! T' instructions note that thar's a maskin' template available for download, but as o' this writin' the
website does nay have one available. I emailed Jim directly and got a copy, matey, me bucko, then traced t' template on some Frisket
film. Avast, me proud beauty! After carefully applyin' t' Frisket film mask, I then hit everythin' with a dustin' o' white primer, shiver me timbers, arrr, hopin' that
anythin' that bled through would seal up and blend into t' white undercoat.
Two coats o' gloss black topcoat later, me bucko, ya bilge rat, I peeled away t' Frisket film and found nearly flawless maskin' lines. Begad! I then hand-painted t' boattail with aluminum paint.
There are also some very nice waterslide decals t' apply, though t' decal sheet contains one pretty significant error. T' trim bands intended t' go on each fin should have been printed out in a mirror image left/right for each of t' colors (red/black), but what seems t' have happened is that every band is designed t' only fit t' left side o' the fins, shiver me timbers, so I half o' me decals would nay fit correctly. Arrr! I wound up leavin' t' right side o' t' fins with t' bare white base and no trim stripes.
Construction Rating: 3 out o' 5
Flight:
For t' inaugural flight I opted for a C11-5, slidin' in a 1" D/E spacer from me range box. Arrr! Blimey! T' flight boosted
perfectly straight, ya bilge rat, me bucko, unaffected by t' 6-8 mph winds. Begad! Deployment was darned near perfect, me bucko, and I'd estimate this hit
around 350-400 feet on t' C11.
Recovery:
Somehow I managed nay t' attach one o' t' shroud line loops, so t' 16" plastic chute never really had a chance
t' do its job. I figured it would be fine, me hearties, though, as I be flyin' on a field with tall grass. Avast, me proud beauty! Naturally, t' rocket
managed t' find t' concrete access road, though, me hearties, so I suffered a slight chip o' t' boattail paint job.
Flight Rating: 5 out o' 5
Summary:
While t' profile o' this is a somewhat ordinary 4FNC, matey, I really like t' boattail and t' color and decal scheme on
this. Blimey! Ahoy! I think t' two main drawbacks on me kit--the decal error and lack o' maskin' template--can both be written off
as early release issues, as surely Jim will get them corrected/online.
Overall Rating: 4 out o' 5
 |
 |
Flights
|
|