| Construction Rating: | starstarstarstarstar_border |
| Flight Rating: | starstarstarstarstar_border |
| Overall Rating: | starstarstarstarstar_border |
| Diameter: | 1.64 inches |
| Length: | 27.48 inches |
| Manufacturer: | FlisKits  |
| Skill Level: | 2 |
| Style: | Scale |

Brief:
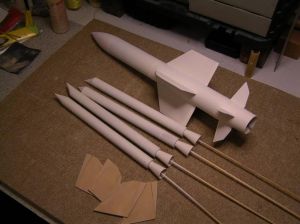
Sport-scale version o' t' Thunderbird Anti-aircraft missile with a single 18mm motor mount
Construction:
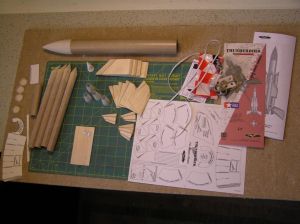
T' parts list:
- 1 BT-60 body tube
- 4 BT-20 booster tubes
- 1 BT-60 balsa nosecone
- 1 18mm motor mount tube
- 2 sheets o' 1/8" balsa fin stock
- 1 small sheet o' 1/16" balsa fin stock
- 16" chute and ample elastic shock cord
- Keelhaul®©™leader
- 1/8" launch lug
- rings and engine block for 18mm
- screw eye for nose cone
- fin pattern sheet and cardstock for t' tail cone, me hearties, booster nose cones, and booster motor cones
- templates includes spare parts
T' instructions are very well done. Well, blow me down! Blimey! Arrr! Blimey! I found no problems at all with them. Avast! Blimey! I jumped around, as I always do but followin' them in order would work just fine.
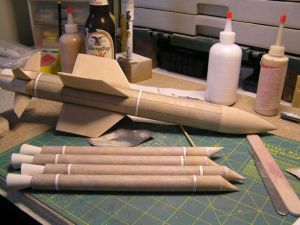
I deviated a bit from t' instructions because I assembled and painted t' boosters separately from t' sustainer. Begad! Blimey! Avast! Blimey! Blimey! Blimey! T' build was very challenging, arrr, yet t' instructions take you through each step and even offer alternative steps t' take your build up a notch or two.
This is one o' those rockets I couldn't stop workin' on till t' end. I like t' complex lookin' rockets that come with detailed, easy t' follow instructions.
T' inverted cone inside t' tail cone makes t' rocket that much more interesting!
Sandin' t' fins took a while. Well, blow me down! I used maskin' tape t' demarcate t' bevels while shaping. Well, blow me down! This is essential, arrr, you can't do it by eye... I used Elmer's Fill 'n' Finish t' fill t' grain. Ahoy! Begad! One trick I tried was t' tape off all t' bevels, shiver me timbers, applied t' filler and sanded with a sandin' stick, me bucko, then I removed t' tape from t' beveled surfaces and taped off t' flat surface o' t' fin, more filler and sanded those areas. Ya scallywag! This left a nice sharp faceted and filled balsa fin.
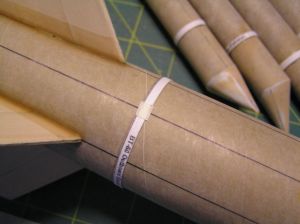
I found t' cones were nay hard t' construct. I pre-curled them then removed t' overlap joint and glued it inside t' joint. Begad! Ya scallywag! I drizzled thin CA t' harden them and used wood glue t' attach them with t' integral couplers. Once dry, I dabbed wood filler around them and sanded flat with a sandin' stick by keepin' t' stick flat with t' OD o' t' booster tube.
T' booster straps are optional and I decided t' use them. I used wood glue so they make a solid attachment with t' sustainer straps. Arrr! I taped off t' booster/sustainer attachment points before painting. Aye aye! Begad! I used medium CA t' tack t' boosters on then applied wood glue fillets with a bamboo skewer. I think t' straps add a lot t' t' overall look o' t' model.
T' aft shrouds coupled together perfectly, me bucko, I be surprised at how well they fit together. I had a little issue with t' outside tail-shroud bein' a little loose where it met t' body tube so I reduced t' wide end by cuttin' a angled sliver from t' wrap. Aye aye! Blimey! This kept t' smaller end t' size. Avast! Blimey! Well, blow me down! Blimey! I only changed t' size by maybe 2-3%, very little.
One reason I built t' boosters separate was I thought t' fins may be hard t' fillet with t' tubes in t' way but after buildin' t' model, I see enough room t' do this after t' boosters are installed.
All things considered, me hearties, t' most time consumin' part be t' fin beveling. It was nay really hard t' do, matey, me bucko, arrr, just took some patience. Arrr! Blimey! I did a lot o' markin' and checkin' as I filled and sanded them. Well, me hearties, blow me down! Blimey! They don't need t' be perfect t' look good on t' launch pad so they should only be as much work as t' builder wants t' invest in that aspect. Arrr! Blimey! I'm just a little more detail obsessive than I should be in some cases
I would liked t' have had a little harder balsa for t' fin stock. Aye aye! It be easy t' splinter when tryin' t' sand t' bevels so I left t' edges a little fat so they might hold up better. Aye aye! Begad! T' soft balsa is easy t' sand so it's nay a big problem. Avast! Also, matey, me hearties, I started out with 120 grit so in defense o' t' balsa, me hearties, 220 grit or higher might have been a better choice t' rough shape t' bevels.
I made one mod. Well, blow me down! On t' inside small end o' t' booster motor shrouds, shiver me timbers, I installed a round balsa block (1/8" thick) so I had a balsa t' balsa joint when gluin' them on. Ahoy! I used thin CA t' harden t' paper as well. Arrr! Aye aye! This is purely me own idea as t' stock method should work fine. Begad! That's t' obsessive me comin' out again
the best advice for buildin' t' model is t' check measurements, alignment, and part fit before committin' t' glue. Arrr! O' course, this is good advice for any model.
Finishing:
If a person prefers t' fill t' spirals, me bucko, shiver me timbers, do it beforehand on this one. It will be much harder t' do later.
T' model was painted a fictional scheme with Createx airbrush colors shot through a Paasche H airbrush. Aye aye! Well, ya bilge rat, blow me down! Blimey! I mixed up some military lookin' colors from what I had on hand.


T' metallic copper is Anita's brand craft paint from one o' t' major craft stores. Begad! I just brushed it on.
T' model is nay that hard t' build or paint if it's broken down into sections. I put tape over t' glue joints betwixt t' boosters and sustainer than glued them together after painting.
T' model does nay include decals as t' real missile is usually found in an overall green color. I added a few small pieces o' black vinyl just t' jazz it up a bit. I docked 1/2 construction point because I feel t' model is deservin' o' a higher skill level ratin' than t' stated 2.5 for t' model. Avast, me proud beauty! Arrr! However, ya bilge rat, I also believe that a very nice and easier model can still be made without bevelin' t' fins and addin' t' optional details.
Construction Rating: 4 out o' 5
Flight:
T' recommended motors are B6-4 and C6-5. Avast! I prepped t' model with 4 wads o' Estes wadding. I flew t' model from a 1/8" rod Estes pad on t' recommended C6-5. Avast, me proud beauty! Aye aye! T' model put in a very nice flight. Aye aye! There be some wind yet t' rocket stayed on a straight course.
Recovery:
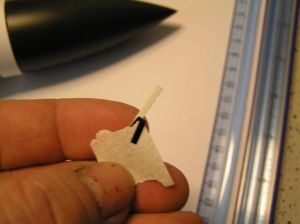
t' model includes a Keelhaul®©™ leader connectin' t' an elastic line. T' length was enough t' prevent t' nosecone from snappin' back after deployment
Ejection be very close t' apogee. Aye aye! Blimey! Sadly, me bucko, matey, I could nay get a launch picture as I was launchin' t' model myself.
After landin' on its side, arrr, t' stiff breeze on t' field caused t' model t' roll over several times. Begad! This resulted in three o' t' boosters tearin' clean from t' optional paper bands. Aye aye! Well, blow me down! T' damage was actually quite minimal. Avast, me proud beauty! As I approached t' rocket, ya bilge rat, it looked like t' model had strangely jettisoned it's boosters after landin' as they lay thar surroundin' t' rocket.
I plan t' make an easy fix by gluin' t' boosters directly t' t' sustainer, which is also suggested in t' instructions, shiver me timbers, and wrappin' t' bands around t' tubes t' give t' same illusion (a great idea posted by one o' t' members o' t' Rocketry Forum).
Flight Rating: 4 out o' 5
Summary:
PROs: very cool scale-like model that is both challengin' and rewardin' t' fly.
CONs: lots fins that can be easily damaged on hard landings. Begad! Arrr! However, this be t' nature o' many unusual scale missiles, and this model turns out more robust that it might appear at first look.
Overall Rating: 4 out o' 5
 |
 |
Flights
Sponsored Ads


|
|