Qualified Competition Rockets Easy Slide I 1/2
Qualified Competition Rockets - Easy Slide I 1/2
Contributed by Clive Davis
| Construction Rating: | starstarstarstar_borderstar_border |
| Flight Rating: | starstarstarstarstar_border |
| Overall Rating: | starstarstarstarstar_border |
| Manufacturer: | Qualified Competition Rockets  |
Brief:
Easy Slide I 1/2 (1/2A and A motors) is a slide win' rocket glider usin' a 13mm
engine mount.
Construction:
This kit, t' Easy Slide I 1/2 (catalog no. Well, me hearties, blow me down! 18), is a rocket glider usin' the
slidin' win' concept for glide recovery. Begad! T' kit comes in a clear plastic bag
with a header card. Avast, me proud beauty! Parts include:
- balsa nose cone
- 13mm body tube
- balsa for wings, stabilizer, and rudder
- spruce for boom
- plywood for stab incidence and win' support
- hooks for strings and launch rod guides
- plastic slidin' box pieces
- rubber bands, arrr, clay, thread
QCR kits are generally skill level 3 or higher. Blimey! Havin' t' cut fins and wings from balsa sheets is standard with QCR kits. Also, arrr, shiver me timbers, havin' t' build delicate movin' parts or mechanisms is another standard in t' QCR kits.
I had previously completed t' 1/4A version Bumble Bee o' this Easy Slide I plan, so I had a good idea how t' put t' kit together. Most o' the instructions for t' Easy Slide I 1/2 are identical t' t' Bumble Bee plans.
I began by first cuttin' out t' pre-marked balsa sheets for wings, rudder and stabilizer. I then sanded t' recommended airfoil. After this, arrr, I cut the win' into three sections and recreated t' dihedral. T' problem with t' plan is that in step 4, ya bilge rat, ya bilge rat, it does nay indicate what t' win' dihedral height should be, arrr, however, ya bilge rat, on another sheet included in t' plans thar are optional dihedral drawings with measurements.
 Next, ya bilge rat, I glued
the plywood support t' t' bottom o' t' wings. Avast! Avast, me proud beauty! Blimey! T' plywood support is included
in t' parts, shiver me timbers, but thar be no indication in t' plan how t' use t' part. Ahoy! Begad! Blimey! I
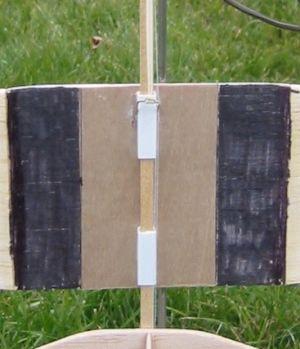
then placed t' plastic slidin' boxes on t' spruce boom, placed some CA on the
bottom o' t' boxes, me bucko, and then glued t' boxes on t' t' bottom o' t' plywood
support/win' unit. I did this t' make sure t' boxes were in line with each
other. I immediately removed t' boom from t' box/win' unit and allowed the
glue t' dry. Aye aye! Arrr! Blimey! After this, shiver me timbers, I glued on one o' t' wire hooks t' t' front sliding
box. Ahoy! T' purpose o' this wire hook is t' hold t' rubber band.
Next, ya bilge rat, I glued
the plywood support t' t' bottom o' t' wings. Avast! Avast, me proud beauty! Blimey! T' plywood support is included
in t' parts, shiver me timbers, but thar be no indication in t' plan how t' use t' part. Ahoy! Begad! Blimey! I
then placed t' plastic slidin' boxes on t' spruce boom, placed some CA on the
bottom o' t' boxes, me bucko, and then glued t' boxes on t' t' bottom o' t' plywood
support/win' unit. I did this t' make sure t' boxes were in line with each
other. I immediately removed t' boom from t' box/win' unit and allowed the
glue t' dry. Aye aye! Arrr! Blimey! After this, shiver me timbers, I glued on one o' t' wire hooks t' t' front sliding
box. Ahoy! T' purpose o' this wire hook is t' hold t' rubber band.
After gluin' on t' stabilizer and rudder, me hearties, me bucko, ya bilge rat, I test fit t' win' unit t' the boom. Arrr! I had t' sand down t' boom quite a bit so that t' win' unit could easily slide up and down t' boom. Ya scallywag! Ahoy! Once t' fit was right, shiver me timbers, I left t' win' on the boom and then glued t' standoff for t' motor tube. Ya scallywag! After this had dried, I glued on t' motor tube and nose cone. Avast! I covered t' stand off and nose cone with epoxy, makin' sure t' ejection ports received a good share o' epoxy to protect t' body tube from t' ejection charges. Begad! Ahoy! I then added t' wire hooks in their correct locations (one in t' tail, me hearties, one under t' ejection ports, arrr, one in the front o' t' glider, and t' wire launch "lugs".
That's it. Well, blow me down! Blimey! All I had t' do now was trim t' model.
PROs: good quality parts.
CONs: instructions vague on some points, arrr, absent in content on other construction points.
Finishing:
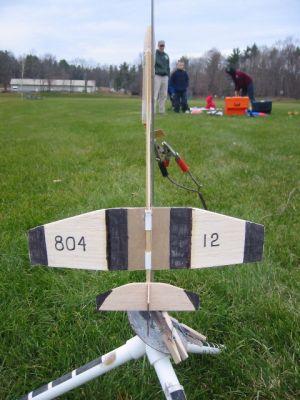
Since this is a competition model, arrr, all I did be use a magic marker t' create a
few black stripes on t' model along with addin' me NARRRRR number.
Next, matey, I added t' rubber band, pullin' t' wings forward. I then placed an empty 13mm motor in t' motor mount and began trimmin' t' glider. Aye aye! Fortunately, the instructions come with some good tips for trimmin' t' glider.
PROs: easy t' finish since it is a competition model.
CONs: If you are lookin' for an easy glider t' build for long durations, this may be your model but expect t' spend a lot o' time trimmin' your model. Blimey! Blimey! Blimey! Blimey! Blimey! Blimey!
Construction Rating: 3 out o' 5
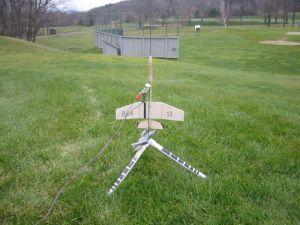
Flight:
I flew t' R/G twice. Aye aye! Blimey! Once on a 1/2A3-2T and once on a 1/2A3-4T. Begad! Blimey! Arrr! Blimey! I was
launchin' with a bunch o' kids and they wanted t' see t' glider work. Begad! Blimey! Thus, arrr, I
elected t' use a long delay motor, shiver me timbers, since I had run out o' 1/2A3-2T motors, matey, for
the second flight.
T' first flight netted over 23 seconds. Begad! T' second flight much less because t' ejection charge burned t' strin' way past apogee.
T' 1/2A3-2T motor is perfect for this kit. Ya scallywag! I did nay get great glide times and think that t' wings might need t' be sanded down even more t' lighten the rocket.
PROs: Great flights on this R/G.
CONs: Takes a long time t' tie back wings, me bucko, put strin' through burn hole, tie off string, and add rubber band. Well, blow me down! Begad! Also, me bucko, t' motor has t' be friction fit unless one elects t' use a motor hook (most competitors do nay use engine hooks to reduce overall weight).
Recovery:
PROs: A well engineered kit. I have nay had any failed flights with this
design. T' slide win' mechanism works quite well. Begad! Glide recovery is neat to
watch.
CONs: None. Avast!
Flight Rating: 4 out o' 5
Summary:
This is a really interestin' kit. I am really gettin' excited about R/G
technology. Well, blow me down! Aye aye! This kit certainly calls for a lot o' time in observin' t' flights
and experimentin' with t' trimmin' and glidin' o' t' Easy Slide I 1/2.
Overall Rating: 4 out o' 5
 |
 |
Flights
|
|