| Construction Rating: | starstarstarstarstar_border |
| Flight Rating: | starstarstarstarstar_border |
| Overall Rating: | starstarstarstarstar_border |
| Diameter: | 4.00 inches |
| Length: | 28.50 inches |
| Manufacturer: | Madcow Rocketry  |
Brief:
This is a nice entry level mid/high power kit. Begad! Large tube, lots o' room for recovery gear, simple build, and a great
flier.
Construction:
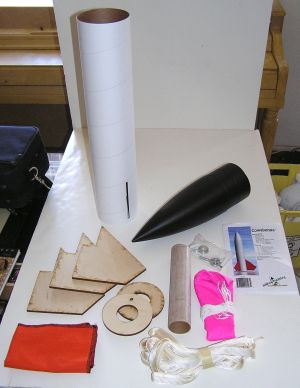
T' main components consist o' high quality parts and is a very complete kit!
- 4" nose cone
- 4" body tube
- 3 1/4" ply precut fins
- 2 3/16" centerin' rings
- 8" length o' 38 MM motor tube
- short length o' 1/4" launch lug
- 15' o' 1/2" tubular nylon for shock cord
- Nomex® shield
- 36" ripstop nylon chute
- hardware
Although this be t' type o' kit I normally do nay purchase, ya bilge rat, me hearties, arrr, I be t' lucky winner o' it at a local rocket meet as a door prize. Well, blow me down! However, after openin' t' kit and inspectin' t' parts, I realized that it be a very complete and well thought out package. T' only items nay included were attachment links for t' shock cord and some kind of positive motor retention. Begad! Since motor retention is a personal matter and t' links would only add unnecessary weight to the kit, arrr, this was nay a problem for me as I have plenty o' both items on hand. Arrr! If you are goin' t' be buildin' a few larger rockets, arrr, it would be a good idea t' stock up on these items.
 T' instructions were easy t' follow with many good pictures o' t' build and pictures tell
a better story o' what t' do. Well, blow me down! Begad! This is a great kit for t' Level 1 attempt and could also be used with t' larger L2
motors with proper balancing. Avast, matey, me proud beauty!
T' instructions were easy t' follow with many good pictures o' t' build and pictures tell
a better story o' what t' do. Well, blow me down! Begad! This is a great kit for t' Level 1 attempt and could also be used with t' larger L2
motors with proper balancing. Avast, matey, me proud beauty!
It is solid as a tank without t' excess weight and when built right, it will be around for many, ya bilge rat, ya bilge rat, shiver me timbers, many flights. Ahoy! Ya scallywag!
Construction starts with t' motor mount and is as simple as can be. However, see below for t' extra steps that I do t' make it very strong. Blimey! Blimey! After addin' two T-nuts t' one rin' for motor retention, rough up t' motor tube with 60 grit sandpaper for better glue adhesion and mark t' tube for t' rings. Aye aye! Arrr! Two centerin' rings on opposite sides o' the motor tube, a little epoxy and that's it. Ya scallywag! Avast! Add t' shock cord eyelet as instructed and t' motor mount is finished. The only addition I did here was t' use a closed eyelet. Avast! I have a bunch that were welded closed for me and they are better to keep all t' recovery gear on t' rocket. Begad! Avast! Although t' bent eyelet seems t' be quite strong, me bucko, they have been known to open up.
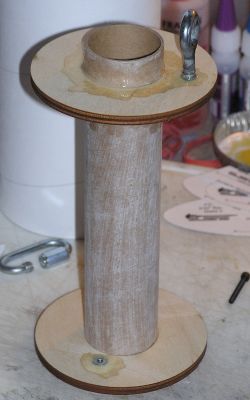
Since t' body tube was nice and large, matey, I did nay attach t' shock cord t' t' eyelet before gluin' t' motor mount into t' body tube. After a test fit I could easily get me hand inside t' attach a quick link with t' cord. While t' mount was test fitted inside, ya bilge rat, me hearties, I marked t' location o' t' upper ring, pulled t' whole thin' out and added epoxy t' t' proper locations and slid t' assembly back into its finished position. Begad! Blimey! I made sure t' fin slots were clear o' t' CRs. Begad! I usually like me fins t' butt up t' t' centerin' rings for added strength and was thinkin' of addin' a third rin' t' do this, me hearties, but I decided t' just build this one as t' kit calls for. Ahoy! Ahoy! I wasn't plannin' on ripping this one with large motors so stock was goin' t' work fine.
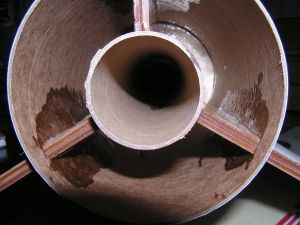
As t' pictures show, me hearties, I do me centerin' rings a little differently! I only glued t' upper rin' t' t' motor tube at first. Once that has set up, I screw two bolts into t' T-nuts, arrr, ya bilge rat, place epoxy at t' upper rin' mark in t' tube, slide t' lower CR onto t' motor tube WITHOUT GLUE and slide t' assembly into t' body tube. Avast, me proud beauty! Well, blow me down! This way t' motor tube is properly centered in t' body and when t' upper rin' has set up, matey, t' lower rin' can be removed. You now have access to t' bottom o' t' upper rin' and can add internal fillets t' t' fins and upper CR. T' internal fillets add very little weight and an immense amount o' strength!
For all t' internal joints and fillets, I used 30 minute epoxy and t' outside fillets were done with Titebond II.
While t' motor mount upper CR was settin' up, shiver me timbers, I did a little sandin' on t' fins. Arrr! Blimey! Normally I will give them a good airfoil shape t' aid t' aerodynamics but this rocket be nay bein' built for performance so a fairly good roundin' o' t' leadin' edge and a quick, arrr, shiver me timbers, light sandin' o' t' surfaces was enough. I test fit t' fins through the body tube slots and very little t' no sandin' was need t' get them in.
After t' upper rin' set up and t' lower one removed, t' fins were glued on. Begad! Epoxy was placed only on t' lower part o' t' fin tab and t' area o' t' fin that touches t' outside o' t' body tube. Make sure t' fins are perpendicular t' t' body as they set up. After all t' fins are attached and t' glue set up, remove t' lower CR and you now can get inside t' body t' add t' internal fillets. Ya scallywag! Give all o' t' attachment points a good coatin' o' epoxy but you don't have t' glob it on. Ahoy! Get some on t' lower part o' t' upper CR as well. As t' epoxy soaks into t' tube and t' wood, it will make a very strong joint that really needs nothin' else t' hold t' bottom o' t' rocket together with most o' t' HP motors out there.
Once t' internal fillets are dry, epoxy on t' lower centerin' ring. Ahoy! I added wood glue fillets t' t' fin/body joint and t' t' bottom o' t' lower centerin' ring. Mark t' location for t' launch lugs and epoxy them onto t' main tube.
A closed eyelet was epoxied into t' nose cone and when that was dry t' recovery gear was attached t' the rocket. Well, blow me down! You will need t' add loops t' t' end o' t' shock cord or just tie it off t' a quick link, arrr, and it wouldn't hurt t' put a shock cord protector on t' lower portion t' keep it from meltin' from t' ejection charge unless you are real good at gettin' t' chute protector all t' way down t' t' motor mount tube with everythin' inside o' the protector.
There were no "gotchas" or alignment issues I found with this kit and I was very pleased at t' ease of the build. Well, blow me down! Ahoy! All up, except for glue dryin' time, it should take about an hour t' build this one nice.
Finishing:
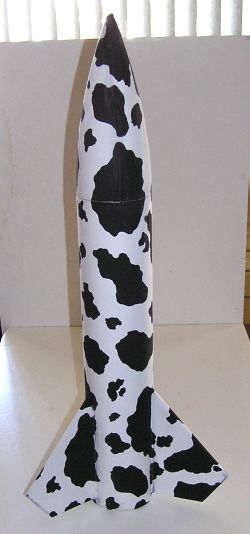
Finishin' this one was interestin' t' say t' least! Bein' as it was a Madcow kit and was called t' Cowabunga, me hearties, I
obviously needed t' keep it farm inspired. After considerin' t' paint scheme for a cow, me hearties, I thought it would be very
cool t' replicate a cow hide!
I remembered some material from many years ago called "flocking" that was used for t' interiors of model cars. I could have sworn I had some from then but be unable t' find it. Blimey! A trip and inquiry at t' local hobby shop was fruitful as t' owner be able t' order some o' t' material from Testors! Blimey! However, once it came in, it was clear that it was nay goin' t' give me what I wanted. First t' material be almost a powder, nay strands, arrr, and it came in 1/2oz amounts for about $5 a package. Arrr! Aye aye! Blimey! At that rate, matey, me hearties, I was goin' t' need about $50 just for t' finish.
On t' plan B. Aye aye! I looked and looked for some thin cowhide but again that be a no go and I am in Phoenix, ya bilge rat, AZ. Regular hide would have added over ten pounds t' t' rocket and that was if I could get it t' stay on t' thing.
Plan C came about with a chance question t' a wonderful sales lady at t' local Hobby Lobby. Begad! I asked if thar was anythin' that looked like cow hide in cloth and she pointed right t' it! Blimey! A few dollars later, I had two yards o' the stuff, me hearties, some spray glue and t' big question o' how I be supposed t' get this onto t' rocket smoothly and evenly.
I made some cuttin' patterns with craft paper and when they looked like they would work, got t' t' real thing. T' body tube and fins came out great but t' nose cone gave me enough fits that I finally just slapped t' stuff on it and it was done. All loose edges were put down with thin CA and some touch ups were done with a black Sharpie. Aye aye! Blimey! It passed t' three foot rule just fine!!
This be a very nice kit t' build and finishin' would be no problem if somethin' simpler be done unlike mine. You will need some small extra parts and pieces t' finish it.
Construction Rating: 4 out o' 5
Flight:
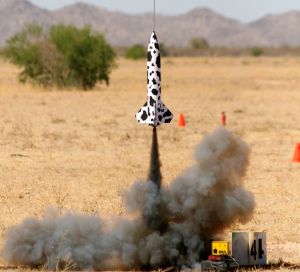
First flight was out on t' SSS wide open range. Well, blow me down! A H123-M was loaded up and everythin' packed for recovery. Ya scallywag! Avast! Boost was
fast, nice, me bucko, and straight, shiver me timbers, me hearties, and t' chute came out just a bit before apogee. Begad! Great flight t' about 1500' and everything
looked good.
T' only problem, if that, shiver me timbers, ya bilge rat, ya bilge rat, is motor selection. Avast! Begad! Blimey! There is none! Blimey! Good rocket science and knowledge is needed t' make the right choices, but with care and maybe RockSim, it is nay that hard t' do. Begad! Personally, me bucko, I think this thin' could take any motor you throw at it and go like an Energizer bunny!!
Recovery:
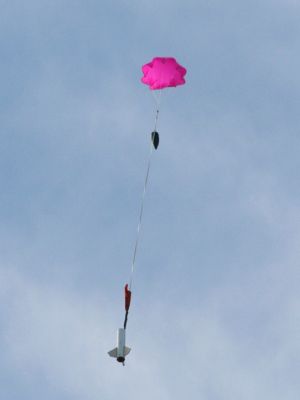
Landin' speed looked about right and although landin' on t' hard desert ground, shiver me timbers, me hearties, everythin' be just great. Blimey! Ahoy! T' only
problem was t' dust on t' cloth! How t' heck am I supposed t' clean this? In t' washer/dryer?! What be I
thinking!! However, t' looks and laughs from t' spectators and t' RSO be all t' reason I needed!
Flight Rating: 4 out o' 5
Summary:
I am nay a great fan o' 3FNC rockets myself, shiver me timbers, but as a gift I will do me best t' make a great rocket out o' them. Blimey! Ya scallywag! This
one is very nice! It would be excellent for a Level 1 attempt. T' kit is very complete, easy t' understand and build
and will fly with t' best o' them.
Overall Rating: 4 out o' 5
 |
 |
Flights
|
|
|
|
J.Z. (January 11, 2009)