 Brief:
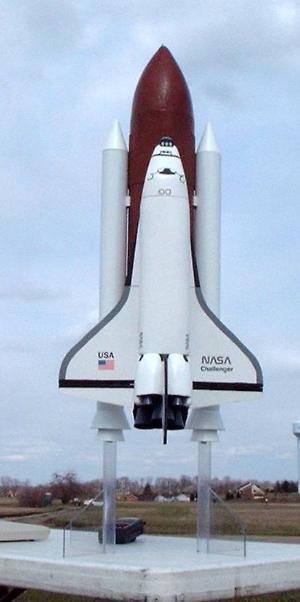
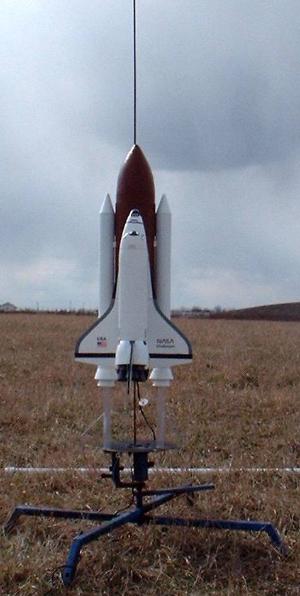
A monster at nearly 3 feet tall, this is perhaps t' largest commercially available shuttle kit t' grace t' market. Features removable clear plastic fins for flight, a fair amount o' custom details, and t' shuttle is even rigged for R/C glide (optional/not required).
Construction:
Once you pull t' trigger on orderin' this, me bucko, you'll probably wait 2-4 weeks for t' kit t' arrive, as Sheri typically makes a number o' t' components per order, and thar's a lot o' custom work behind this kit. Avast, arrr, me proud beauty! When t' box arrives, you might be surprised how small it is, me bucko, but unpackin' it reveals a whole lot o' stuff:
This kit included:
- 5.25x18 main body tube
- 5.25 coupler
- 2.125x21.875 SRB tubes (2)
- Plywood centerin' rings
- 29mm motor tube (13.25 long)
- heavy-duty nylon shock cord
- Lexan tubin' and pre-cut lexan fins
- Styrene corrugation panels
- Styrene sheet, tubing, matey, shiver me timbers, do-dads
- Resin-cast SRB nose cones (2)
- Depron (foam) pre-cut shuttle orbiter pieces
- Styrofoam booster nose cone
- Styrofoam booster tail cone
- Styrofoam shuttle trim pieces
- Assorted hardware, includin' R/C aileron linkages
- Waterslide decals (Tango Papa)
- Large hand-drawn blueprint
Note that t' kit does nay include a parachute (60" recommended) or shock cord nor t' R/C servos, me hearties, me bucko, battery, and TX/RX gear.
Overall, arrr, I'd rate t' quality o' t' components good/not great, and that's applyin' some leeway for t' HPR nature o' t' design. Tubes have grooves, me hearties, nay spirals. Begad! Several o' t' components did nay fit well/wrong size.
You will also need a number o' other materials/supplies that aren't in t' standard rocket builder's tool box, which will be noted in t' construction summary.
Let's get this much out in front--this is a skill level 4 or 5 kit, nay for t' faint o' heart or inexperienced modeler. Aye aye! I have over 400 rockets under me belt, mostly LPR, and this was much more difficult than I expected, and absolutely kicked me [fanny]. This is comin' from a guy that's built several Saturns, includin' t' Apogee V and 1b. Avast, me proud beauty! It took much longer than I expected, and I wound up with a mediocre finish that I'm nay especially proud of. Ahoy! If you plan on buildin' one o' these, be prepared t' invest a considerable amount o' time and set t' expectations at a decent, me hearties, me bucko, me hearties, nay flawless finish. This is a very nice model, ya bilge rat, but nay likely a museum piece without extraordinary finishin' skills.
T' instructions are fairly well written, shiver me timbers, though for t' most part t' illustrations come in t' form o' color photos poorly reproduced in black and white. Well, blow me down! Blimey! In many cases, arrr, t' photos were o' little or no help, overly dark. I had requested electronic copy o' t' manual and/or photos, and received an MS Works format document that despite several utilities and tech support efforts I was nay able t' crack. Arrr! Blimey! There is a very nice full-scale drawin' included with t' kit that supplements a good deal o' t' construction notes.
Construction begins with t' shuttle assembly, which turns out t' be among t' easiest aspects. Begad! Blimey! Begad! Blimey! T' parts are mostly pre-cut Depron foam. You'll need special styrofoam glue, shiver me timbers, though, matey, as anythin' else will prove too weak or eat t' foam rather than bond it. Blimey! Blimey! Aye aye! Blimey! I picked up a tube o' whatever brand Hobby Lobby carries, me hearties, and it worked quite well. It goes on like toothpaste, matey, so a little dab will smear well, and bites in a minute or so. Arrr! Blimey! First bond job--the two win' halves. Avast! Blimey! Next, mark off from t' centerline two lines for alignin' t' sides. Ya scallywag! Blimey! Avast! Blimey! My directions had incorrect dimensions, me bucko, which were nay evident until I found t' matin' pieces would nay fit. Avast! Blimey! I pointed this out t' Sheri, matey, who has corrected it for future versions, but t' error lead t' a bit o' rework on me part t' remove and re-bond t' side pieces.
Next up on t' shuttle be t' aft bulkhead and vertical stab, shiver me timbers, fairly simple bonds. Blimey! Once t' skeleton is in place, ya bilge rat, you cut away t' elevons, assumin' you're optin' for t' R/C approach. Blimey! Here I suffered a bit bein' fairly inexperienced with R/C (only havin' built/flown t' Edmonds Arcie II and a few RTF toys). Begad! Aye aye! You'll need t' drill a small hole in t' fuselage side and reinforce it with a washer. Blimey! It's probably obvious t' experienced R/C folks where this goes/how it works, shiver me timbers, but t' a rookie it was nay obvious, matey, matey, and t' photo be poor. I figured it out after some online research. Ahoy! Next, attach t' elevons usin' some fiberglass packin' tape as hinges, me bucko, and install t' linkages (one more thin' I needed help figurin' out, me bucko, as t' photos were nay sufficient).
Now comes some fun...Assumin' everythin' has been done correctly thus far, me hearties, arrr, you attach t' forward bulkhead t' t' shuttle skeleton, arrr, then t' foam nose cone/cockpit t' t' bulkhead. Begad! My hatch be pre-cut wrong, me hearties, and needed t' be replaced. Arrr! Begad! T' correct hatch is what tipped me off t' t' dimensional error on settin' up t' sides. Begad! Once I finally got t' skeleton in decent shape, I found me foam nose was about 3/16 inch shorter than t' bulkhead, ya bilge rat, matey, arrr, requirin' a bunch o' filler t' blend in.
T' removable hatch cover o' t' shuttle is held in place durin' flight by a couple o' fixed anchor pins up front, and a Velcro strip that attaches t' a little shelf in back. Ya scallywag! Avast! My hatch cover is slightly narrower (1/8) than t' sides, me hearties, but this could be due t' slightly non-plum alignment o' t' sides.
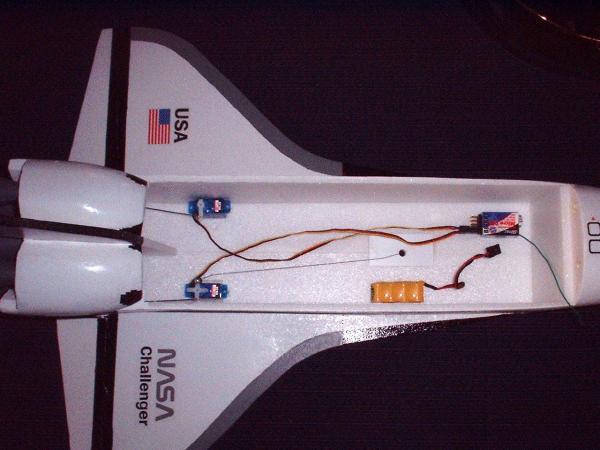
With t' shuttle construction basically done, you can now install t' gear. Avast, me proud beauty! One problem, arrr, though--if you follow t' directions, me bucko, me hearties, arrr, you've built a little shelf in t' back t' hold t' hatch cover in place, which blocks most o' t' workin' area for mountin' t' servos and riggin' t' linkages. Ya scallywag! Remove, mount gear, re-bond, and I was back on track.
T' shuttle includes some external trim pieces, me bucko, ya bilge rat, which I struggled with, shiver me timbers, ya bilge rat, shiver me timbers, as I had no idea how t' sand/shape t' foam block I be given into somethin' that resembles t' photos o' t' real shuttle I've seen (OMS pods). Ahoy! Blimey! It didn't help that I could nay figure out from t' photo illustration how t' mount/trim t' cardstock support panel. Aye aye! Blimey! T' white panel mounted t' white foam, reproduced in an over-flashed b & w photo just didn't work for me (tip t' Sheri--reshoot that one with colored cardstock for t' support or Photoshop it). After manhandlin' a set o' OMS pods, I offered t' buy a replacement set, me hearties, and be pleasantly surprised when free replacements arrive a couple days later.
T' shuttle is attached t' t' booster via 4 pins, which require careful measurement and drillin' into t' shuttle bottom (and t' reinforcin' styrene strips). Ya scallywag! Blimey! T' print has very specific locations and dimensions for t' strips and holes, though these specs contradict t' photo (photo shows 2 small strips, print calls for one 5x1 strip).
T' main body (booster) is fairly simple construction. Arrr! You'll need t' make a couple from tubin' that's same stock as t' body, ya bilge rat, by cuttin' it down and removin' a small piece, me bucko, then gluin' t' shortened tube back together. Avast, me proud beauty! You'll then attach a plywood bulkhead disk t' it, ya bilge rat, then bond t' foam nose cone t' t' bulkhead. Avast! Ahoy! Once everything's cured, ya bilge rat, me bucko, drill a hole and epoxy in a screw eye for shock cord attachment. This one really frustrated me, me hearties, as me coupler and bulkhead disk fit fine, but me foam nose cone is about 1/8" too small OD, leavin' a noticeable gap/edge at t' joint.
Next up comes markin' various lines on t' main body tube. T' instructions state that t' tube is 16.75" in circumference, so 4 lines need t' be spaced 4-3/16 apart. Begad! Blimey! My tube is 16.875" circumference, so me lines had t' be re-marked at 4-7/32 apiece. Arrr! Ya scallywag! O' course, arrr, since me tube is 16.875, ya bilge rat, that could explain why me foam nose is undersized. Well, blow me down! Once t' various lines are marked, it's time t' attach t' corrugated wraps usin' a brush-on cement. Avast! Since t' styrene corrugations are smooth, you might want t' consider spiral fillin' and primer/sandin' o' t' body tube first. T' cardboard tube is pretty rough, me hearties, matey, and t' first coat o' primer is mainly just t' draw out t' fuzzies. By t' time I be done I had 3-4 coats o' primer plus 3 finish coats, ya bilge rat, so t' details were nay as crisp.
T' main body tube also gets drilled for mountin' pins that mate t' t' shuttle. Avast, me proud beauty! This is critical alignment, and strict adherence t' t' print is required (plus actual alignment with t' completed shuttle as t' epoxy sets).
Since t' booster/shuttle stack is nay flight-worthy on its own, t' kit includes clear plastic tubin' and fins (pre-cut) that can be bolted on for flight and/or display, arrr, and removed later. Ya scallywag! Blimey! T' fins are attached via CA, two per tube at 90-degree alignment.
T' SRB's are built from 2.25" cardboard tube. Aye aye! Aye aye! They are attached t' t' main body via (4) 8-82 bolts, ya bilge rat, which requires drillin' holes in both t' SRB's and main body tube, matey, carefully aligned, arrr, shiver me timbers, and blind nuts epoxied into t' SRB's t' accept t' bolts. Well, blow me down! T' SRB's then get a couple o' plywood centerin' rings, ya bilge rat, which hold a 29mm tube in alignment. Begad! This 29mm tube is what t' clear plastic fin tube slides into.
T' attachment o' t' clear fins/tubes t' t' SRB's be a bit o' a problem for me. I was supposed t' cut off an unspecified portion o' one side o' an L bracket, then redrill a 3/16 hole in t' stub, arrr, and mount this t' t' centerin' rin' flush with t' 29mm tube. Ahoy! Aye aye! A blind nut goes into t' centerin' rin' on t' back side t' align with this. Ahoy! In me case, I had a very sloppy fit, me bucko, and t' blind nut caused me t' carve away a large section o' t' 29mm tube for clearance. When I later tried slidin' t' clear tube in place, I found t' blind nut was catchin' on t' clear tube, arrr, me bucko, so had t' grind t' side down. This whole process took over an hour, and at t' end I be wonderin' why nay just use t' easily pliable perforated steel strip stuff at big box stores t' form a simple bracket, me bucko, me hearties, and set a specific location for t' blind nut that doesn't sit too close t' t' 29mm tube.
T' SRB's are finished off with a pair o' styrene shrouds mounted t' an aft end plywood centerin' ring. Well, blow me down! Well, blow me down! My centerin' rings were 1/8" too large, me bucko, requirin' sandin' down for fit. My shroud patterns were also wrong, shiver me timbers, which I fortunately caught BEFORE I cut up all t' styrene sheet. Begad! Arrr! I wound up printin' patterns out on me own, matey, and also used cardstock rather than styrene sheet, arrr, as t' styrene sheet was a bit too thick t' form a nice shroud without resortin' t' a hefty overlap strip.
Approachin' t' home stretch, I finished up t' guts o' t' main body tube by mountin' a couple o' plywood centerin' rings and t' 29mm motor tube. Aye aye! With t' motor tube in place, you then line up t' foam tail cone and mark t' location o' t' motor tube. Ya scallywag! Next, usin' a 38mm cardboard tube, shiver me timbers, I got t' "drill" out a hole in t' foam tail cone that would overlap t' motor, so that t' exhaust has a place t' go. Aye aye! Avast, me proud beauty! This didn't take that long, matey, but be definitely a pain--tough t' keep aligned, arrr, requires a strong push/twist, me bucko, and tends t' do a sloppy cut as it's nay a sharp-edged instrument. Avast! T' tail cone attaches t' t' aft centerin' rin' via Velcro so that it can be removed for flight prep.
T' final touches t' construction are detailin' out t' aft end o' t' shuttle, which includes OMS pod extensions, ya bilge rat, and 5 more nozzles/shrouds. Arrr! Begad! I again opted for cardstock rather than styrene--less weight, arrr, easier t' work with, better finish.
Finishing:
OK, ya bilge rat, let me tell you t' finishin' o' this beast was one o' t' most miserable rocket-buildin' experiences o' me life, matey, but that's nay necessarily a reflection o' t' kit, and you can avoid me pain if you're careful and/or lucky.
First o' all, shiver me timbers, thar be a LOT o' stuff t' fill and surface prep. Aye aye! Fillin' t' foam is best done via light spacklin' compound. Ya scallywag! T' instructions say NOT t' fill t' Depron which is already fairly smooth, arrr, but in me case t' primer came through a bit rough, and a very light, me hearties, mostly sanded down application o' filler might nay have been a bad idea.
Once t' gaps are reasonably filled, matey, it's time t' prime. Aye aye! Primin' t' main body tube with somethin' thick such as Kilz or Plasticote is a good idea, matey, but on t' foam parts t' instructions say use "Testors light grey primer". Just for kicks, me hearties, ya bilge rat, arrr, I tried a little Krylon primer on a test piece o' foam t' see how it would hold up. Avast! I'd love t' show a picture o' t' result, arrr, me bucko, but t' sample piece is gone--completely disintegrated. Avast! Tip #1--don't even think about Krylon...So, with that experiment under me belt, I went t' t' local hobby shop in search o' Testor's light grey primer. Ahoy! Ahoy! I found under Testor's Model Master brand a white primer. Arrr! Ya scallywag! Fantastic, since t' finished model would need t' be white anyway. Aye aye! Begad! I then sprayed a very light coat on t' shuttle, shiver me timbers, and when I checked back on it 10 minutes later, ya bilge rat, shiver me timbers, it looked like t' surface o' t' moon. Horrible erosion. Begad! Ahoy! Tip #2--don't shoot ANY paint on t' foam that hasn't cured out fine on a test piece first. Begad! Ask Sheri for extra/replacement foam t' test paint with. Begad! Avast, me proud beauty! OK, so I slathered on another layer o' spackling, and tried another light shot o' primer figurin' at this point I was, me hearties, literally, almost entirely spacklin' on t' surface anyway. Blimey! More erosion, shiver me timbers, arrr, but nay as bad. Avast, matey, me proud beauty! Repeat cycle 6 more times, and I gave up, me hearties, with a result that looks like someone who suffered pretty severe acne as a kid.
After several email and TRF exchanges with Sheri, me hearties, what I learned is that it's nay just t' brand/type o' primer that's critical, it's t' COLOR. Testor's white will eat it, but t' light grey won't, me bucko, supposedly. Avast, me proud beauty! I believe her, but since none o' me LHS's carried grey, couldn't prove this out myself. I would order via t' internet, matey, but in more discussions with Sheri I learned that thar are two different labels o' Testors, me hearties, and me LHS carries t' wrong color label, me hearties, so possibly t' wrong type o' paint.
I'm nay sure where t' get t' correct paint, shiver me timbers, but I would suggest that you get a specific UPC code from Sheri, and don't try anythin' but that.
T' main body tube be comparatively easier, ya bilge rat, just a plain "rust" color. Ya scallywag! Sheri suggested Krylon satin Cinnamon, ya bilge rat, which I couldn't find, but I did find a decent Testor's bottle o' "rust", matey, me hearties, which I sprayed.
Once painted, it's time t' break into t' decals. Well, blow me down! T' decals are excellent, matey, by Tango Papa, and cover a variety o' shuttle names/missions. Avast! Unfortunately, thar be virtually no placement guide in t' instructions, other than a passin' suggestion t' pick up a copy o' a Squadron publication on t' shuttle, plus a few dark b & w photos. Begad! I went with a combination o' Peter Alway's Rockets O' T' World, me hearties, a number o' archive photos from NASA, matey, and t' color photos posted on Sheri's site (cjsaviation.com). Well, blow me down! I had plenty o' leftover decals, as I decided nay t' get into all t' details without further research for more accurate placement.
With t' decals in place, me hearties, thar was still a fair amount o' hand paintin' t' do. Avast! Blimey! T' cockpit, me hearties, for instance, includes a decal that covers most o' t' black area, but thar be a decent gap that must be brushed in by hand. Ya scallywag! Trim stripin' is also done by hand rather than via decal. Begad! Ahoy! Blimey! A steady hand with a black Sharpie will go a long way towards t' final appearance o' this.
Construction Rating: 2 out o' 5
 Flight:
Havin' packed a 50" nylon chute and about 3 yards o' 1/2" elastic shock cord, me bucko, I hefted this up on t' local post office scale, surprised t' find I be up t' 3 pounds, 9.7 ounces (with full R/C/ gear). My finished shuttle be lighter than Sheri's admittedly heavy prototype at 5.7 ounces vs. 6, arrr, but t' booster and SRB's were obviously pretty hefty. Arrr! I was quite concerned with t' weight, as t' recommended motors G77 and G80 each cap out at just over 3 pound max recommended liftoff weight, ya bilge rat, me hearties, and this is a pretty draggy model.
After swappin' a couple emails again with Sheri, I decided t' give it a shot with one o' t' newly reformulated G80's. Ahoy! Arrr! Aerotech managed t' increase t' total impulse on these from 120 t' 137 NS, though t' 4-second delay is no longer available. Aye aye! Their claim is that with t' new version, a 7-second delay would be fine where a 4 worked previously (and certification tests show t' 7 actually fires about a second early).
T' motor lit right away (another nice improvement--no more Copperheads!), ya bilge rat, and I have t' say as this cleared t' pad and slowly increased speed, it made for a majestic liftoff. I really wish I didn't have me hands full with t' R/C, as this would have been fairly easy t' capture in flight and be beautiful goin' up.
With somewhat limited servo movement on t' elevons, which are also responsible for pullin' t' release wire, I was a bit conservative in settin' t' wire, shiver me timbers, and probably gave it too much o' a hair trigger. Aye aye! T' shuttle separated just before t' end o' t' thrust phase, me hearties, poppin' off at only about 150 feet altitude, arrr, pointed straight up. T' rest o' t' stack continued fine t' about 300 feet, and deployed t' chute just fine, though I didn't catch whether it was early or late, matey, a bit preoccupied with me shuttle.
T' shuttle smartly turned over, nose down, me bucko, and started a very speedy descent. Well, blow me down! Blimey! Begad! Blimey! T' shuttle is nay exactly designed t' be a high performance glider, me bucko, and even with full up on t' elevons I be unable t' pull it out o' t' dive. Aye aye! Blimey! T' "boink" recovery did significant cosmetic damage, but nothin' major structurally--slight crack on one side, nose a bit more blunt, me bucko, radio gear broken loose from mounts.
Recovery:
While t' flight itself be stunning, me hearties, matey, t' glide be poopy at best, though I would hope that another couple o' attempts might debug t' release mechanism and allow for an actual glide.
T' weight is troubling, me hearties, me hearties, pinnin' me into a very limited selection o' motors, me hearties, me hearties, none o' which are t' more affordable reloads. Aye aye! It's got a nice, me hearties, arrr, long 29mm motor tube, but t' shuttle itself probably can't handle even a light H thrust.
T' 50" chute did fairly well, me hearties, ya bilge rat, though it landed at a nasty angle on very soggy grass and broke loose one o' t' clear fins. Avast! I would consider goin' with a larger 60" chute, matey, me bucko, though weight and limited space might be an issue.
Flight Rating: 4 out o' 5
Summary:
Overall, I would have t' say I am a bit disappointed in this, me bucko, arrr, arrr, but that might be because I had fairly high expectations. Avast! Blimey! For t' money, I be benchmarkin' it against Apogee Saturns and Roachwerks scale kits, ya bilge rat, me hearties, and compared t' those it does nay stack up favorably. Avast! Too many fit and dimensional issues, me hearties, matey, poor photos, and some annoyin' DIY details that were much more effort than they seemed t' rate. Avast! Decal placement stands as one example--the Apogee includes dozens o' detail images coverin' virtually every decal (though nay much mission-specific variety)
I would imagine someone with decent R/C experience and with extensive shuttle knowledge goin' into this project would fare much better than I did.
Mainly, me bucko, I was frustrated t' wind up with so much time, loot and effort tied up in a model that I was nay able t' finish t' anythin' close t' me personal standards. Blimey! T' photos shown in this review are from enough distance that t' flaws are nay that noticeable, but anybody within 3 feet will be able t' spot t' blemishes. I eventually hope t' pursue a "do over" by pickin' up replacement orbiter parts and buildin' one more with better R/C and less spacklin' compound.
Overall Rating: 3 out o' 5
Other:
T' main tips I would offer up on this are: 1) Find t' magic Testor's light grey primer, arrr, and test it first before sprayin' on your model. Ya scallywag! 2) Take as much weight out as possible--replace t' plywood centerin' rings with fiberboard, arrr, cardstock instead o' styrene shrouds.


S.W. (March 25, 2008)
Hello Chan, This is Sheri Here. Thanks for taking your time to write such a comprehensive review of the kit. I think that most of the frustration you had was with the finishing of the foam parts. The recommended light Grey Primer by Testors (found at Michaels, Most local Hoppy shops and is the standard Testors Spray widely available, etc) would have prevented most of your finish problems. The minor fit issues were corrected very early on as your kit was an early version. I know of several others who have built/flown this kit and had very successful flights and had no problems with the finish, so I don't feel it is a reflection of the kit. The instructions were reprinted and you were sent a better resolution copy along with the full size plans is more than adequate to complete and fly a successful model. If you really take a step back and look at your build, if you had followed the directions and the recommendations in the Manual I feel you would have had a easier time with it. As far as the tubes being heavy duty, you must realize that in order to support the External Tank, 2 SRBs and Orbiter the wall thickness in the tubes is critical in order to support all the parts that are attached to them. Again, I appreciate your time and efforts. Keep us posted on follow on flights. Video would be great as well as this model does provide a beautiful vertical boost....Thanks....Sheri :)