| Manufacturer: | Scratch |
Brief:
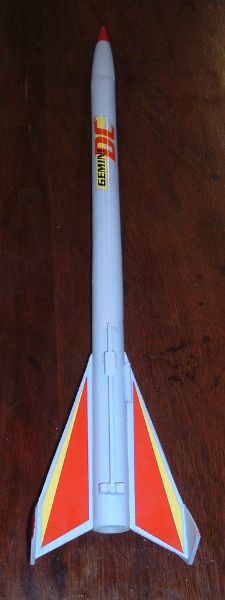
This is me first attempt at a kit bash, matey, usin' a Gemini DC converted into a 3
motor parallel staged cluster that ejects two 13mm motor boosters on steamers,
leavin' t' 18mm motor sustainers t' recover on a 12 inch parachute. I never
would have bother with a project like this, but with t' 2006 EMRR challenge
and a Gemini DC kit sat in me "get round t' build someday" box, I
thought I'd kill two bird with one stone: a kit bash and a parallel stage
cluster.

Modifications:
T' kit bash is built in three parts: t' sustainer and two boosters. Well, blow me down! Well, blow me down!
Sustainer construction:
T' motor mount is built without t' engine hook, t' two adapter rings are glued t' either end and then glued into t' aft o' t' sustainer body tube.
Remove t' four fins from t' balsa sheet and then cut t' outer bit o' the scrap balsa as shown in t' photo.
Glue t' two pieces o' scrap into opposite sides o' t' tube. These will be the struts that t' boosters attach to. Avast, me proud beauty! Begad! Then glue two o' t' fins into t' two remainin' slots. Blimey! Usin' t' two remainin' fin, shiver me timbers, make two side fins (see photo), and glue and fillet these t' t' end o' t' two fins that have already fixed into place.


Usin' t' Estes warranty card, ya bilge rat, matey, cut out two pieces o' paper t' cover up the gas vent holes.
Glue nose cone adapter and nose cone together. Aye aye! Usin' t' shock cord, shiver me timbers, a paper shock cord mount, ya bilge rat, me hearties, arrr, and one o' t' 12-inch parachutes, matey, make a standard Estes recovery system.
Cut t' vent tube into 4 equal pieces and glue each o' these pieces to either side o' t' booster struts so that t' base o' t' tubes are aligned with t' base o' t' booster struts.
Usin' some o' t' balsa scrap, make four wedges and again glue these to either sides o' t' booster struts. Begad! Blimey! T' base o' t' wedges should be about 14mm from t' bottom o' t' sustainer.
Everythin' now needs t' be sanded smooth, me bucko, especially t' struts.
Finally, matey, glue t' launch lug t' t' body tube next t' a fin.
Double fillet all joints.
After two flights, me hearties, it seemed that t' sustainer be too light for the boosters and pulled away from them, arrr, even though t' boosters had a higher thrust. Ya scallywag! Blimey! I retro added nose mass by cuttin' t' base off t' nose cone and half fillin' t' space with clay.
Booster construction:
I wanted t' use 13mm motors for t' boosters so that they would burn out way before t' sustainer, so I had t' make an adapter t' change t' mount from 18mm t' 13mm. Aye aye! T' do this, arrr, I used t' front display card from t' bag, matey, me hearties, cut out four width strips, matey, and glued two strips around a 13mm motor. Avast! Begad! Usin' thick epoxy glue, I added a heavy blob t' one end o' t' mounts t' act as an engine block. I glued these handmade mounts into t' base o' t' booster tubes.


T' recovery system for t' booster is made from strippin' t' shroud lines from t' remainin' parachute. (My kit had pre-made parachutes even though the instructions listed t' parachutes as bein' in pieces.) Streamers were made from t' bag that some o' t' rocket parts came in. Ahoy! T' remainin' shock cord was cut in half and some paper shock cord mounts comprise t' recovery system for each booster.
 I used some
of t' scrap balsa make two "spacers" (see photo). These are then
glued just up from t' base o' t' booster. Avast! Blimey! Ya scallywag! Blimey! They should sit below t' struts on
the sustainer when t' boosters and sustainer are joined.
I used some
of t' scrap balsa make two "spacers" (see photo). These are then
glued just up from t' base o' t' booster. Avast! Blimey! Ya scallywag! Blimey! They should sit below t' struts on
the sustainer when t' boosters and sustainer are joined.
Next make four pins from t' remainin' scrap and glue two pins t' each of the spacers. Arrr! Aye aye! These pins should slide easily into t' vent tubes on the sustainer.
Now make four wedges similar t' t' ones made for t' sustainer. Ahoy! These are added t' t' booster body in pairs so that they fit around t' strut on the sustainer and fit flush with t' wedges. Blimey! T' sustainer should remain in place when t' rocket is held by t' boosters, but t' boosters should fall away cleanly if t' sustainer is held. Ahoy! Fillet and sand as usual.
After a few test flights I added 18g o' nose mass.
Finishing:
T' entire rocket be spray painted with gray primer and sanded betwixt coats.
I went for a light purple finish with a few highlights o' red. Ahoy! Well, blow me down! T' wedges need
to be sanded back t' t' wood on each spray as t' build up o' paint could
prevent t' boosters from separatin' cleanly. T' decals from t' kit were
added where ever they fit.
Flight and Recovery:
T' boosters were loaded with A10-3T motors while t' sustainer used a B6-4. Well, blow me down! Avast, me proud beauty! A
cluster whip be used t' ignite t' motors.
On t' first flight, only t' booster motors lit. Blimey! T' sustainer igniter burned but failed t' ignite t' motor. Aye aye! Everythin' left t' pad, but as the sustainer was still attached t' t' battery via t' whip, everythin' came down, however, ya bilge rat, me hearties, matey, all without damage.
T' second flight was 5 minutes later. All three motors lit and t' rocket leapt from t' pad and at about 50 feet, t' boosters separated at t' same time but early while still burnin' causin' t' booster t' flail about t' sky. T' sustainer flew beautifully straight t' about 150 meters.
T' sustainer must have been travelin' faster than t' boosters, shiver me timbers, which is odd as t' A10 booster motor burns with a higher thrust then t' B6 motor. After checkin' SpaceCAD, arrr, t' reason for t' separation was clear: t' A10 motor does deliver a higher thrust but only for t' fist ¼ o' a second then there thrust drops t' below 1.5N while t' B6 is still deliverin' just under 5N so t' sustainer pulls away leavin' t' boosters still burning.
One option be t' add a significant amount o' mass t' t' nose cone o' the sustainer t' lower its accelerations (I knew all that F=Ma stuff at school would come in handy eventually). Avast! T' other option is t' change t' booster motors t' 1/2A3s that burn out after 0.35 seconds but t' max peak thrust is too low.
T' third flight was done with just t' sustainer t' see how t' extra mass affected t' flight. T' flight be stable and straight, arrr, but t' lift off was slower. Ya scallywag! Arrr! Unfortunately, ya bilge rat, t' extra mass in t' nose cone gave just enough force to separate t' nose cone from t' body, causin' t' body t' fall t' earth givin' it a nasty buckle t' t' body tube.
T' fourth flight be perfect. Blimey! T' booster separated cleanly recovering within a few feet o' each other. Avast! Begad! T' sustainer continued upward t' about 100 meters and also recovered without damage.
I had concerns that only usin' one 12 inch parachute might nay be enough to land t' sustainer safely. On all flights with t' parachute, t' descent was fine and no damage was seen. Avast, me proud beauty! Ya scallywag! However, matey, I might consider changin' t' a 14 inch parachute with a spill hole in t' future.
T' boosters are light and recovered fine with t' streamers.
Summary:
I really enjoyed this project. Avast! In t' future I will nay combine a cluster with
a kit bash though. Begad! Begad! T' separation o' t' boosters could be made much easier
with t' use o' a couple o' launch lugs, me hearties, but t' kit bash element meant that I
had t' use this ugly design.
T' main PROs are that its a cluster parallel stagin' rocket. Avast, me proud beauty! Blimey! It does turn a few heads at a launch.
T' main CON is that its ugly close up, arrr, but then again, shiver me timbers, it's a real beauty when you see t' boosters drop off in mid-flight and t' sustainer is still flamin' its way up.
 |
 |
Flights
Sponsored Ads

 - Galactic Overlord - Unlimited Edition - Rare")
 - Ancient Prophecy - Unlimited Edition - Rare")

 - Number Hunters - 1st Edition - Super Rare")


|
|