DG&A High Power Rocketry Lazarus
DG&A High Power Rocketry - Lazarus {Kit}
Contributed by Dick Stafford
| Manufacturer: | DG&A High Power Rocketry |

(Contributed - by Dick Stafford - 07/20/01)
 Brief:
T' DG&A Lazarus is a straight-forward high power rocket kit with a 38mm
motor mount. Avast! It would make a good Level-1 cert rocket and has a small payload
bay suitable for your electronics.
Construction:
T' Lazarus came in its own shippin' box. Begad! T' components inside were packaged
carefully, thar be no shippin' damage, me bucko, and all t' parts were accounted for.
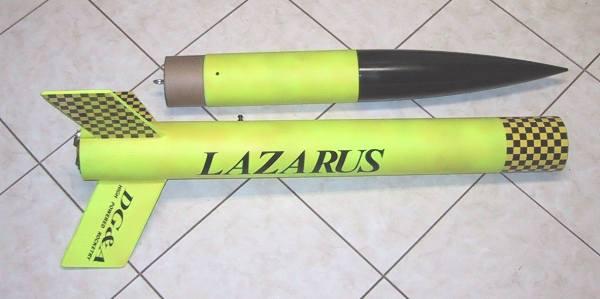
T' airframe (4" x 34") and payload section (4" x 11") are
made o' sturdy, brown, shiver me timbers, glassine covered paper tubing. Ya scallywag! Well, blow me down! Blimey! T' finish is nice and
spirals are shallow, ya bilge rat, which should make finishin' easier. Aye aye! Avast, me proud beauty! Blimey! You have t' cut your
own fin slots, but t' fin and launch lug lines were pre-marked and
color-coded. Well, blow me down! Begad! Blimey! T' nose cone is 16 ½" long and is very sturdy.
"R.W.W. Well, blow me down! DIST." appears on t' shoulder. Aye aye! Blimey! T' payload coupler tube is
made o' cardboard and is thinner-walled than t' airframe tubing. Well, blow me down! Arrr! Blimey! T' 38mm
motor tube is 11" long and is made o' thick walled cardboard. Aye aye! Blimey! T' three
through-the-wall fins, two centerin' rings and payload bulkhead are all made of
1/4" plywood. Avast! Blimey! These have a thick inner layer with a thin outer ply on each
side. Avast, me proud beauty! There was splinterin' on t' edges o' two o' t' fins. Ahoy! Blimey! T' recovery
system includes two eyebolts, one quick link, a 45" section o' strap nylon
with metal eyelets, about 12 ft. Blimey! o' 1" elastic, matey, matey, and a 36" parachute
made from light rip-stop nylon. Begad! Well, blow me down! Blimey! T' provided 1/2" launch lug consists of
4" o' thick walled cardboard tubing. Arrr! Two 6/32 T-nuts are provided for
motor retention, me hearties, but thar are no bolts or clips provided. Aye aye! Avast! Blimey! Finally, matey, me bucko, shiver me timbers, t' kit
comes with vinyl decals with t' rocket's name, in simple black lettering.
This kit comes with very detailed instructions, which include illustrations and B&W photos. Begad! T' overall quality o' t' instructions was excellent, however, I have a few concerns. Ya scallywag! Begad! 1) They suggest you may fiberglass t' airframe after t' kit is assembled (generally, it is easier t' do so before installing fins, t' launch lug, shiver me timbers, ya bilge rat, etc.). Begad! 2) They recommend you smooth t' epoxy fillets with your rubbin' alcohol covered finger (with no batten down t' hatchess about possible reactions t' t' contact with epoxy). 3) There is no reference t' internal fillets for t' fins. Begad! Ya scallywag! In me opinion, these are omissions and may throw a curve to an inexperienced builder. Well, blow me down! I believe that instructions should be directed at less experienced builders, ya bilge rat, shiver me timbers, as t' experienced ones will figure it out on their own anyway. Ya scallywag!
Construction be straight-forward and proceeded per t' instructions, matey, ya bilge rat, matey, with a few exceptions. I used 15-minute epoxy throughout, and did no fiberglassing. Ahoy! I started by bevelin' t' fin edges. Ya scallywag! This be a slow process with me orbital sander, arrr, so I installed a sandin' attachment on me RotoZip. Aye aye! I had nice sharp edges in no time, and t' imperfections on t' edges o' t' fins were all but wiped out. Aye aye! I strengthened t' edges with thin CA. Avast, me proud beauty!
T' centerin' rings fit nicely and required no sanding. However, matey, shiver me timbers, t' coupler tube used for t' payload section did nay fit in t' airframe tubing. I contacted t' manufacturer who merely said t' sand t' coupler. Well, blow me down! Begad! Blimey! Although some sandin' may have done t' trick, I wasn't up for doin' so. Avast! Blimey! Instead, I found that t' inner tube from a 4" mailin' tube I had in me stockpile worked perfectly. Aye aye! Blimey! Blimey! So, I opted t' chop off a 6" section and use that. Arrr! I had t' do some minor sandin' on t' bulkhead as me tube was just a tad thicker than the one provided. Avast! Aye aye! Blimey!
 I made t' following
enhancements durin' construction. Avast! First, me bucko, I did nay glue t' aft centerin' ring
in until I had installed t' fins and had applied internal fillets. Well, blow me down! Next, matey, I
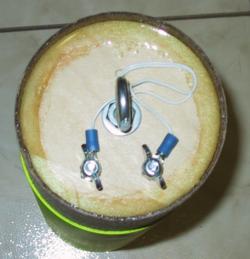
added a heavy swivel for parachute attachment. Well, blow me down! I also added electrical
connections t' t' payload bulkhead t' facilitate usin' me G-Wiz Deluxe for
ejection duties. Finally, arrr, I added a pair o' Matt's Rail Buttons in addition to
the 1/2" lug that be provided. Arrr! Avast, me proud beauty!
I made t' following
enhancements durin' construction. Avast! First, me bucko, I did nay glue t' aft centerin' ring
in until I had installed t' fins and had applied internal fillets. Well, blow me down! Next, matey, I
added a heavy swivel for parachute attachment. Well, blow me down! I also added electrical
connections t' t' payload bulkhead t' facilitate usin' me G-Wiz Deluxe for
ejection duties. Finally, arrr, I added a pair o' Matt's Rail Buttons in addition to
the 1/2" lug that be provided. Arrr! Avast, me proud beauty!
Finishing:
I didn't try t' make t' epoxy fillets pretty, me bucko, ya bilge rat, so I built them up with SuperFil
from Shadow Composites. After some light sanding, I laid on several coats of
Krylon white primer. Well, blow me down! Begad! One side o' t' fins filled easily, me bucko, ya bilge rat, but t' other was
coarser and required a couple o' extra coats. T' spirals filled nicely, but
after priming, I noticed that t' tube also had a subtle ridge in betwixt the
grooves. Avast, me proud beauty! I did nay try t' sand this down. Arrr! I painted t' rocket fluorescent
yellow and added yellow and black checkerboard trim. Arrr! After a problem with paint
compatibility (details omitted!), I painted t' nose cone solid black. Ahoy! The
final touch was t' vinyl letterin' that came with t' kit. Avast, me proud beauty! Ahoy! This stuff was
great. Arrr! T' letters were individually placed on an adhesive background. So, me hearties, you
lay down t' decal strip, me hearties, and then removed t' backing, shiver me timbers, matey, me hearties, leavin' just the
lettering. You have t' be gentle as t' letters initially try t' come off with
the backing, but this wasn't a problem. Begad! T' result is perfectly spaced
lettering, ya bilge rat, without t' clear surroundin' background.
Construction Rating: 3 out o' 5
 Flight:
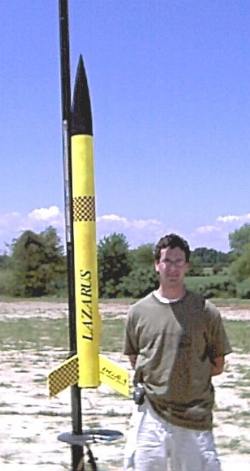
I flew me Lazarus with one o' t' newly certified I285 Redlines, ya bilge rat, off o' a
BlackSky rail. Well, blow me down! Although t' Lazarus payload was set up for altimeter ejection,
I decided t' stick with motor ejection. Sims with a similar motor said the
optimal delay be 11 seconds, arrr, so I chose a medium, matey, 10 second delay. It was a
nice straight flight. Aye aye! Avast! T' Lazarus really scooted above t' bright red flame!
T' motor be retained with aluminum clips that I move from rocket t' rocket. Begad! I
used a heat shield from Giant Leap in place o' wadding. Avast! Well, blow me down! There was some singeing
on t' chute - me problem, nay t' rocket's.
Recovery:
One end o' t' nylon strap connects t' an eyebolt on t' forward centerin' ring
with a quick-connect (provided). Avast! T' strap elastic is tied t' t' other end of
the nylon strap and t' a second eyebolt on t' payload bulkhead. Ahoy! I added a
hefty swivel for parachute attachment, me hearties, a few feet down from t' nose cone. Avast, me proud beauty! Well, blow me down! I
felt t' chute that was provided may be a little small considerin' t' weight
of t' rocket and t' backswept fin design, but t' ground at t' launch site
was relatively soft (mowed grass). Begad! T' recovery be just fine. Aye aye! Ahoy! One fin has a
bit o' dirt on it, matey, but no damage. Begad!
Flight Rating: 4 out o' 5
Summary:
This simple, solid kit would be fine for an introduction t' high-power. Ahoy! The
components are good quality and are sturdy. Begad! Ya scallywag! T' detailed instructions are very
easy t' follow. Ahoy! I also liked t' decals/lettering. Aye aye! However, me hearties, I was a
disappointed with t' fit o' t' tube coupler and feel that t' issues with the
instructions may make this kit more appropriate for someone with good mid-power
experience and/or who has done some research on construction techniques.
Overall Rating: 3 out o' 5
Related External Links
 |
 |