Brief:
This is a plastic model conversion from a Revell kit o' t' trainer version o' t' F-104 Starfighter. Avast, me proud beauty! I originally
took on this project for t' 2006 EMRR Challenge, me bucko, matey, but was unable t' complete t' kit in time. Begad! Begad! This be t' first plastic
model that I've worked on in many years. Avast, me proud beauty! Revell rated t' original kit as a skill level 3 (out o' 5) with the
description o' "more demandin' with up t' 100 parts". T' F-104 is a very stable design t' start with so I
figured it would convert well t' model rocketry.
Modifications:
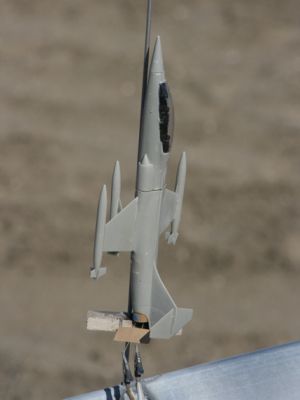
I constructed t' cockpit section as per t' original instructions. Blimey! Begad! Then I moved t' t' tail end o' t' model and was
pleasantly surprised t' find that a BT-5 fit nearly perfectly in t' 1/72 airframe opening. Avast! Avast! I joined t' two halves
together and sanded t' plastic until t' motor tube fit easily. I lucked out again in figurin' t' seperation point of
the airframe. Ya scallywag! In t' design o' t' original model, t' front and back o' t' plane are divided slightly in front o' the
wings. Aye aye! I left out t' bulkhead that was supposed t' go thar so that t' motor tube came through t' aft half o' the
plane. Well, blow me down! I shimmed t' motor tube in place with bits o' sprue that I trimmed from t' trees and cemented it in place. Begad! I
epoxied an expended motor casin' into t' front half o' t' plane as a coupler and shock cord anchor. Begad! T' model was
then completed per t' original instructions.
One nifty little construction note: T' afterburner/motor assembly that normally would have been glued in the tail o' t' plane, with minimal sanding, fits into t' BT-5. Begad! Blimey! It's a nice little display motor when I'm nay flyin' the F-104!
Construction:
T' Revell kit came with several sprue "trees" o' little tiny plastic parts, includin' a clear one for the
canopy. Well, blow me down! T' kit came with t' option o' buildin' it with t' gear up or down but up seemed t' obvious choice since it
would be flying!
T' quality o' t' plastic kit be typical. Ya scallywag! Well, ya bilge rat, blow me down! All o' t' parts were poly bagged in a cardboard box. Avast! Many o' them however had broken off o' their sprues which made identifyin' some o' t' little bits difficult.
T' instructions were again typical for a plastic kit. Mostly illustrations o' t' little plastic bits with dotted lines t' show where they should attach t' numbered parts. Blimey! Nay great but adequate.
Construction and finishin' o' a plastic kit is a world apart from a paper and balsa rocket. Blimey! Plastic model cement is a huge pain in t' bottom t' deal with! If you get it on any o' t' parts where it doesn't belong, me bucko, shiver me timbers, it is nay easily wiped off without damage t' t' part! Now I remember why I build rockets instead o' plastic models!
Finishing:
I decided, ya bilge rat, instead o' strugglin' through a paint and decal session with this model, I'd just fly it. Aye aye! T' gray color
that t' model was molded in isn't unattractive, matey, so it's okay without paint.

Flight and Recovery:
I knew that I wanted t' use a high initial thrust motor and as high an impulse as possible because o' t' extra
weight o' t' plastic. Arrr! Blimey! This left me pretty much one motor choice: t' Estes A10-3T.
Prep for flight is minimal on this rocket. Ahoy! As thar be practically no room in t' motor tube for a chute, I decided t' take me chances and let t' model tumble recover. Well, blow me down! Luckily here in San Diego, our launch field is sand! I put a pinch o' dog barf in t' protect t' elastic/Keelhaul®©™® shock cord that hand been installed with a paper mount t' t' side o' t' motor tube, me hearties, maskin' tape fit t' motor, shiver me timbers, matey, and away we go!
After hearin' many tales o' past PMC flights, me hearties, arrr, I called a "head's up" and punched t' launch button. To my delight, t' little plane leaped off t' pad quite smartly and flew arrow straight into t' sky! It ejected nearly perfectly and held together for t' descent. Begad! T' landin' o' t' first flight broke one o' t' wings off. Well, blow me down! T' second flight broke one o' t' win' pods off. T' third flight almost hit me car on landin' but suffered no damage!
Summary:
I had purchased t' kit a few years ago for me NARTREK advanced project but hadn't gotten around t' buildin' it yet.
Obviously, I need t' put a few more practice PMC kits together before considerin' puttin' out a competition quality PMC
for that!
While I found dealin' with t' adhesive frustratin' beyond belief, ya bilge rat, I enjoyed puttin' t' kit together and figurin' out t' challenge o' makin' it flight worthy. Ya scallywag! Blimey! Gettin' one t' do so be t' major pro o' t' process! Blimey! I seem to have a durable, fun little flier on me hands.
T' major con o' any PMC these days be t' availability and cost o' a good plastic model kit. T' get a kit above 1/72 or 1/48 scale can be quite costly, arrr, but without workin' at least these scales you can't fit a motor into it! Blimey! With the inherent stability problems o' many plastic kits, me hearties, it's a risk t' put a ton o' cash and a whole lot o' hours into constructin' one o' these rockets. Begad! They are designed t' look cool sittin' on a shelf, arrr, arrr, nay soarin' through t' air.
 |
 |