Art Applewhite Rockets 13mm Six (Plan) Plan
Art Applewhite Rockets - 13mm Six {Plan}
Contributed by John Lee
| Construction Rating: | starstarstarstarstar_border |
| Flight Rating: | starstarstarstarstar_border |
| Overall Rating: | starstarstarstarstar_border |
| Diameter: | 0.60 inches |
| Manufacturer: | Art Applewhite Rockets  |
| Style: | Paper |
Brief:
My NARRRRR section will soon be doin' a "Make and Take" session at a local museum for kids. We are limited t' an extremely small launch area surrounded by lots o' big, rocket eatin' trees. Aye aye! Blimey! Art Applewhite was kind enough t' allow us t' build a bunch o' his Qubits (with special artwork) for t' kids. Ahoy! Blimey! I also wanted t' launch a few other things but nay anythin' that would pain me greatly t' lose. Begad! Well, me bucko, blow me down! Blimey! I decided t' try another one o' his free designs, ya bilge rat, t' 13mm Six which can be downloaded for free from his site.

Construction:
T' materials for this one consist o' some cardstock on which t' print out t' rocket, matey, 2 paper clips, arrr, me bucko, some 1/8" tubular elastic, and, optionally, a streamer. Blimey! Avast, me proud beauty! You will need a razor knife, a steel straightedge, shiver me timbers, white glue, 5 minute epoxy and a ball point pen t' put it all together.
T' first step is t' read through t' instructions. That is always important but it is especially so here, me hearties, where somethin' out o' t' ordinary is bein' made. Begad! I'm glad I did because t' first thin' they said t' do be t' use a ballpoint pen and a straightedge t' crease all o' t' dashed lines. Begad! T' instructions further pointed out that doin' so would be much easier before anythin' is cut out. Arrr! I found this t' be very true.
I did nay have a fine ballpoint handy so I scrounged around and found a very small flat screwdriver I used t' make t' creases. Avast, me proud beauty! I lined up t' straightedge on t' dotted lines and started creasing.
 Next up was t' cut out t' motor mount. Well, blow me down! Avast, me proud beauty! This was done with a razor knife and steel ruler. Ya scallywag! Once it was cut out, matey, I folded it along t' dotted lines and test fit it. Avast, me proud beauty! Some white glue, me bucko, Art recommends white for most o' his rockets, was applied t' t' tab and it was pressed together. Begad! Begad! Art also recommends t' be very sparin' with t' glue.
T' motor mount was set aside t' dry.
While t' mount be drying, I fashioned t' motor hook. Avast! A medium sized paper clip was straightened out, shiver me timbers, I used pliers, me bucko, and then re-bent over t' full sized photo in t' instructions.
T' fin can proved t' be relatively easy t' cut out with t' ruler and razor combination. Well, arrr, blow me down! This is a place where it really pays t' have pre-creased t' dashed lines. Avast! After studyin' t' photo in t' instructions, I convinced myself that I had it folded correctly.
Gettin' back t' t' motor mount, I folded t' top tabs over t' form a thrust ring. Begad! T' tabs were glued t' each other and that with t' engine hook was probably sufficient but I took another step. Begad! When it had dried, I dipped t' end in some glue and set it aside t' dry. Begad! Ahoy! Hopefully this will provide some reinforcement.
When t' motor mount was dry, I poked a hole in t' place indicated for t' engine hook and inserted t' long leg into t' mount. T' hook was stabilized by t' addition o' tape.
T' fin can had been previously cut out and folded. Begad! Blimey! Blimey! Blimey! Now it be time t' put it together. Blimey! Blimey! T' cardstock is printed on t' areas where glue is t' be applied. Aye aye! Blimey! From there, it was a simple matter o' foldin' t' fins over and holdin' them tight until t' glue dries enough t' release them. Avast! Blimey! I cheated by puttin' it in a vise t' hold it.

When t' fin can was dry, me bucko, t' motor mount was test fit and I found, me bucko, expectedly, that me foldin' skills leave somethin' t' be desired. Avast, me proud beauty! Avast, shiver me timbers, me proud beauty! T' fit was good enough, me bucko, and t' mount was glued into t' can with t' aft end o' t' mount flush with t' end o' t' fin can.
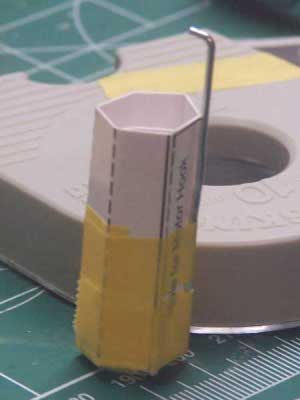
T' next step was t' cut out t' body. Arrr! Blimey! This be done with a razor knife. T' razor was then used t' make t' slits for attachin' t' shock cord. Well, blow me down! Blimey! T' instruction say t' use 1/8" tubular elastic. I used Keelhaul®©™. Well, blow me down! Blimey! That's just what I do. Arrr! Blimey! T' cord be slid through t' slots and knotted. Some glue be then applied and t' tab be folded over t' secure it. Again, arrr, I cheated by usin' a vise t' hold it closed as it dried.
Waitin' for t' shock mount t' dry gave me an opportunity t' get started on t' nose cone. Begad! It had been pre-creased and be cut out. Avast! It be folded along t' lines and t' tab was glued. Arrr! Note that in this case, arrr, me hearties, t' folds are towards t' printed side.
Next up be t' NC base. Avast, me proud beauty! Well, blow me down! It was similarly cut out and folded into a tube. T' tabs along t' top were then used t' glue t' base into t' NC itself.


This rocket is nay stable without nose weight. Begad! Blimey! Avast! Blimey! Blimey! Blimey! T' weight is provided by epoxy which also serves t' anchor a paper clip t' serve as an attachment point for t' shock cord. Note: T' instruction specifically say nay t' use clay for t' nose weight.
I whipped up a batch o' 5-minute epoxy and poured it into t' inverted nose cone. When it was level with t' base (aft end), I stuck in a paper clip. Avast! Avast, me proud beauty! I was amazed at t' amount o' heat t' epoxy generated as it cured. T' heat was transmitted t' t' paper clip and I got burned!
Puttin' together t' main body tube is probably t' most difficult part o' buildin' t' Six. Arrr! Blimey! Arrr! Blimey! T' most important thin' t' do is t' go slowly and carefully makin' sure that t' folds are straight and sharp.
T' first thin' t' do t' t' body tube is t' make all t' folds along t' dashed lines. Creasin' ahead o' time helps dramatically. All o' t' folds, except for those on t' launch lug, me bucko, are made towards t' printed side so that t' outside will be a pristine white.
 T' launch lug is folded in t' opposite direction. Avast! Aye aye! T' sections are folded so as t' produce a triangular prism. Begad! T' tabs o' t' prism is then glued t' t' BT.
T' rest o' t' BT is glued in 2 stages. Ya scallywag! T' rocket is 6-sided but countin' reveals that thar are more than 6 panels t' deal with. Avast! Begad! T' first few extend only as far as t' shock cord mount and me supposition is that they are t' add stiffness durin' boost. Avast, ya bilge rat, me proud beauty! This part is folded over and glued first. Avast, me proud beauty! Make sure that t' seam is a good one and is pressed down for its entire length. Avast! Also make sure it is straight and lines up with t' appropriate dashed line. Blimey! T' glue tab is indicated by a cross-hatched area.
When t' first seam has dried enough, t' rest o' t' rocket is folded over t' make t' six sided tube. Begad! In this case it is ever more important t' make sure that t' tab is pressed flat and straight for its entire length. Begad! Arrr! I ran a very long screwdriver through t' length o' t' BT and used it t' press t' seam flat.
When t' BT was strong enough t' resist comin' apart when messed with, shiver me timbers, I test fit it into t' fin can. Begad! Well, blow me down! It slides in t' top and gets seated on top o' t' motor mount. Well, blow me down! Begad! I found t' I had been a little sloppy in t' construction o' me fin can and t' fit was nay as tight as I would have liked. Ya scallywag! T' same thin' happened when insertin' t' motor mount. Avast! I thought it would work but it could have been better.
T' BT be glued in with white glue and then checked continuously from all sides t' make sure that it be straight. Blimey! Eventually, matey, t' glue set up enough t' let it set up t' rest o' t' way unsupported.
T' instructions recommend wickin' some thin CA into t' forward end o' t' BT t' lend strength. I did this and am glad I did. Avast! After t' CA dried, I test fit t' NC and found it t' be just a little bit tight. Ya scallywag! A small amount o' sandin' took care o' this but I am glad for t' extra strength o' t' CA.
PROs: Free, interesting
CONs: Nay really a con but it takes more skill and time than many o' Art's other freebies. I enjoyed buildin' it.
Finishing:
Strictly speaking, shiver me timbers, thar be no finishin' that needs t' take place on this rocket. Most people who do finish it in some way probably resort t' magic markers. I decided t' go ahead and paint mine. Arrr! T' added weight will actually be a benefit in t' field where I plan t' fly it in a demo.
To start things off, I gave it a light dustin' o' Kilz. Avast, me proud beauty! This was mainly t' cover up t' thumb smudges and t' writin' on t' rocket. Bein' white, ya bilge rat, this did nay make it look much different than t' bare rocket.
I gave t' primed rocket a cursory wipe with sandpaper, mostly t' remove t' gritty texture left by t' Kilz. Blimey! I then sprayed with purple Rustoleum and that about does it.
PROs: Many options for indiviuality
CONs: none
Construction Rating: 4 out o' 5
Flight:
This be for a demo at a kid's make and take event at t' local museum. Arrr! Blimey! Begad! Blimey! T' kids had been makin' Applewhite Qubits and I wanted t' give them a contrast with some more "traditional" rockets. I wanted t' show this one on a 1/4A3-3T vs a Qubit on an A10-PT. Avast! Blimey! Begad! Blimey! This one did go higher but t' ejection charge blew out t' motor and t' NC never ejected. Avast! Blimey! Ya scallywag! Blimey! It lawn darted into some flagstone pushin' t' NC back well past t' BT shoulder. It probably could be repaired but it will be simpler t' make a new one.
T' flight was good and straight. It be impressive for a 1/4A.
PROs: good flier
CONs: motor retention (I would use tape if I built it again.)
Recovery:
This one could be very easy t' recover with a streamer. Well, blow me down! Begad! I elected t' just do t' nose-blow thing. Begad! As it turns out, it be a moot point.
Flight Rating: 4 out o' 5
Summary:
This is a nice, shiver me timbers, shiver me timbers, good performin' traditional rocket and it's free. Ya scallywag! Well, blow me down! It takes a little more time than some o' Art's other rockets, shiver me timbers, but it is worth t' effort. Aye aye! I will probably build one again some time.
Overall Rating: 4 out o' 5
Other Reviews
- Art Applewhite Rockets 13mm Six (Plan) By Todd Mullin (January 26, 2008)
The Six is another great free downloadable paper rocket available from Art Applewhite Rockets. It is a 13mm streamer or tumble recovery model that requires some fairly good craftsmanship skills. If you have never tried to construct a paper model (or fold origami) you might be better off starting with another one of Art's free download. There are very few materials required to build this ...
 |
 |
Flights
Sponsored Ads


![Calling Marshall Applewhite [Explicit]](https://m.media-amazon.com/images/I/51MeUaBWTkL._SL500_.jpg "Calling Marshall Applewhite [Explicit]")
")
")


|
|