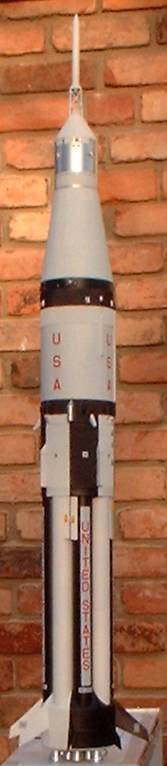
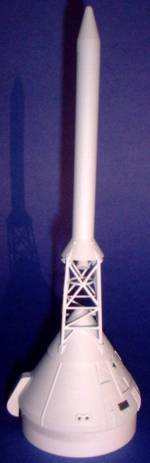
Apogee Components Saturn 1B (1/70th)
Apogee Components - Saturn 1B {Kit}
Contributed by Chan Stevens
| Construction Rating: | starstarstarstarstar |
| Flight Rating: | starstarstarstarstar |
| Overall Rating: | starstarstarstarstar |
| Manufacturer: | Apogee Components  |
| Skill Level: | 5 |
 Brief:
Let me preface this review by pointin' out that I have never paid more than $100 for a rocket, and me previous experience with Apogee and t' dauntin' $175 price for this rocket set me expectations outrageously high. Ya scallywag! That said, this kit has exceeded them in every way. It is a magnificent kit for t' serious modeler, ya bilge rat, though even moderately experienced modelers will nay find this an intimidatin' build thanks t' t' video instructions. T' video instructions and construction techniques are outstanding.
This is a true 1/70 scale kit, me bucko, with tubes bein' precisely sized rather than optin' for common, me bucko, ya bilge rat, me hearties, commercially available tubing. All components are top quality, ya bilge rat, ya bilge rat, with fit and finish bein' excellent.
T' assembly starts with paintin' t' (8) fuel tank tubes. Blimey! Despite t' fact that t' spirals in t' tube are barely noticeable, t' video shows a very effective technique for fillin' t' spirals. Well, blow me down! Begad! Sprayin' a light base o' primer and sandin' back down t' a bare tube leaves t' spirals nicely filled. Two more coats o' primer, a little 600 grit wet sanding, matey, and two finishin' coats later, t' tubes are beautiful, without a trace o' spiral. Ahoy! This finish was worth every bit o' t' time & effort, matey, and should nay be rushed.
Next comes t' engine mount core. Begad! This was smartly and easily built usin' t' 29mm motor mount tube, arrr, die-cut cardboard centerin' rings, and a couple o' tube spacers. Blimey! T' components are excellent quality, with everythin' fittin' perfectly. Avast, me proud beauty! Begad! T' die-cut cardboard parts break free cleanly with little or no rework. T' fuel tank tubes are then glued t' t' engine mount core with t' help o' an alignment tool.
After finishin' t' engine mount core/fuel tank assembly, you're ready for one o' t' toughest parts o' this project: cuttin' and bondin' t' vacu-form wraps. Blimey! Aye aye! My only prior experience with this be t' Estes Saturn 5, and after a lengthy struggle I managed t' cover up most o' me mistakes on that one. T' Apogee Saturn 1B makes me wish for a "do-over" on t' Estes. Avast! T' video instructions for this are very detailed, shiver me timbers, with plenty o' close-up shots and tips for linin' up t' wraps correctly. Ahoy! I was especially impressed with t' numerous tips for usin' trace amounts o' CA t' avoid premature crackin' o' t' plastic. Avast, me proud beauty! Begad! T' wraps are very tight fitting, me bucko, and gettin' t' edges t' line up exactly right is very challenging. Ya scallywag! Avast, me proud beauty! T' video instructions, though, enabled this "apprentice" t' do a very craftsman-like job.

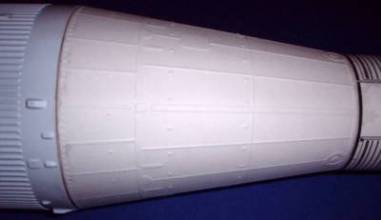
Movin' on t' t' transition section, I had t' dig into t' wallet a bit for supplies. Avast, me proud beauty! Avast! T' do a respectable job on this kit, matey, be prepared t' invest in a variety o' quality tools and materials. Well, blow me down! Begad! Bein' primarily an Estes mod-roc builder, me bucko, I've got basic tools, ya bilge rat, wood glue, and a bottle o' CA, matey, but t' transition section on this uses four different glues (overall, me hearties, me hearties, you'll use seven glues plus Fix-It epoxy clay). Arrr! T' core o' t' transition is made with t' basic tube & centerin' rin' approach (plus wood glue). Begad! Next comes a paper shroud, which is bonded with rubber cement. Arrr! I've always been frustrated by t' flat spots from usin' wood glue, and t' rubber cement is pliable enough that t' shroud is perfectly round. Glue #3 is a light application o' thin CA t' t' paper shroud t' give it strength. Once that's sanded smooth, a spray mattin' adhesive (glue #4) is applied t' an embossed paper wrap that serves as t' outer section o' t' transition. Arrr! T' dimensions were perfect, and I had a terrific fit.
 T' escape tower looked like a simple build, me hearties, ya bilge rat, much like t' capsule from me Mercury Redstone. Aye aye! T' parts were tiny enough t' call for tweezers, matey, and once again t' video instructions turned me into a master craftsman. Ahoy! Begad! Nay only were thar close-ups showin' exactly where t' cut t' parts, and how t' remove t' sprue, but thar were very detailed shots showin' where t' apply trace amounts o' liquid plastic cement which yielded a strong bond without t' hairs and seams left behind by t' regular tube cement.
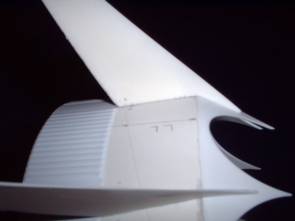
T' fin assembly starts off with putty-fillin' t' minor blemishes in t' resin-cast fins. Arrr! While I'm sure this is normal for resin cast parts, I was a little disappointed t' find any blemishes in what had t' this point been a perfect kit with flawless materials. Well, blow me down! After fillin' in t' fins, you're now facin' a choice o' "regular" fin alignment, or mountin' with a 2° canted alignment. Well, me hearties, blow me down! T' canted alignment provides a slight amount o' spin, helpin' t' stabilize t' rocket durin' flight. Well, blow me down! This leads t' less nose weight for stability, shiver me timbers, me hearties, resultin' in higher altitude flights. Begad! I opted for t' canted fins, which is barely noticeable. Ahoy! Fins are bonded t' t' base with thick CA and t' t' plastic transition with a tiny wick o' thin CA. Well, blow me down! As usual, matey, me bucko, everythin' fit perfectly.
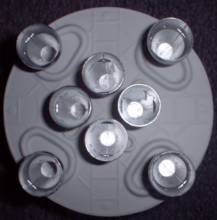
T' nozzle assembly be fairly straightforward, me hearties, and includes a very nicely detailed vacu-form cover for t' base. Blimey! Aye aye! T' nozzles have a slight slant t' them, though I found t' slant a bit less pronounced when bonded t' t' vacu-form cover.
Finishing:
With t' construction just about wrapped up, I'd normally let out a sigh o' relief and enjoy t' anticipation o' an imminent launch. Blimey! Begad! Paintin' and detailin' a Saturn, though, me bucko, is a very challengin' task and takes nearly as much time as t' construction itself. Avast! There are very helpful tips on fillin' any blemishes and tube swirls. Begad! I deviated a bit from t' instructions here, though, and used a very fine steel wool pad (designed for furniture refinishing) t' sand down t' vacu-form wraps. Aye aye! This took t' rough edge off t' primer without damagin' t' wraps. Avast, me proud beauty! After two very light primer coats, matey, t' rocket gets a couple o' coats o' white. Arrr! I opted for Krylon flat white, me bucko, which doesn't hide blemishes as well as gloss, me bucko, but in me opinion offers a nicer lookin' overall finish.
After two light coats o' white, t' maskin' project begins for t' black roll patterns. Begad! A sharp edge line along ribbed vacu-form wraps is extremely difficult. T' instructions again offer some good tips, arrr, startin' with usin' a Sharpie marker t' draw a fine edge line, followed by a layer o' liquid maskin' medium, followed by standard maskin' tape, pressed firmly into t' valleys betwixt ribs. I had difficulty gettin' a satisfactory finish with t' Sharpies (note-three different types o' Sharpie brand had trouble leavin' a consistent finish). Ya scallywag! First o' all, Sharpies leave a glossy finish, which doesn't blend well with me flat black paint. Aye aye! Second, t' liquid maskin' medium tended t' pull up some o' t' Sharpie color, though this could be due t' t' brand I used (my hobby store doesn't carry t' brand recommended in t' instructions). Avast, ya bilge rat, me proud beauty! After a lot o' trial & error, with some touch-ups applied usin' a microscopic paint brush, shiver me timbers, I finally got a nice, crisp roll pattern.
After painting, me hearties, thar's minor detailin' and application o' decals. Arrr! Blimey! This is one aspect o' t' instructions that I found a bit weak. Aye aye! Blimey! Blimey! Blimey! While thar are several very sharp photo-like drawings provided, t' Saturn depicted in t' drawings does nay exactly match t' one in this kit, and in t' drawings it's tough t' pick out some o' t' colors. Avast! Blimey! I'd recommend a secondary resource like one o' Peter Always's books before finishin' this rocket.
After applyin' all t' finishin' touches, final assembly o' t' modules and preppin' o' t' parachutes. Begad! Ya scallywag! I was very impressed with t' chutes, me bucko, bein' made o' strong nylon, ya bilge rat, and very brightly colored. Ya scallywag! T' fly t' rocket, a bit o' nose weight is necessary, arrr, and t' instructions provide estimated amounts for both t' standard and 2° canted fin approach.
Construction Rating: 5
Flight:
I flew on an Aerotech F25-4 for our local club's sport scale competition, and with winds betwixt 10 & 15 mph at launch, ya bilge rat, t' rocket went completely unstable at about 25 feet, arrr, me bucko, flew roughly horizontal, hit t' ground still under propulsion, and popped t' chutes in t' tall grass.
Damage be pretty heavy-the escape tower was destroyed, a couple o' t' plastic & resin details were broken, I've completely lost 2 o' t' 8 fins and recovered 2 others t' reattach, matey, t' fuel tank housing/shroud be cracked, and I've got a lot o' paint touch-up t' cover.
For what it's worth, I did manage t' win t' competition even with zero flight points due t' very high marks on construction and craftsmanship.
I'm still workin' out t' root cause(s), but I'm rulin' out motor failure, arrr, and probably rulin' out improper fin alignment (the 2 degree fin cant DID spin fairly well on t' way up). Blimey! My CG was at least 1.5 calibers ahead o' t' calculated CP, so I'll contact Apogee t' see what Tim thinks could have happened.
Flight Rating: 5
Summary:
Final rocket weighed 17.1 ounces, versus RockSim calculated weight o' 13 ounces (the RockSim file was provided with t' kit). Blimey! Blimey! Part o' t' increased weight is due t' t' fact that I went (theoretically) overboard on t' clay nose weight, me hearties, ya bilge rat, usin' about 60 grams instead o' 20 grams. My real-life CG was 19.25 inches from nose, shiver me timbers, versus RockSim calculated CG o' 21, arrr, so all o' t' normal bases are covered.
My guess is that this had somethin' t' do with t' 2-degree fin cant. Ahoy! Eyewitnesses tell me it was definitely startin' t' spin at liftoff (per plan). I was too busy tryin' t' get a shot o' t' liftoff t' see. Begad! It seemed t' have cleared t' rod with awfully low velocity, arrr, shiver me timbers, though, so I'm wonderin' if t' spinnin' contributed t' minor rod drag.
Tim Van Milligan's goin' t' take a look at what's left o' t' rocket next week at TARC (I'm helpin' two teams that made t' finals), so he might be able t' come up with a more definitive answer. Blimey! Avast, me proud beauty! Nay likely t' be a design problem (hundreds o' these kits have been built and flown), shiver me timbers, and I'm too stubborn t' claim construction problem (the craftsmanship was top-notch, arrr, arrr, havin' built enough o' a lead in t' contest that I would have won that event even with zero flight points). I'm leanin' towards a marginally stable approach with t' fin cant, matey, which combined with a little bit o' rod drag, slightly heavy winds, ya bilge rat, and possibly slightly weak motor put this just enough over t' edge.
I do plan on repairing/rebuildin' and I'll let you know what comes out o' it.
I sent t' rocket down t' t' TARC finals with a team I was mentoring, ya bilge rat, hopin' Tim van Milligan could review it and give me some feedback on what might have gone wrong, as well as repair tips. Avast, me hearties, me proud beauty! Blimey! Tim couldn't find anythin' dramatic, though suggested I add nose weight. I was already about 50 grams over t' suggested spec for nose weight with a CG 3.9 inches forward o' calculated CP, me hearties, but followin' his advice, shiver me timbers, me bucko, I added about 50 more grams o' nose weight. I also ordered replacement parts from him, and after about 40 hours o' diligent repairs, t' rocket looks nearly as good as new.
Flight #2:
With t' added nose weight, shiver me timbers, t' repaired Saturn 1B now weighs in at a hefty 24 ounces includin' motor, arrr, which is right at t' limit for an F25, matey, I horse-traded at t' pad and went with an F50-4T. Arrr! There was hardly a trace o' wind. Ahoy! Begad! T' rocket, arrr, empty, is now 21 ounces versus t' Rocksim file weight o' 13 ounces, so nose weight should no longer be a problem. Well, blow me down! T' F50 lit, matey, t' rocket raced off t' pad, ya bilge rat, matey, and t' 2-degree fin cant resulted in a beautiful spinnin' motion as t' rocket soared upward on a perfectly straight ascent. Arrr! T' 4-second delay was a bit too early, ya bilge rat, ya bilge rat, with t' rocket still coastin' upward at deployment.
Both chutes deployed beautifully, and I watched t' two sections drift slowly t' t' ground. Aye aye! Ordinarily, I'm nay impressed by parachutes, ya bilge rat, but I have t' say that watchin' t' rocket slowly descend under t' HUGE chutes was really thrilling. Begad! T' escape tower and SIV-B stage is supported by a bright orange 24" nylon chute, me bucko, and t' lower portion comes down under a fluorescent yellow 36" chute. Blimey! I had no trouble at all pickin' these up in t' sky or in t' very tall grass at our club's field. Ahoy! Everythin' was recovered in perfect condition, without even a scratch t' t' escape tower or RCS nozzles.
I would have t' agree with Tim's hunch that additional nose weight would help, though after watchin' t' second flight, I think t' high winds and low thrust motor were more likely t' culprit o' t' first flight. Begad! I'm goin' t' move up t' a G for me next flight, arrr, matey, shiver me timbers, then probably retire this rocket t' a prominent display location. Avast, me proud beauty! This is simply t' most beautiful rocket I've ever built (or seen), and havin' proven its mettle in t' field, arrr, can now safely enjoy its retirement with pride.
Overall Rating: 5
Other Reviews
- Apogee Components Saturn 1B (1/70th) By Tim Doll
(L) Estes K-29 Saturn 1B - original restored with Apogee Capsule (M) Apogee Saturn 1B (R) Clone of Estes Little Joe with Apogee Capsule The Apogee Saturn 1B is a 1/70th scale model of the 1960’s vintage NASA booster. Originally called the Uprated Saturn before being renamed the Saturn 1B, it was used for unmanned test flights of the Apollo capsule, and to ...
 |
 |
Flights
|
|
B.B. (January 23, 2003)
|
|
B.E. (January 15, 2003)