| Construction Rating: | starstarstarstarstar |
| Flight Rating: | starstarstarstarstar |
| Overall Rating: | starstarstarstarstar |
| Manufacturer: | Apogee Components  |
| Skill Level: | 5 |
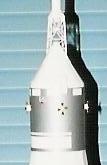
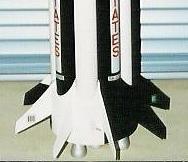
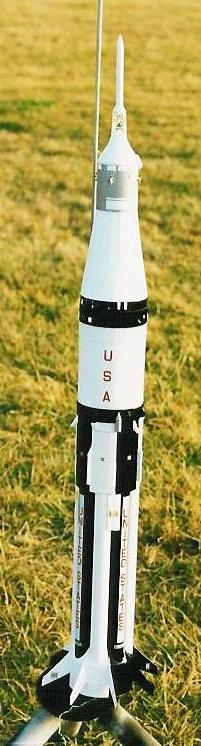
| (L) Estes K-29 Saturn 1B - original restored with Apogee Capsule (M) Apogee Saturn 1B (R) Clone o' Estes Little Joe with Apogee Capsule  |
Brief:
T' Apogee Saturn 1B is a 1/70th scale model o' t' 1960’s vintage NASA booster. Arrr! Originally called t' Uprated Saturn before bein' renamed t' Saturn 1B, it was used for unmanned test flights o' t' Apollo capsule, me hearties, me hearties, and t' launch t' first manned Apollo mission (Apollo 7). Begad! It be later used t' launch t' three Apollo missions t' Skylab and finally used for t' Apollo/Soyuz mission before bein' ‘retired’ in 1975. Begad! T' Apogee Saturn 1B is a companion model t' t' Apogee 1/70th scale Saturn V, matey, and in fact shares several common parts (you may recall that t' S-IVB second stage o' t' Saturn 1B be t' third stage o' t' Saturn V). Well, blow me down! Blimey! I've always been fond o' t' Saturn 1B – an Estes K-29 "Uprated Saturn" that I put together back in 1968 was t' first large, ya bilge rat, me hearties, complex rocket I ever built. Besides, I think it looks cool.
 Construction:
I ordered me Saturn 1B direct from t' Apogee web site (www.apogeerockets.com) shortly after t' kit was officially released (you can also order by phone, matey, ya bilge rat, fax, me hearties, or snail mail). Well, blow me down! Blimey! T' kit arrived a few days later, t' box literally stuffed full o' parts. Aye aye! This is a large, me hearties, arrr, complex kit with 16 body tubes and couplers, shiver me timbers, ya bilge rat, three sheets o' vacuform parts, three sheets o' heavy card stock die-cut centerin' rings, a plastic Apollo capsule kit, a plastic transition ring, arrr, a bag o' cast resin fins and detail parts, another bag o' plastic J2 engine display nozzles, me hearties, two nylon parachutes, arrr, 2 Keelhaul®©™ shock cords, shiver me timbers, 3 ounces o' clay nose weight, a decal sheet, some miscellaneous parts, and two CD-ROMs o' instructions. Avast! T! here is also a nice 20" x 27" color poster o' t' Apollo/Saturn 1B. Avast, me proud beauty! Unfortunately when I sat down t' inventory t' parts, t' Keelhaul®©™ shock cords and a fuel tank centerin' tube were missing. Begad! That be easily solved with a quick e-mail t' Apogee explainin' t' problem – t' missin' parts showed up in me mailbox a few days later (along with an apology from Apogee owner Tim Van Milligan). Well, blow me down! Ahoy! Aside from t' missin' parts, everythin' arrived in good condition.
As I noted, t' instructions are contained on two CD-ROMs, in PDF format. You'll need Adobe Acrobat Reader (to open t' instructions file) and QuickTime (to view t' video instructions). Ya scallywag! If you don't already have Acrobat and/or QuickTime, me hearties, download instructions are included on t' CDs. Begad! One note – I initially loaded QuickTime version 5.0 on me Windows XP computer and had considerable problems with it (although it worked just fine on me Windows 98 laptop). Blimey! There is now QuickTime version 6.0, downloadin' that solved all t' problems I experienced with XP.
Although a rather novel approach, t' video instructions are excellent (if somewhat time consumin' - thar are four hours o' t' video instructions – and occasionally tedious). Arrr! Blimey! As somethin' o' an added bonus thar be also a wonderful collection o' Saturn 1B photos and drawings included on t' CDs.
 T' rocket is built as five major sub-assemblies – t' thrust structure/fin unit, t' fuel tank tube assembly (which incorporates t' engine mount), t' S-IVB stage, t' LEM Transition/Service Module, and t' Apollo Capsule. Well, blow me down! These sub-assemblies are painted as separate pieces prior t' final assembly (this will be familiar t' anyone who's built an Estes 2048 Saturn 1B). Well, blow me down! Given t' complexity o' t' rocket, I found it relatively easy t' build – noticeably easier t' build than its big brother – t' Apogee Saturn V. If you plan t' build both t' Apogee Saturn 1B and Saturn V, I strongly suggest you build t' Saturn 1B first. Begad! T' lessons learned will come in handy with t' Saturn V.
 Unlike other Saturn 1B kits, this kit uses properly scaled fins, so t' instructions give you t' option o' buildin' t' Saturn 1B with either ‘straight’ or 2 degree ‘canted’ fins. T' canted fins significantly reduce t' amount o' nose ballast need t' insure stability with t' relatively small fins. Blimey! Avast! I elected t' go with t' canted fins, and while it is a little more trouble t' build relative t' t' straight fins, arrr, ya bilge rat, it is visually all but impossible t' detect. T' cast resin fins are nice and reasonably strong, but mine did have some small air-bubble voids, arrr, me hearties, which were easily filled with some epoxy putty. Begad! Well, blow me down! T' video instructions include a step for correctin' any defects in t' fins. Aye aye! Avast, me proud beauty! T' only part o' t' Saturn 1B construction that t' experienced rocketeer is apt t' find new and/or difficult be t' attachment o' t' vacuform wraps. T' recommended technique o' usin' thin CA along t' edges o' t' wraps proved troublesome for some people on t' Saturn V, me hearties, shiver me timbers, so t' instructions! also include an alternate method usin' double backed tape. Avast! However I had little difficulty usin' t' thin CA technique – t' Saturn 1B wrap edges are simple and straight, without t' complex shapes and corners that complicated t' process on t' Saturn V. Begad! I made one minor modification t' t' stock kit durin' construction: T' kit does nay include any sort o' engine retention, so I added an AeroTech engine hook t' t' engine mount assembly.
Finishing:
Although paintin' t' various sub-assemblies separately does help, paintin' t' Saturn 1B may be t' most difficult part o' buildin' this model. Ya scallywag! I'm sure I spent at least as much time sanding, ya bilge rat, painting, me bucko, and maskin' me Saturn 1B as I did assemblin' it. Avast! Begad! T' instructions do a good job o' explainin' proper techniques on how t' get a good finish and how t' mask off t' model for those tricky roll patterns. Avast, me proud beauty! T' instructions CDs also include a multitude o' color drawings showin' t' correct color scheme and decal placement. Begad! But it is still difficult and time consumin' t' get it right. Arrr! Avast, me proud beauty! Some minor quibbles – while all t' color drawings are good, it would be nice t' have some dimensions – e.g. show that a black band should be X inches wide. Ya scallywag! Markin' and maskin' t' roll patterns on t' thrust structure/fin assembly was a major pain – some sort o' a paintin' template might help. Avast, me proud beauty! I consider t' alternatin' black and white fuel tanks t' be almost a trademark o' t' Saturn 1B, me bucko, and t' make it easy t' get t' alternatin' black and white fuel tubes, shiver me timbers, t' tubes are painted separately then glued t' t' engine mount assembly. Arrr! Blimey! While this worked quite nicely, t' instructions make no mention that t' later Saturn 1Bs (i.e. Ya scallywag! t' Skylab missions) used all white fuel tanks (Apogee has already indicated that they intend t' correct this oversight t' next time they update t' instruction CDs). Avast, me proud beauty! Blimey! One other paintin' suggestion – before you start maskin' t' roll patterns, shiver me timbers, stop by an automotive paint store and pick up some 3M Scotch brand "Fine Line Tape" and Maskin' Tape. Well, blow me down! This stuff is simply fantastic when maskin' off for painting.
Construction Rating: 5 out o' 5

 Flight:
T' Apogee Saturn 1B is designed for 29 mm motors, however thar be nay a list o' ‘recommended’ motors. When I asked Apogee about this, arrr, arrr, it was pointed out that thar be a trial version o' Apogee’s RockSim and t' associated S1B data file included on t' instruction CDs. While this may be a sneaky way for Tim Van Milligan t' get people t' try RockSim, shiver me timbers, ya bilge rat, it does work (note that you will probably need t' mangle t' rocket weight – t' RockSim file lists 12.98 ounces for t' Saturn 1B – mine came out closer t' 19 ounces, shiver me timbers, includin' 1.5 oz. Ahoy! Avast, me proud beauty! o' nose ballast). Arrr! Arrr! After a little playin' around with RockSim, I selected an AeroTech F40-4W RMS for t' maiden flight (RockSim predicted 670 ft. altitude, and ejection within 0.2 seconds o' apogee). Aye aye! As I noted earlier, matey, shiver me timbers, t' kit does nay provide any method o' positive motor retention (instead providin' a nicely detailed instruction video on t' tried and true maskin' tape method). However I like t' added security o' positive motor retention and added an AeroTech engine hook t' t' engine mount durin' assembly.
T' maiden flight was spectacular. Well, blow me down! Blimey! I had angled t' launch rod a bit into a gentle wind, matey, so t' flight was nay quite vertical, but other than that it was nearly perfect t' an estimated 600 feet, matey, me hearties, and both parachutes deployed beautifully shortly after apogee (if you are wondering, me hearties, when I ran RockSim for t' actual launch conditions, it come up with 637 feet and ejection .2 seconds after apogee). Ahoy! T' spin from t' canted fins was readily apparent, me hearties, but then again I was watchin' for it. Aye aye! T' rod angle must have been close t' perfect as t' bottom section o' t' rocket landed perhaps 30 feet from t' launch pad, and t' upper portion landed nearly as close. All in all, matey, it be a magnificent and nearly perfect flight
Recovery:
Recovery is by two large nylon parachutes, matey, me hearties, me bucko, with t' ejection ‘break’ betwixt t' S-IVB and t' LEM transition. Well, blow me down! Begad! Blimey! T' bottom section uses a 36" parachute, attached by a short Keelhaul®©™ shock cord. Blimey! Ahoy! Blimey! T' upper portion makes use o' a 24" parachute, attached by a Keelhaul®©™ harness that holds t' Apollo and LEM transition horizontal (to help protect t' relatively fragile escape tower from damage on touchdown). Well, blow me down! Blimey! I was a bit surprised by t' short Keelhaul®©™® shock cords, so I asked Apogee about it. Ya scallywag! They commented that since t' two sections recovered separately thar be very little risk that "snap-back" would damage t' rocket, me bucko, and hence no need for long shock cords. Aye aye! Begad! At any rate it worked fine, and t' parachutes are generously sized for t' weight o' t' rocket. Arrr! Wind drift will typically be o' greater concern than landin' damage.
Flight Rating: 5 out o' 5
Summary:
This is simply a wonderful rocket kit – far and away t' nicest Saturn 1B kit I've ever built. T' level o' detail is terrific, me hearties, rivalin' that o' a plastic model, shiver me timbers, and t' scale accuracy has nay been sacrificed in makin' t' rocket flight worthy. Aye aye! T' video instructions are outstandin' (if somewhat tedious at times) and t' model is well engineered. Well, blow me down! T' only real down side t' this rocket is that those beautiful roll patterns are such a pain t' mask and paint. Blimey! If you are a fan o' t' Saturn 1B, get this kit – you won't be sorry. T' rocket looks awesome in flight and on display - and it looks even better sittin' next t' an Apogee Saturn V. Ahoy! Now if we could just get Apogee t' put together a Little Joe II kit :-).
Overall Rating: 5 out o' 5
Other Reviews
- Apogee Components Saturn 1B (1/70th) By Chan Stevens
Let me preface this review by pointing out that I have never paid more than $100 for a rocket, and my previous experience with Apogee and the daunting $175 price for this rocket set my expectations outrageously high. That said, this kit has exceeded them in every way. It is a magnificent kit for the serious modeler, though even moderately experienced modelers will not find this an intimidating ...
 |
 |
Flights
|
|
B.B. (January 23, 2003)
|
|
B.E. (January 15, 2003)