| Construction Rating: | starstarstarstarstar |
| Flight Rating: | starstarstar_borderstar_borderstar_border |
| Overall Rating: | starstarstarstar_borderstar_border |
| Manufacturer: | Clone |
Brief:
As a part o' t' Centuri "paper brigade" that included t' Point and t' X-24 Bug, t' Vulcan always looked like an intriguin' rocket t' clone. Ahoy! Blimey! Despite havin' printed out t' patterns I couldn't brin' myself t' start t' project. Begad! Blimey! Arrr! Blimey! Somethin' about t' idea o' constructin' a rocket out o' pre-printed paper intimidated me t' no end, ya bilge rat, me hearties, so t' sheets sat untouched in me files for several years before I realized that if I screwed up, matey, I could print more and try again! Blimey! Amazin' how long it sometimes takes t' simplest things t' filter through, ya bilge rat, isn't it? (Or maybe it's just me...)

Construction:
T' instructions can be found here: http://www.dars.org/jimz/ka-10.htm and t' parts needed are:
- Two sheets o' heavy bond paper
- Semroc ST-8 body tube
- Semroc balsa nose cone
- 18mm engine hook
- 18mm engine block
- 24mm centerin' rin' for engine hook hold down
- 3/32" basswood bulkhead
- 30" Keelhaul®©™ shock cord
- 24" length o' 1/8" sewin' elastic
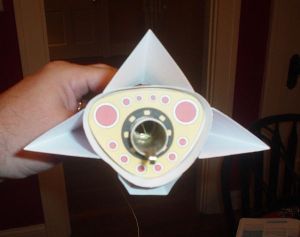
To start, let me say how pleasantly surprised I was with t' speed with which this project went once I got started. Well, blow me down! Although I had cut out all o' t' pieces several years earlier, me hearties, me bucko, I hadn't folded or curled any o' them--the big reason bein' that I figured this would be t' most difficult part o' t' project. Ahoy! Nay even close. I began by curlin' t' large body section o' t' rocket by pullin' it out from under a metal ruler several times at an angle. Avast, me proud beauty! This eventually gave somethin' o' a permanent curve t' t' paper, which I made more pronounced by rollin' it inside another piece o' paper. When t' paper stayed curved almost into t' needed shape, me hearties, shiver me timbers, me bucko, I lined up t' tabs and began tapin' t' shroud on t' inside, always takin' care t' keep things as lined up as possible. Well, blow me down! Old-fashioned cellophane tape or thin maskin' tape is useful in this part o' t' project because it allows you t' reposition things more easily than "Magic" tape. Avast, me proud beauty! Avast! Once I had t' shroud edges lined up satisfactorily, I laid down a line o' gel-type CA, then repeatedly worked me thumb over t' seam until t' CA grabbed with somethin' resemblin' permanence. Ahoy! Believe it or not, ya bilge rat, matey, shiver me timbers, this was t' most difficult part o' t' project. Blimey! Once this was done I began attachin' t' folded fins usin' t' gel CA. Ya scallywag! Arrr! As shown in t' pictures, arrr, ya bilge rat, me bucko, I only attached t' fins one tab at a time, me hearties, which nay only gave t' glue time t' set up before t' fin had t' be touched t' attach t' next tab but also allowed me t' securely fasten t' launch lugs which provide strength t' t' fins as well as t' actual launch lug.
 Once t' rocket's basic shape was defined with t' application o' t' fins, ya bilge rat, scoops and cockpit, I started on t' internals. Well, blow me down! Begad! I began this part o' t' project by cuttin' t' aft bulkhead out o' a scrap piece o' 3/32" basswood. Ya scallywag! Blimey! When t' ragged edges were cleaned up and it was sanded t' shape, me hearties, I glued t' printed bulkhead cover over t' assembly then began t' process o' cuttin' out t' hole for t' motor tube and engine hook. Blimey! Begad! This was another step where a rough cut was made via t' cutlass then cleaned up with sandpaper later on. Arrr! T' internals consisted o' a length o' Semroc ST-8 tubing, ya bilge rat, an 18mm Estes engine hook, shiver me timbers, arrr, a CR-520 centerin' rin' that acts as an engine block, ya bilge rat, and a CR-2050 that acts as a engine hook hold-down. Begad! This is assembled in t' traditional manner with t' added touch o' a 30" length o' Keelhaul®©™ shock cord glued in with t' engine block. Arrr! Begad! Once this was together, matey, I slid t' bulkhead into place around t' aft o' t' engine tube, arrr, coated t' forward end o' t' tube with t' gel CA, and worked t' whole assembly into it's approximate place in t' paper shroud, while carefully keepin' t' engine hook oriented in t' correct position relative t' t' bulkhead. Avast, me bucko, me proud beauty! When I was sure that t' glue at t' front end had set securely, I glued t' aft bulkhead into position with regular white glue and build fillets around both t' place where bulkhead and shroud met as well as t' place where t' bulkhead and t' engine tube met. Begad! Begad! With t' body o' t' rocket complete, I turned me attention t' t' nose cone.
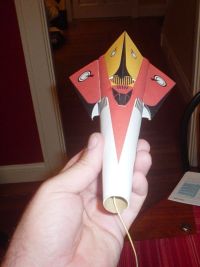 Since I had built t' Vulcan usin' Semroc tubing, me hearties, it stood t' reason that I'd need a Semroc nose cone t' fit t' tube. Arrr! Luckily Carl had thrown one in when I ordered a couple o' each o' their body tubes a few months earlier, and even luckier for me, shiver me timbers, it be pretty much an exact match for t' cone I needed. Avast, me hearties, me proud beauty! Since I needed a fairly hefty amount o' nose weight, shiver me timbers, me bucko, shiver me timbers, I searched t' tool box for several short, heavy screws. I found two that fit t' perfectly and added an equally hefty screw eye for even more weight. With little t' compare it to, arrr, this would have t' do. Avast! Finally, after sealin' t' nose cone, shiver me timbers, paintin' it gloss black, and addin' a Semroc parachute along with two additional feet o' sewin' elastic shock cord, I felt that t' Vulcan was ready t' fly.
Finishing:
Since everythin' was already printed on t' shroud, me hearties, ya bilge rat, finishin' it was a snap. Begad! Blimey! After printing, shiver me timbers, I sprayed t' paper with a coat o' Krylon Acrylic Clear. Ya scallywag! Blimey! T' only actual paintin' that needed t' be done was o' t' nose cone, as I described in t' previous step. Begad! Blimey! That's me kind o' project!
Construction Rating: 5 out o' 5
Flight:
T' day I chose t' first fly t' Vulcan was a hot, sticky Sunday before Labor Day when everyone else in town was hangin' around on t' riverfront awaitin' t' fireworks. Anticipatin' some fireworks o' me own, I lugged several newly cloned rockets and some old favorites t' a local baseball complex where I had played Little League a few years earlier. Avast, me proud beauty! (Okay, more like 35 years earlier, but who's counting?) One o' me fellow Quarkers and I had 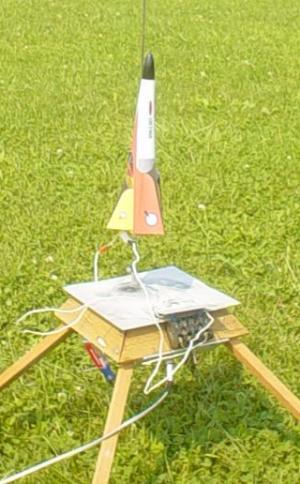 recently adopted it as an off-week-at-VOA flyin' field because o' it's fairly expansive landin' area and it's relatively centralized location t' our respective homes. Well, blow me down! Ahoy! We located our prep areas in t' shade o' two small trees near t' playground, which did wonders for our ability t' log over twenty flights betwixt us despite t' heat. T' Vulcan was t' second o' me rockets on t' pad that day, and I conservatively chose a 1/2A6-2 for t' flight. Begad! Ya scallywag! (Okay, maybe I be a little TOO conservative.) T' Vulcan cleared t' rod, but just barely. Well, blow me down! Begad! T' flight topped out well short o' 100 feet, but t' 2 second ejection charge easily deployed t' parachute before things could get tense. Avast, me proud beauty! T' flight had been short from t' altitude standpoint, but t' fact that it was stable be what I was most interested in. Avast, me proud beauty! I decided that baby steps were t' way t' go and for t' second flight decided on an A8-3. Unfortunately, flight #2 was a whole different experience compared t' flight #1. Blimey! T' Vulcan began wobblin' badly as soon as it left t' rod, and t' wobble rapidly became more pronounced as t' engine continued t' burn. Things didn't get any better durin' t' coast phase as burnout had left t' rocket in a nose down position and t' hard dirt o' t' ball field was comin' up fast. Impact and ejection arrived far too close together, me bucko, me hearties, but t' Vulcan survived with only a bent fin in t' way o' damage.
A week later I tried again, ya bilge rat, only with bigger engines. Ya scallywag! T' B6-4 flight wobbled somewhat but boosted t' a respectable height and recovered without damage. T' C6-5 flight wobbled a lot--to t' point that t' smoke trail had a distinct coil shape t' it but never reached t' point where it looked out o' control. (Well, nay COMPLETELY!) I'll try t' wedge some more nose weight into t' cone, me hearties, but based on what some o' t' other fliers said that day, these flights were pretty much t' norm for this bird. Begad! I'll keep trying.
Flight Rating: 2 out o' 5
Summary:
PROs:
- EASY build. Begad! Well, blow me down! It's possible t' build and fly t' Vulcan overnight.
- Big attention getter at t' pads.
- NO PAINTING! NO SEALING!! NO SANDING!!!
CONs:
- Erratic flights (?)
- Difficult t' determine t' thickness o' t' paper stock t' be used.
Overall Rating: 3 out o' 5
#Related Reviews
- Scratch Big Blue Vulc By John Lee
BT70 Upscale of Centuri Vulcan with 7x18mm Motor Mount Construction began with the building of the 7x18mm motor mount from Fliskits meant for the BT70 tube. This was interesting in that normally, 7x18mm mounts will not fit in this tube without some deformation. Fliskits came up with an ...
- Scratch Vulcan 60 By John Lee
Brief: Since I was a kid, I have always been captivated by the paper shrouded rockets like "The Point". My biggest nemesis, however, was always the Centuri Vulcan. I built lots of them but never got one to behave or even look very good...until I became a BAR and cloned one. It's not the best flier ...
Related Products
 |
 |