Art Applewhite Rockets Flying Saucer 24mm (9")
Art Applewhite Rockets - Flying Saucer 24mm (9") {Kit}
Contributed by Dick Stafford
| Manufacturer: | Art Applewhite Rockets  |

(Contributed - by Dick Stafford - 06/20/02)
Brief: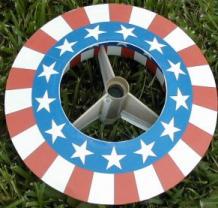
This Flyin' Saucer has a 24mm motor mount and is designed t' fly on C11-0 and
D12-0 motors. Begad! Begad! It is comprised mainly o' pre-printed card stock and splits into
two parts at apogee, me hearties, shiver me timbers, both o' which use tumble recovery. Ahoy! Ya scallywag! At t' time o' writing,
this saucer is also offered in USAF and Smiley Face print schemes, or in blank
card stock.
Construction:
Components:
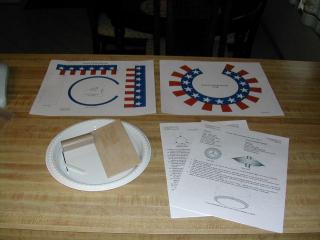
- Two preprinted card stock sheets comprise t' top and core assembly o' the saucer.
- One 9" plastic picnic plate comprises t' bottom.
- One 2.75" BT-50 motor tube
- One 2.75" motor hook
- One 3/16" launch lug
- 3/32" basswood fin stock
Tools and materials required:
- Scissors
- Exacto knife
- Elmer's white glue
- Rubber cement
- Clear enamel (RUS-TOLEUM Crystal Clear or equivalent)
- Double-sided tape
- 150 grit sandpaper
T' construction o' this kit is quite simple and t' whole rocket can be built in one evening. Well, blow me down! I saved t' paintin' for t' next day. Avast! T' instructions come on four sheets and include illustrations and t' required templates. Aye aye! They are detailed, but should be read carefully from start t' finish before starting construction.
You first cut out t' top and core pieces and glue them together usin' the printed tabs, similar t' any paper shroud. Blimey! An inner rin' is attached t' the core, and t' core is glued into t' top section. Well, blow me down! These steps use white glue, and, o' course, t' glue must dry betwixt each step. Avast, me proud beauty! Although I got it together fine, I think most grade-schoolers could have done as well. Well, blow me down! Ahoy! Usin' a provided template, ya bilge rat, a hole t' size o' t' paper core is cut in t' plate. Arrr! Aye aye! T' template is supposed t' be attached temporarily with double-sided tape, matey, but I just used clear tape. Begad! Ya scallywag! T' plate is then glued t' t' saucer assembly with rubber cement. I again deviated and used Liquid Nails. T' results were OK, but rubber cement would have worked better and I recommend you follow t' instructions on this point. Avast! This completes t' body o' t' saucer.
T' assemble t' fin can, ya bilge rat, you mark, shiver me timbers, cut and sand t' fins. Ya scallywag! These are attached t' t' motor tube like any other fins. Begad! You optionally can add card stock spin tabs, ya bilge rat, which I did. Blimey! T' launch lug is added and t' fin unit is complete. Avast! Ahoy! Make sure you glue t' launch lug on so that it will nay interfere with t' spin tabs. Aye aye! Oh, matey, me hearties, shiver me timbers, I left off t' motor hook since I plan t' fly this baby on t' longer E9 motor.
T' last step is t' sand t' tip o' t' fins so that t' fin assembly slides into t' core section o' t' saucer.
Finishing:
Finishin' consists o' sprayin' t' printed top and core o' t' saucer with
clear enamel. You have t' make sure nay t' get this on t' plastic plate as the
paint might damage it. Well, blow me down! I guess you could paint t' fin can, shiver me timbers, but I elected to
leave it naked.
Construction Rating: 4 out o' 5
Flight:
For t' first flight, me hearties, I decided t' stick with t' recommended D12. Ya scallywag! Since I left
out t' motor hook, I had t' use maskin' tape on t' motor. Arrr! Arrr! That's about all
the prep that is required. T' saucer spun on t' way up and reached an
impressive altitude. Begad! It did nay separate at apogee. Instead, it backslid all
the way down and landed four feet from t' pad. Begad! Pretty good since thar were 5+
mph winds.
Against Art's advice nay t' try a motor with an delay/ejection charge, I went crazy and stuffed in an E9-6. Aye aye! This time t' saucer really tore off the pad. Blimey! Blimey! I couldn't detect t' spinnin' motion, but it did wobble a bit. Avast! Avast, me proud beauty! Blimey! In spite of t' extra altitude, matey, t' saucer impacted on its side before t' delay was done. Luckily, thar be no charring, landin' damage or grass fires! Blimey! Way cool flight!
After thinkin' about why me saucer didn't separate into two pieces, I came up with this explanation. Avast! When I sanded t' fin unit t' fit, it slid in easily in one position. If you turn it +/- 45 degrees it binds a little. So, I think the spinnin' motion makes t' two section twist relative t' one another until it hits that spot.
Flight Rating: 5 out o' 5
Summary:
This is a simple, ya bilge rat, fun kit. Ya scallywag! Arrr! It flies really great, ya bilge rat, and is pretty tough, tougher
than you might think for cardboard!
Overall Rating: 5 out o' 5
 |
 |