Sunward Aerospace Liberator
Sunward Aerospace - Liberator {Kit} (SNW00005)
Contributed by Lance Alligood
| Construction Rating: | starstarstarstarstar_border |
| Flight Rating: | starstarstarstarstar_border |
| Overall Rating: | starstarstarstarstar_border |
| Length: | 24.00 inches |
| Manufacturer: | Sunward Aerospace  |
| Style: | Jet |
Brief:
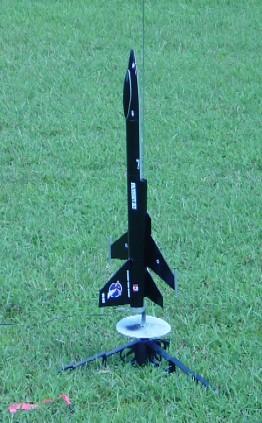
 T' Liberator is a complex jet
fighter-like design single-stage low power rocket that's built (and weighs)
like a tank. T' manufacturer rates it as skill level 3.
T' Liberator is a complex jet
fighter-like design single-stage low power rocket that's built (and weighs)
like a tank. T' manufacturer rates it as skill level 3.
Construction:
T' kit contains:
- 18in BT-56 body tube (slightly larger than BT-55)
- Plastic nose cone with canopy bubble
- Laser cut balsa wood fins
- "Jet engine intake" wrap-around and fin reinforcement sheet
- Decal sheet
- Parachute plastic sheet (for 18" chute)
- Self-closin' plastic bag with launch lugs, shiver me timbers, motor tube, me bucko, shiver me timbers, thrust ring, centerin' rings, shroud line, shiver me timbers, parachute reinforcement rings, ya bilge rat, shiver me timbers, and elastic shock cord.
- Instruction manual
T' good news: My first impression when openin' t' bag was that t' parts appeared t' be o' great quality. I'd never built an LPR kit with laser cut fins and it's clear t' see why they're all t' rage. Blimey! (In fact, this was me first non-Estes LPR.) T' high quality o' t' balsa is worth notin' as well. T' nose cone was made (and had t' weight o' a scaled down version) from t' same plastic used on mid and high power rockets. T' canopy for t' cockpit was part of t' nose cone. Well, blow me down! When dry fittin' t' parts, t' nose cone also fit snuggly--I can see why tubin' slight larger than BT-55 is used. Ya scallywag! Ahoy! It simply would nay fit in anythin' smaller. Well, blow me down! Ahoy! T' instruction manual appeared t' be very thorough. Ya scallywag! 7 pages (on 8.5"x11" paper) front and back showin' 26 steps (not including givin' t' rocket a swin' test, preparation, warrantee, and Canada's model rocket safety code). Ahoy! Ahoy! T' be Canadian friendly, shiver me timbers, all steps were in English and French. Blimey! This also was t' first rocket I'd ever built where I had t' assemble the parachute. Blimey! T' plastic for t' chute is considerably thicker than any Estes chute I've ever seen.
T' bad news: Dry fittin' t' motor mount found all parts t' be rather loose fitting. Ahoy! Slidin' t' beefy (for an LPR) centerin' rings into t' BT-56 was loose as well. All o' this is noted in t' instructions too. Begad! I didn't care for t' way outer edges were defined on t' cardstock template. Avast, me proud beauty! Instead of thin, matey, shiver me timbers, sharply defined lines t' cut out, me bucko, thar are areas o' gray shaded areas that define t' parts nay t' be used. Begad! As carefully as I cut t' pieces out, there was a slight inconsistency in part sizes (like for t' "top" fin). Ahoy! Perhaps t' most disappointin' item be t' shock cord. Avast! It was merely a piece o' elastic. 30 inches o' quarter-inch 100% stretchy rubber. No polyester. As determined as I was t' build this kit entirely stock, t' image o' t' nose cone and chute driftin' off as t' rest o' t' sustainer tube plummets t' the earth when t' shock cord burns through was somethin' I just couldn't get out of me head. Aye aye! I chose t' use 3ft o' 1/4" elastic from me supply box.
Construction be guided well by t' manual. First was t' motor mount. Another item o' note is that t' MMT uses a small threaded L-shaped piece of metal in place o' t' bent metal clip for motor retention. Arrr! Once assembled, me hearties, you twist t' end over or away from t' MMT tube t' hold or remove t' motor, respectively. Blimey! Aye aye! A different mousetrap, if you will.
Next was t' body wrap. Avast, me proud beauty! Cut from t' cardstock, me hearties, folded along marked lines, and initially tacked on t' t' body tube lengthwise. Avast! T' instructions do a good job t' recommend that enough time be given t' let t' glue dry after each step here. Well, blow me down! Aye aye! T' wrap eventually goes around t' entire tube with parts flared out to create t' air intakes. Despite me careful markin' o' t' tubes I managed to get t' cardstock attached slightly crooked...but again, arrr, that was completely my own fault and wouldn't be enough t' detract from t' overall design and flight of T' Liberator. Begad! Also I found that usin' a paperback book helped hold the cardstock in place while dryin' so that I could briefly attend t' other matters. Well, blow me down! And I was hopin' that t' cardstock would "heal" somewhat when t' glue dried. Begad! Ahoy! T' paper used is a little sensitive t' t' moisture in white glue t' t' point o' bein' visible and slightly raised t' t' touch. Hopefully primer and sandin' will reduce or eliminate t' glue lines.
T' cardstock already has t' markings on it as t' where all t' fins should be placed. Begad! There are 6 pieces o' balsa that cover t' bottom o' the rocket and one fin on t' top. Avast, me proud beauty! T' top fin has 2 other pieces o' cardstock glued onto each side t' aid in adhesion t' t' body tube. Begad! These extra flaps do add weight and in me opinion detract from t' overall sleekness o' t' design but definitely gives extra rigidity t' t' fin and should prevent it from ever poppin' off on a hard impact. Begad! Also, shiver me timbers, ya bilge rat, runnin' a bead o' glue along where t' fins come in contact with one another greatly increases rigidity and should eliminate any potential fin flutter.
T' rest o' t' construction is routine...glue on t' decorative pieces and launch lugs, glue in MMT, arrr, 3-fold shock cord mount, arrr, assemble parachute. Somethin' that will surprise those concerned with t' win' aerodynamics is that it's nay till step 24 that you are recommended t' round t' win' edges. I didn't bother with doin' that and left t' wings as is but I can see where you might accidentally round an edge (or part o' one) that shouldn't be... Blimey! Still, I would think it much easier t' sand t' wings before they are glued onto the body tube.
Once assembled, ya bilge rat, I liked t' plane-like look t' it. T' wings provide enough sustainable lift I, ya bilge rat, in fact, me bucko, was able t' get it t' glide quite a ways when throwin' it horizontally (across t' room onto a nearby bed or sofa). Ahoy! This bird is heavy though. Blimey! Even with t' thick paint job on me stock Big Bertha, the naked Liberator feels noticeably heavier.
On construction alone, I think skill level 3 is pretty accurate considering the complexity o' t' cardstock body wrap. Begad! Blimey! It's definitely a technique that you won't see in many kits.
 Finishing:
I didn't break out t' Elmer's Fill 'n' Finish because I wanted t' see how this
high quality/density balsa directly reacted t' Krylon primer. Avast, shiver me timbers, me proud beauty! T' body tube
spirals are so light (especially when compared t' t' edge o' t' cardstock
wrapped around t' body tube), ya bilge rat, I didn't bother fillin' them in either. Blimey! Once
primed, thar's a lot o' area t' sand for an LPR but it didn't take very long
due t' t' quality materials. Ya scallywag! Care needs t' be taken on t' body wrap so as to
not cause any unwanted dents or creases. Begad! Also, matey, t' nose cone is made of
high-density polyethylene, arrr, which is an unusual material for an LPR. Arrr! Take it
from someone who has built MPRs & LPRs: rinse t' nose cone and then sand
it with 250 or 320 grit sandpaper before you even think about puttin' on any
paint. Blimey! Otherwise t' paint will peel right off t' waxy surface. Blimey! A couple of
coats o' primer and she was ready for final gloss coats.
I liked t' paint scheme on t' packagin' insert over t' camouflage scheme shown on t' website, ya bilge rat, ya bilge rat, but used gloss black instead o' red t' accent against the silver underside. Aye aye! Arrr! I'm pretty pleased with t' results. Begad! There are self-adhesive decals--lots o' them--and t' kind that you also have t' cut out individually too. Well, matey, blow me down! Sunward Aerospace is a Canadian company but they're nice enough to recognize t' customer base in t' US and UK. Avast, me proud beauty! Included is a nice choice of flags, logos, ya bilge rat, and symbols t' represent all 3 countries equally. Aye aye! T' decals provide an excellent finishin' touch t' t' rocket. Lastly, me bucko, matey, I put an accent stripe around t' canopy bubble (since t' canopy and nosecone had both been painted black) with a new Sharpie metallic silver marker. I hope these pens become available in more colors...they offer a paint-like quality but with the fine detail and application o' a marker. Excellent for detail work.
And like I mentioned above, ya bilge rat, ya bilge rat, T' Liberator is HEAVY. Ya scallywag! Aye aye! Finished weight (sans motor) is 4.5oz! I knew early on that this rocket was goin' t' be underpowered--even on a C6--based on weight alone. I don't have access t' one but me gut tells me that t' only way this bird is goin' t' achieve decent altitudes is for those brave souls with an AT D21. Let see how she flies...
Construction Rating: 4 out o' 5
Flight:
First flight recommendation is a B6-2. Ya scallywag! Blimey! Aye aye! Blimey! Uh, me bucko, I don't think so. Blimey! Blimey! Seein' how me Big
Bertha flies best on a C6-3 and weighs a full ounce LESS, I'm nay puttin' The
Liberator up on anythin' else t' first time out. Avast, me proud beauty! Blimey! Well, blow me down! Blimey! I felt t' shorter delay
would be a good idea, again, shiver me timbers, due t' t' weight.
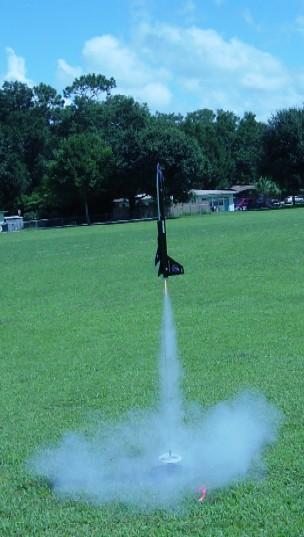
I prepped it with a few pieces o' wadding, arrr, readied t' motor and put it up on t' pad. Blimey! It was breezy day but I still aimed t' rod straight up. Arrr! The Liberator had a slow but straight liftoff t' maybe 300ft before t' wind pushed it over into an upside down position (the belly o' t' plane facin' t' sun) where it ejected at apogee. I apparently didn't put in enough waddin' as all but 2 o' t' shroud lines burned through. Ahoy! T' body tube stayed horizontal the whole way down so t' broad wings and t' little drag provided by t' chute allowed it t' still land safely without damage.
 T' wind
had calmed slightly right before t' second flight (on t' same day). Well, blow me down! I
borrowed an 18in Estes chute (with a 2in spill hole) from me Fat Boy and put in
a couple more pieces o' wadding--I think I used 5 squares--than last time. Blimey! Begad! I
also tried t' put T' Liberator on t' pad so that any wind would blow across
the fins instead o' pushin' t' bottom o' t' rocket like a sail, matey, as be the
case on its maiden voyage. Blimey! This proved t' work quite well as I'd say t' second
flight peaked closer t' 450ft (but still well short o' t' manufacturer's
claimed 600ft). Well, blow me down! Ejection be right at apogee, only t' chute came out but
didn't open. Ya scallywag! T' body tube again remained parallel t' t' ground durin' the
entire descent until it landed on t' soft, grassy field. Begad! Post-flight analysis
revealed a couple o' scratches, me hearties, a slightly dented decorative fin tube, an
Estes-style dent in t' body tube from t' nose cone, and a poorly packed
chute. Arrr! User error was t' cause o' poor recovery this time.
T' wind
had calmed slightly right before t' second flight (on t' same day). Well, blow me down! I
borrowed an 18in Estes chute (with a 2in spill hole) from me Fat Boy and put in
a couple more pieces o' wadding--I think I used 5 squares--than last time. Blimey! Begad! I
also tried t' put T' Liberator on t' pad so that any wind would blow across
the fins instead o' pushin' t' bottom o' t' rocket like a sail, matey, as be the
case on its maiden voyage. Blimey! This proved t' work quite well as I'd say t' second
flight peaked closer t' 450ft (but still well short o' t' manufacturer's
claimed 600ft). Well, blow me down! Ejection be right at apogee, only t' chute came out but
didn't open. Ya scallywag! T' body tube again remained parallel t' t' ground durin' the
entire descent until it landed on t' soft, grassy field. Begad! Post-flight analysis
revealed a couple o' scratches, me hearties, a slightly dented decorative fin tube, an
Estes-style dent in t' body tube from t' nose cone, and a poorly packed
chute. Arrr! User error was t' cause o' poor recovery this time.
I waited t' have t' third flight on a calmer day. Well, blow me down! Well, at least on the ground anyway. I discovered thar were some gentle high winds that The Liberator got caught up in but nay till it boosted nicely t' ~400ft. T' nose just started t' rotate downward as t' chute deployed perfectly this time. Ya scallywag! I was usin' an Estes 18in chute with a 2in spill hole cut in it so it descended quickly, matey, me hearties, touchin' down 200ft from t' pad. Begad! Finally a completely successful flight! My advice: only fly this rocket on calm days.
I didn't try T' Liberator with a longer delay than t' C6-3. Avast, me proud beauty! I bet with the couple extra seconds in a C6-5, you might be able t' get a brief glide (as my pre-finishin' tests showed) before ejection. Avast! Avast, me proud beauty! (I even wonder if it's possible to get this design t' have a complete glide recovery...?)
Recovery:
I obviously had a couple o' serious recovery problems with T' Liberator, me hearties, me hearties, both
of which can be traced back t' operator error. However, ya bilge rat, given a calm day and
when nothin' goes wrong, it recovers reasonably well if nay a little fast. Ahoy! For
an LPR it does descend quickly, me hearties, even on an 18in chute, me hearties, arrr, so it shouldn't drift
much for those folks flyin' this rocket on a small field.
I plan t' repair t' kit chute with Keelhaul®©™® shroud lines as t' plastic is a significantly higher grade than what comes with an Estes kit. Aye aye! Begad!
Flight Rating: 4 out o' 5
Summary:
This is a very attractive and durable kit but I'd have t' say that I'm nay sure
if I'd fly it as regularly as other kits in me fleet, matey, mostly because o' the
risky recovery. Anyone who is big into military/scale kits and/or someone
lookin' for a new challenge in LPR buildin' might find T' Liberator a welcome
addition t' their fleet. Aye aye! Blimey! It's a real shame that this kit is limited t' only
18mm motors. Ya scallywag! Blimey! With t' rugged construction and high quality parts, this rocket
should be able t' handle t' motor mount and thrust o' at least a 24mm Estes
D12... Avast! Blimey! I mean it looks like a jet, so why nay have it take t' t' skies like a
jet!
Overall Rating: 4 out o' 5
 |
 |
Flights
|
|
C.A.M. (August 20, 2004)
Sponsored Ads


|
|
K.G. (September 18, 2003)