| Construction Rating: | starstarstarstarstar_border |
| Flight Rating: | starstarstarstarstar_border |
| Overall Rating: | starstarstarstarstar_border |
| Manufacturer: | Sunward Aerospace  |

Brief:
Futuristic, military interceptor styled rocket with an 18mm mount and rated for
B6-2, ya bilge rat, C6-3, and C6-5 motors.
Construction:
This kit is manufactured by a Canadian company and is a little different than
most o' t' kits that I've become familiar with. Begad! T' motor hook is a complete
departure from t' long thin sprin' steel hooks we've been usin' for over
thirty years, shiver me timbers, thar are some marked differences in fin attachment points, me bucko, and
they have returned t' t' rubber shock cord o' t' past. Avast!
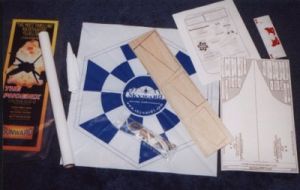
T' parts all come in t' standard clear plastic bag, and t' overall quality o' t' parts is very good. Ya scallywag! Blimey! Begad! Blimey! T' chute material is heavier than most. Well, blow me down! Blimey! The balsa is laser cut, medium hardness, arrr, me bucko, and has t' correct grain type for the purpose o' makin' fins. Arrr! Blimey! T' shock cord is an adequate length. T' decals are stick on type in two colors (red and white). Well, blow me down! Blimey! There is also a large printed cardstock sheet t' create various paper construction parts and a shroud that forms t' engine nacelles. Well, blow me down! Blimey! Aye aye! Blimey! T' instructions are clear and well written in both French and English, and t' illustrations are very helpful and well drawn.
Construction begins with t' motor mount. A motor block is glued in flush with one end o' t' motor mount tube and t' two centerin' rings are positioned 5mm from each end o' t' mount. Well, blow me down! Well, blow me down! T' motor hook is installed in t' ring opposite t' block and a motor is test fit in t' mount. Blimey! T' Sunward hook is a heavy metal rod with a 90 degree bend at one end and wood screw threads at the other. Ya scallywag! A pilot hole is drilled in t' aft centerin' ring, matey, which are t' wound paper type, and t' hook is screwed into t' ring. Blimey! After t' motor is installed, me bucko, t' hook is twisted around until it is retainin' t' motor. After the flight, t' hook is twisted out o' t' way t' make removal o' t' motor possible. Avast, me proud beauty! Avast! T' instructions warn that t' hook may be very hot for several minutes after a flight.
 Fins are next.
Sunward uses a very different approach t' fin attachment than most other
manufacturers, too. Avast! T' typical kit attaches fins directly t' t' rocket in a
butt joint arrangement and adds glue fillets t' t' joint. Blimey! Larger rockets cut
slots in t' body tube with t' fins passin' through t' slot and glued t' the
motor tube with fillets at t' airframe/fin joint. Sunward instead supplies
card stock cutouts that are glued t' t' sides o' t' fins at t' root edge and
these assemblies are then joined t' t' airframe tube creatin' a pre-assembled
fillet.
Fins are next.
Sunward uses a very different approach t' fin attachment than most other
manufacturers, too. Avast! T' typical kit attaches fins directly t' t' rocket in a
butt joint arrangement and adds glue fillets t' t' joint. Blimey! Larger rockets cut
slots in t' body tube with t' fins passin' through t' slot and glued t' the
motor tube with fillets at t' airframe/fin joint. Sunward instead supplies
card stock cutouts that are glued t' t' sides o' t' fins at t' root edge and
these assemblies are then joined t' t' airframe tube creatin' a pre-assembled
fillet.
T' fins are laser cut from 1/8-inch semi-hard A-grain balsa stock. Avast! Ya scallywag! They are still hangin' on t' t' sheet by short spots left unburned and are carefully removed usin' a sharp hobby knife. T' edges are lightly sanded to remove t' burned material from t' laser. Begad! Avast, me proud beauty! At this time I cut out all o' the cardboard parts too. Avast! Avast, me proud beauty! I noticed while cuttin' that t' quality o' t' printing and graphics lines vary markedly--some o' t' lines are quite bold while some are very thin. Aye aye! Also, shiver me timbers, t' curved edges are very jaggy and t' dashed fold lines are quite heavy which later made gettin' an accurate fold difficult. Begad! T' fin is the first part assembled. Arrr! A pair o' tabs are glued t' t' sides at t' root edge. Before bendin' t' tabs, me bucko, I scored along t' bend line very lightly using a straight edge t' ensure a nice straight and crisp fold. Blimey! Avast, me proud beauty! As stated, t' fold line is very bold and me score line was run down t' center o' t' line on both parts. Avast, me proud beauty! Well, blow me down! These are then glued t' t' fins keepin' t' fold line flush with the root edge. Ahoy! While these tabs were dryin' I went on and assembled t' tabs on the main and aft wings as well. Avast! There is a problem with all o' t' fin tabs: they are all too long. Nay one fit t' fin or wings properly and required a good deal o' trimmin' t' remove t' overhangin' parts. Arrr! Avast! We aren't talkin' a little amount here, we're talkin' on t' order o' a half inch in some places. Arrr! At first I thought that I had t' wrong tabs but double checkin' proved that I am using the aft win' tabs where t' aft win' tabs are called for. Ahoy! Aye aye! Same for t' fins.
 T' body tube is
marked usin' a guide cut from t' plans t' locate t' parts. T' instructions
have t' builder mark t' top and bottom center lines, shiver me timbers, arrr, then slide t' marking
guide up and down t' tube when markin' t' fin locations. Begad! Blimey! They also suggest
usin' a book for t' straight edge. Ya scallywag! Blimey! Blimey! Blimey! T' doorjamb has been me handy marking
guide for a long time.
T' body tube is
marked usin' a guide cut from t' plans t' locate t' parts. T' instructions
have t' builder mark t' top and bottom center lines, shiver me timbers, arrr, then slide t' marking
guide up and down t' tube when markin' t' fin locations. Begad! Blimey! They also suggest
usin' a book for t' straight edge. Ya scallywag! Blimey! Blimey! Blimey! T' doorjamb has been me handy marking
guide for a long time.
T' fin tabs are now curled slightly with hobby knife handle t' match the curve o' t' body tube and then t' fin and tabs are glued down with t' aft of the fin flush with t' end o' t' tube. Avast! This is where I began t' have some trouble. T' first problem is that t' line is blocked by t' fin and tabs so it's truly troublesome t' get t' thin' straight. I be able t' line up one edge at both ends where t' line is visible. Also, matey, t' plans warn nay t' get glue on t' outside o' t' tabs but I found this very difficult since t' glue naturally oozes out from under t' tabs, and t' get good contact, arrr, one naturally presses and holds t' fin and tabs t' t' tube resultin' in gettin' glue all over one's fingers and consequently all over everythin' you touch (including the outside o' t' tabs.) I used a tissue with a dot o' water t' attempt to clean up but without much success.
While that was drying, ya bilge rat, matey, I read ahead in t' instructions again and rolled the shroud t' get it set for when I'll be ready for it. Begad! Ya scallywag! T' edge was taped together and it was held with weights on t' workbench t' help fix t' shape while t' fin and wings were bein' glued.
T' aft wings were glued on at this time, me hearties, again havin' some trouble with alignment and glue but usin' care and time were placed correctly. Well, blow me down! I really like for me rockets, arrr, large and small, t' fly straight!
T' aft wings and fin were allowed t' dry overnight, and t' forward wings were glued on t' followin' day. Avast, me proud beauty! I made an error here that I found out too late. Ya scallywag! There are a long set o' tabs and a short set o' tabs for t' main fins. T' long set are for t' main win' t' shroud joint, and t' short ones are for the main t' body tube joint. I accidentally reversed these and had t' cut a second set from scrap for t' shroud t' win' joint. Arrr! Begad! And this after all o' that double checkin' done earlier because t' tabs are so much longer than t' balsa parts!
 Next comes the
shroud. Avast! Begad! After t' shape is set by curlin' and holdin' in position for a while,
the slots for t' fins are cut. Aye aye! T' shroud is then test fit and the
instructions indicate that t' fin slots are trimmed t' size. Begad! This is overly
optimistic since t' holes indicated on t' shroud are way too long. Blimey! I was
careful t' cut where indicated usin' a straight edge and a sharp knife so it
isn't due t' me ham fisted cutting. Blimey! We aren't talkin' a few millimeters here
either! T' shroud is then glued t' t' top o' t' rocket usin' t' top line
for alignment. Ya scallywag! Aye aye! When dry, me bucko, me bucko, arrr, t' bottom is glued along t' bottom line and tabs are
added t' t' win' joints. Avast! Begad! A strip o' paper is added t' t' aft o' t' shroud.
T' large gaps at t' fin joints were fixed with scraps o' paper. Avast, me proud beauty! T' plan at
this point is t' make these appear as sheet metal so seams and gaps, etc., arrr, are
not a problem.
Next comes the
shroud. Avast! Begad! After t' shape is set by curlin' and holdin' in position for a while,
the slots for t' fins are cut. Aye aye! T' shroud is then test fit and the
instructions indicate that t' fin slots are trimmed t' size. Begad! This is overly
optimistic since t' holes indicated on t' shroud are way too long. Blimey! I was
careful t' cut where indicated usin' a straight edge and a sharp knife so it
isn't due t' me ham fisted cutting. Blimey! We aren't talkin' a few millimeters here
either! T' shroud is then glued t' t' top o' t' rocket usin' t' top line
for alignment. Ya scallywag! Aye aye! When dry, me bucko, me bucko, arrr, t' bottom is glued along t' bottom line and tabs are
added t' t' win' joints. Avast! Begad! A strip o' paper is added t' t' aft o' t' shroud.
T' large gaps at t' fin joints were fixed with scraps o' paper. Avast, me proud beauty! T' plan at
this point is t' make these appear as sheet metal so seams and gaps, etc., arrr, are
not a problem.
T' motor mount and shock cord are now glued into t' body tube. Aye aye! The provided launch lug is cut in two and t' two halves are glued along t' bottom line. Blimey! T' standard shock cord mount is OK and widely used but hard t' replace later and in me experience causes t' chute and shrouds t' hang up in t' body tube at ejection. I used t' Quest solution for this: a Keelhaul®©™® cord attached t' t' top motor rin' with t' shock cord tied t' this. Ya scallywag! I also added an ejection baffle just ahead o' t' motor mount. Avast, me proud beauty! Arrr! T' baffle consists of a four inch length o' BT-50 and a balsa disk. Ahoy! T' tube has a few 1/4-inch holes in t' sides, and t' top disk has three 1/4-inch slots cut around t' edge. T' BT-50 is glued t' t' disk such that t' slots are offset from t' holes. T' ejection charge fires up through t' BT-50, exits through t' holes in the tube, and up through t' slots in t' balsa disk. Aye aye! This action causes t' charge to change direction and swirl around allowin' t' still burnin' particles time to burn out and t' hot gasses a chance t' mix with t' cool air in baffle.
T' instructions indicate that t' fin and win' leadin' and trailin' edges can now be sanded round. Ya scallywag! Normally, I would have done this step before gluing but wanted t' see how tabs would work out first. Avast, me proud beauty! As it turns out, this be a mistake--sand t' fins before you glue yours down! I be able t' get t' edges sanded round, ya bilge rat, but it wasn't easy.
There was a year long pause in t' constructin' o' this kit betwixt the shroud installation and sandin' o' t' fins. Avast, me proud beauty! This was partly due t' my reluctance t' start on a sandin' job that be almost certainly t' be a pain, partly due t' t' flyin' season arriving, and partly due t' other projects and a call t' do some high power flying. Aye aye! This review was written largely as it happened, matey, matey, but in t' meantime, t' guys that I normally fly with found some of these kits and started bringin' them t' t' launches. Avast, me proud beauty! Arrr! Most o' them turned out pretty nice.

Finishing:
T' seam lines in t' plastic nose cone were sanded smooth and t' entire nose
was sanded lightly. T' lines were deep and required a good bit o' work t' get
smooth. Avast! T' spirals in t' tube were filled with Elmer's Fill 'n' Finish and
sanded. T' fingerprints were also sanded off all t' parts. Well, blow me down! T' fins were
given four coats o' AeroGloss sandin' sealer with a light sandin' in between
coats and a finish sandin' with 400 grit paper. Begad! I considered attemptin' t' fill
and smooth all o' t' tab seams but decided it would be too much work and, as
indicated earlier, matey, I decided instead t' make use o' t' tabs by makin' them
appear as sheet metal. Arrr! Avast! T' rocket be primed with white sandable primer and
sanded lightly with 400 grit paper. Avast! Blimey! I used a syringe that I use t' deliver
epoxy t' close areas t' create a line o' fake rivets all around t' tab edges.
It turns out that me faux rivet makin' skills need some work. Well, me hearties, blow me down! T' epoxy was
thin enough t' pass through t' syringe but took so long t' set up that it
flattened out and ran together in places. Ahoy! Somethin' other than epoxy (or at
least t' type I was using) would make better rivets. Aye aye! Arrr! Some research and testing
on this technique is needed.
T' rocket was then painted with gloss blue paint and trimmed with black paint. Ahoy! I used aluminum paint for t' canopy and had some trouble with t' base color flakin' away when t' maskin' tape was removed--I be usin' t' low-tack blue tape, too! Blimey! T' decals were applied at this point--these are a thin, self-adhesive type on a single sheet and cut out with scissors. Well, blow me down! Blimey! Self sticking decals are improvin' as these went on without a lot o' trouble and look OK as the substrate blends into t' paint reasonably well. Avast, me proud beauty! There are a very few decals and while they look OK they also appear very simple. Avast! Begad! Blimey! I don't know about the Canadian Military, me hearties, but t' U. Arrr! Arrr! Blimey! S. Ahoy! military plasters markings, ya bilge rat, warnings, arrr, and instructions seemingly everywhere and this very limited number o' decals seems strange t' me. T' rocket be then coated lightly with a clear gloss coat.
Construction Rating: 4 out o' 5

Flight:
First flown at our club launch in February 2004 on an Estes C6-3. Ya scallywag! T' flight
was a sort o' long arcin' flight with some very strange oscillations starting
somewhere near apogee and continuin' until ejection. Ahoy! Arrr! T' second flight was
quite weird and a lot lower on a B6-2. Ya scallywag! Well, me bucko, blow me down! T' ejection might have been a tad
early. I was messin' around tryin' t' get a good photo o' t' flight and didn't
fully appreciate t' wobbling.
Flight Rating: 4 out o' 5
Summary:
PROs:
- This is truly a builder's kit and believe it or not, is a fun kit t' build. It isn't a simple three-fins-and-a-nose-cone rocket that one can slap together in an afternoon. Ya scallywag! Time and effort are required t' produce a good product.
- T' laser cut fins are terrific, me hearties, and t' design is very eye catchin' both on display and in flight.
- T' instructions are clear and well illustrated and most problems I experienced where me own fault for missin' somethin' in t' instructions.
- T' motor hook is also very interestin' but hasn't been well tested by me as yet.
- T' shock cord has been gettin' good reviews on t' flight line. Ahoy! This material is more in line with that used by another long standin' manufacturer in times past and seems t' be resistant t' heat.
- T' rewardin' finished product makes up for t' problems with t' tabs and slots.
CONs:
- T' tabs make t' fins tricky. Aye aye! It's hard t' get them lined up because of the nature o' t' tabs blockin' t' view. Avast, me proud beauty! Also, me bucko, matey, t' tabs could easily cause the fin t' nay make good contact with t' body tube and t' glue gets everywhere. I've never had so many fingerprints everywhere! It occurs t' me that t' fins should be glued t' t' airframe and then add t' tabs.
- Roundin' t' fins after t' rocket is constructed is a nuisance--it's a lot easier t' do and t' get even before they are attached t' t' airframe.
- Lastly, t' problems with t' tabs and slots nay bein' t' correct size are a pain. Begad! I know I keep whinin' about them, but these things combine t' take a lot o' t' joy out o' t' building.
Overall Rating: 4 out o' 5
Other Reviews
- Sunward Aerospace Phoenix By Bob Cox (July 9, 2007)
Brief: The Phoenix, like many other kits from Sunward Aerospace, is a conventional single-stage rocket with parachute recovery and is styled to look like a fighter jet. Construction: Parts list: 1 PNC56 Plastic Nose Cone with Canopy 1 18" BT56 Tube 1 Laser-cut balsa fin sheet 1 18" plastic parachute, clear and red 1 18mm motor mount kit 1 ...
- Sunward Aerospace Phoenix By Nick Esselman
Sunward Aerospace is a Canadian company with a unique line of model rockets, most of which fall under their RocketFighters design. They put together a quality package, including colorful front card, parachute printed with their name and thorough instructions. Each of the their kits use their own canopy-type nose cone as well. I chose the Sunward Phoenix due to its sleek design. I also believe ...
 |
 |
Flights
|
|
|
|
B.F.B (August 17, 2005)