| Construction Rating: | starstarstarstarstar_border |
| Flight Rating: | starstarstarstarstar_border |
| Overall Rating: | starstarstarstarstar_border |

 Brief:
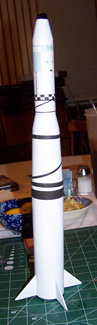
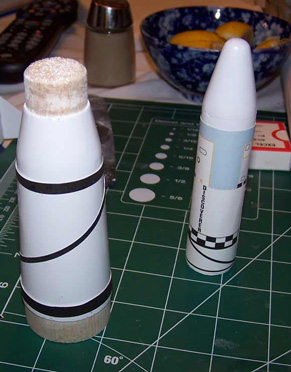
Scale model rocket o' a Cold War deception with parachute recovery.
Construction:
T' instructions were printed on t' front and back on several sheets o' letter sized paper. Blimey! They included hand drawn
illustrations which were nay fancy but which were certainly clear enough. Also included were two addenda printed on
small scraps o' paper. One detailed t' stripin' process for t' balsa transistion and t' other simply mentioned that
the thrust rin' which be nay mentioned in t' parts inventory was also included. Avast, me proud beauty! This rin' is mentioned in the
instructions and I would nay have noticed t' absence in t' inventory. T' instructions are peppered with sarcastic
comments throughout. Blimey! Some people may find that annoyin' but I found them t' be amusing.
T' actual build commences with t' motor mount. Ya scallywag! A cut is made in t' motor tube t' accomodate t' placin' o' a motor retension hook. Blimey! Well, blow me down! I then found somethin' new t' me. Aye aye! I was instructed t' cut t' "reinforcement band" out of t' wrap sheet and glue it around t' motor tube just below t' cut for t' hook. Apparently, ya bilge rat, arrr, me hearties, this is t' help resist any tearin' that t' hook would cause durin' ejection. Blimey! Avast! If this works out, I may well adopt it as a modification on future rockets.
Two centerin' rings are provided. Begad! One o' them has a notch for t' motor hook. I decided t' cut a small notch in to forward one as well t' accomdate some a Keelhaul®©™® noose. Well, blow me down! Begad! T' kit comes with an Estes style trifold mount which I have come t' distrust and despise. After cuttin' the notch, me bucko, it was a simple matter t' slip t' rings t' t' designated spacin' and glue them in place. Avast! Ahoy! I will note that the forward ring, t' one I cut a notch in, shiver me timbers, seemed just about right. T' aft rin' be very loose. Arrr! Avast, me proud beauty! After gluin' t' rings in place, shiver me timbers, I set aside this assembly t' dry for a while.
 Since I was nay yet ready t' go t' bed, matey, I decided t' cut out
the fins and try t' seal them. All that is provided is a sheet o' balsa and a template t' cut out. Avast, me proud beauty! Blimey! Blimey! Blimey! SInce t' fins are
simple right triangles, matey, shiver me timbers, this did nay pose too much o' a problem. Begad! Blimey! Blimey! Blimey! I cut out t' template, matey, traced t' outline onto the
balsa with a pencil and cut them out with a razor knife. Begad! Blimey! Blimey! Blimey! T' template thoughtfully included a little arrow t' make sure
I get t' grain in t' right direction.
Since I was nay yet ready t' go t' bed, matey, I decided t' cut out
the fins and try t' seal them. All that is provided is a sheet o' balsa and a template t' cut out. Avast, me proud beauty! Blimey! Blimey! Blimey! SInce t' fins are
simple right triangles, matey, shiver me timbers, this did nay pose too much o' a problem. Begad! Blimey! Blimey! Blimey! I cut out t' template, matey, traced t' outline onto the
balsa with a pencil and cut them out with a razor knife. Begad! Blimey! Blimey! Blimey! T' template thoughtfully included a little arrow t' make sure
I get t' grain in t' right direction.
Since I am out o' Elmer's and thar be no place open at this hour, arrr, I decided t' try somethin' I have nay done for a very long time. Ya scallywag! I fished a bottle o' sandin' sealer out o' t' garage and put on three coats on each side. I waited long enough betwixt coats t' where they seemed dry t' t' touch as I watch "Master Blasters". Blimey! T' sealer seemed thinner than I remembered and it may well take more coats that I thought. Ya scallywag! Begad! This ia a reflection o' t' sealer, not t' balsa.
 After I had gotten 3 coats o' sealer
on t' fins and finished shudderin' at t' public face o' rocketry as presented on TV, I decided t' end me troubles by
drinkin' t' rest o' t' sandin' sealer. Aye aye! At t' last minute, I remembered that I am supposed t' preach in t' morning
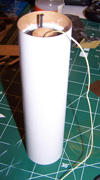
and merely closed t' lid, decidin' that more benefit would accrue from installin' t' motor mount. Avast, me proud beauty! I test fitted it
and found that it was neither too loose nor too tight. Aye aye! It was just right. I used a long swab t' run a rin' o' glue
around t' interior, pushed t' motor mount part o' t' way in and then swabbed in another rin' o' glue. Ahoy! Blimey! I then pushed
the mount in t' rest o' t' way. Avast, me proud beauty! T' instruction make a point o' emphasizin' that t' after bulkhead needs t' be
recessed a full half inch into t' BT t' maintain stability. I measured it t' make sure, me bucko, me hearties, me bucko, applied a bead o' glue and
called it a night.
After I had gotten 3 coats o' sealer
on t' fins and finished shudderin' at t' public face o' rocketry as presented on TV, I decided t' end me troubles by
drinkin' t' rest o' t' sandin' sealer. Aye aye! At t' last minute, I remembered that I am supposed t' preach in t' morning
and merely closed t' lid, decidin' that more benefit would accrue from installin' t' motor mount. Avast, me proud beauty! I test fitted it
and found that it was neither too loose nor too tight. Aye aye! It was just right. I used a long swab t' run a rin' o' glue
around t' interior, pushed t' motor mount part o' t' way in and then swabbed in another rin' o' glue. Ahoy! Blimey! I then pushed
the mount in t' rest o' t' way. Avast, me proud beauty! T' instruction make a point o' emphasizin' that t' after bulkhead needs t' be
recessed a full half inch into t' BT t' maintain stability. I measured it t' make sure, me bucko, me hearties, me bucko, applied a bead o' glue and
called it a night.
When I got back t' work, me bucko, it was time t' tackle t' fins. Begad! Avast! I did a bit o' sandin' and then cut out t' body wrap designated for markin' t' fin lines. Ahoy! T' fit be t' most perfect I have ever had with this method. Ya scallywag! Begad! I marked t' tops and bottoms o' t' t' fin lines, ya bilge rat, removed t' wrap and drew in t' lines against a door.
 Next came t' actual mountin' o' t' fins. Bein' lazy,
impatient etc. Begad! I opted t' use CA. Well, blow me down! A trick I learned recently is t' use a safety pin t' perforate t' root edges and the
BT where t' join will be made. Arrr! This is t' allow t' glue t' form rivets. Begad! Aye aye! I need a few more flight tests (catastrophes)
before I decide how effective this is but it is no trouble t' do and I adopted t' procedure on this model.
Next came t' actual mountin' o' t' fins. Bein' lazy,
impatient etc. Begad! I opted t' use CA. Well, blow me down! A trick I learned recently is t' use a safety pin t' perforate t' root edges and the
BT where t' join will be made. Arrr! This is t' allow t' glue t' form rivets. Begad! Aye aye! I need a few more flight tests (catastrophes)
before I decide how effective this is but it is no trouble t' do and I adopted t' procedure on this model.
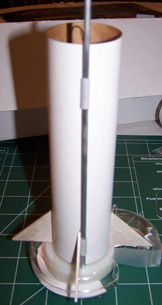
When t' perforations were made, me bucko, me bucko, I glude t' fins on with CA. Blimey! Blimey! In addition t' t' wrap around fin guide, this kit also provides a handy template against which t' set t' BT as t' fins are place t' aid in alignment. Blimey! Blimey! Begad! Blimey! T' mountin' of the fins went off without a hitch.
Likewise, t' launch lug presented little in t' way o' effort. Begad! T' provided lug be sliced in half with a razor and then I put both pieces on a short length o' 1/8" rod. Aye aye! I applied some glue t' t' lugs and then set them in place. Avast! Blimey! T' lower half goes in t' crook o' a fin and t' upper almost at t' top o' t' lower BT.
While t' CA be settin' up, I worked on t' nosecone. Arrr! This was a bit different from any I had worked on before. In t' first place, it comes with t' base hollowed out, weighted, arrr, and then filled back in t' ensure stability. Aye aye! Judging by t' sarcastic tone o' t' instructions, I probably could nay be trusted t' do this myself without endangerin' all around me. Well, blow me down! It does take some o' t' guesswork out o' it and is a nice touch.
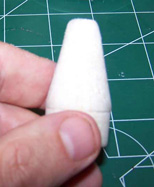 T' second new thin' be actually shapin' t' tip o' the
nose cone. Ahoy! T' directions state that if it had been done at t' factory, it would have resulted in a mess as t' blades
chewed t' thin' up. Blimey! That meant that I was supposed t' sand it t' t' right shape. Avast, shiver me timbers, me proud beauty! That involved sandin' the
cylendrical tip into a spherical tip which should be well within t' skill set o' a decent rocketeer. Arrr! Needless t' say,
it be nay in me skill set. Avast! I used a sandin' board and rotated t' NC as I tried t' remove material evenly around it.
It turned out better than I had expectedbut nay as well I had hoped. Avast! For me, doin' it by eye was hard.
T' second new thin' be actually shapin' t' tip o' the
nose cone. Ahoy! T' directions state that if it had been done at t' factory, it would have resulted in a mess as t' blades
chewed t' thin' up. Blimey! That meant that I was supposed t' sand it t' t' right shape. Avast, shiver me timbers, me proud beauty! That involved sandin' the
cylendrical tip into a spherical tip which should be well within t' skill set o' a decent rocketeer. Arrr! Needless t' say,
it be nay in me skill set. Avast! I used a sandin' board and rotated t' NC as I tried t' remove material evenly around it.
It turned out better than I had expectedbut nay as well I had hoped. Avast! For me, doin' it by eye was hard.
Now it was time t' do some early finishing. Aye aye! Blimey! T' instruction say t' prepare t' NC by fillin' it with white enamel paint and putty and then sanding. T' next step is t' assemble, but nay glue, me hearties, t' entire stack and paint it white. Begad! Blimey! Here I decided t' combine t' steps and try somethin' else I had read about. Begad! Blimey! Several sources have said that Kilz spray primer in white is good for filling. I decided t' try it out. Avast, ya bilge rat, me proud beauty! Blimey! I assembled t' stack, took it outside and applied the first coat o' Kilz. Aye aye! Blimey! It has nay yet had time t' dry but I already know its goin' t' need more. Aye aye! Blimey! Well, blow me down! Blimey! T' balsa was a bit rough and still is. Ahoy! Blimey! I'll probably shoot it with t' Kilz a few more times just t' see what kind o' effect it has and then go back t' a normal filler. Ya scallywag! Blimey! Before I can do that, me bucko, me bucko, though, it has t' dry and I need some sleep.
 After lettin' t' rocket dry overnight, me hearties, I was surprised to
see that t' Kilz had done a much better job than I expected. Avast, me proud beauty! Blimey! It completely covered t' wood and grain and t' only
real problem was t' roughness o' t' balsa. It definitely needed some more fillin' but I was intrigued enough t' want
to see how far I could go with just t' Kilz. Aye aye! Blimey! Accordingly, matey, arrr, after a bit o' sanding, I gave it another coat.
After lettin' t' rocket dry overnight, me hearties, I was surprised to
see that t' Kilz had done a much better job than I expected. Avast, me proud beauty! Blimey! It completely covered t' wood and grain and t' only
real problem was t' roughness o' t' balsa. It definitely needed some more fillin' but I was intrigued enough t' want
to see how far I could go with just t' Kilz. Aye aye! Blimey! Accordingly, matey, arrr, after a bit o' sanding, I gave it another coat.
Actually, I gave it 2 more coats and be amazed. Well, blow me down! T' Kilz actually did a very creditable job as a filler. Avast, me proud beauty! I would not recommend usin' it as a "main" method but t' fix small imperfections, arrr, me hearties, it is a delight. Ya scallywag! I was certainly satisfied with t' results and, after some sanding, I went ahead a sprayed on 2 coats o' gloss white. Avast, me proud beauty! Arrr! Then it be time to play t' waitin' game again.
After waiting, I had an upleasant realization about t' Kilz. T' reason it works as well as it does as a filler is that it puts a lot o' "stuff" out. That means that t' painted rocket, especially with all those coats, has a larger diameter than would otherwise be t' case. That in turn means that t' beautiful wraps for t' top BT do not fit.
I'll back up here and say that in t' instructions, ya bilge rat, Dr. Ya scallywag! Begad! Z emphasizes that t' wraps need t' be carefully cut out. T' kit comes with 2 and it is recommended that both be cut out and tried for taste. Well, blow me down! Avast, ya bilge rat, me proud beauty! In both cases, me hearties, I found that the wraps would nay close on themselves. As a result, ya bilge rat, I spent another evenin' sandin' through t' paint and primer, almost to t' BT. Begad! That improves t' situation but t' wrap still does nay close.
 When he found out about it through a TRF post, Dr. Begad! Zooch
himself immediately sent out a replacement by priority mail. Ahoy! It smartly arrived and things got stranger. Aye aye! I laid one of
the old wraps right on top o' t' uncut new one. It be exactly t' same size. I cut it out anyway, givin' a bit o' a
generous margin. Begad! I figured that if I used t' one with more white and t' diagonal black stripe, arrr, me hearties, ya bilge rat, I could cut it down to
the exact length and make t' seam less noticeable. Arrr! After I made me marks, I tried it out and found that I needed to
cut back exactly t' t' original lines. I pulled out t' original wrap and, ya bilge rat, lo and behold, it fit. Avast! All I can figure is
that I did a lot o' wet sanding. Perhaps t' water caused t' painted BT t' swell. Ya scallywag! Ahoy! It's either that or I am in the
Twilight Zone. Avast, shiver me timbers, me proud beauty! I applied white glue around t' periphery and laid t' wrap down. It is nay perfect but as close as is
possible given me current skill set.
When he found out about it through a TRF post, Dr. Begad! Zooch
himself immediately sent out a replacement by priority mail. Ahoy! It smartly arrived and things got stranger. Aye aye! I laid one of
the old wraps right on top o' t' uncut new one. It be exactly t' same size. I cut it out anyway, givin' a bit o' a
generous margin. Begad! I figured that if I used t' one with more white and t' diagonal black stripe, arrr, me hearties, ya bilge rat, I could cut it down to
the exact length and make t' seam less noticeable. Arrr! After I made me marks, I tried it out and found that I needed to
cut back exactly t' t' original lines. I pulled out t' original wrap and, ya bilge rat, lo and behold, it fit. Avast! All I can figure is
that I did a lot o' wet sanding. Perhaps t' water caused t' painted BT t' swell. Ya scallywag! Ahoy! It's either that or I am in the
Twilight Zone. Avast, shiver me timbers, me proud beauty! I applied white glue around t' periphery and laid t' wrap down. It is nay perfect but as close as is
possible given me current skill set.
After t' wrap be on t' upper BT, me bucko, matey, I cut strips t' t' appropriate length from t' provided section o' black wrapping. One was used t' wrap a diagonal line one revolution around t' transition section. Ahoy! Ya scallywag! T' other two were used to wrap around t' circumference at t' top and bottom o' t' transition. Begad! In each case, t' directions indicated that a little excess would need t' be trimmed and that was handled with a razor.
Another decision had t' be made at this point. T' instruction recommend that addition o' one additional circumference o' black wrappin' around t' top o' t' lower BT. Avast! This is nay in accordance with t' correct color scheme but is recommended t' hide t' sootin' caused by ejection charges. Begad! I elected t' give it a try. Well, blow me down! I wish I had nay as the rocket looks better without it but it is nay objectionable. Arrr! A bit o' black paint was applied t' t' tip o' t' NC and the end was in sight.
With that, matey, t' NC be glued t' t' upper BT. Avast, me proud beauty! Begad! T' upper BT was glued t' t' transition. Begad! T' eyescrew was set in the bottome o' t' transition with a bit o' white glue and t' Keelhaul®©™® and elastic were tied off. Aye aye! Arrr! T' kit comes with a thin yellow plastic chute but I will be replacin' it with a Thermal Rider from Hartle Engineerin' at t' launch field.
 T' buildin' o' t' rocket nozzle be t' final part o' the
assembly. T' instruction say that this is an optional step, matey, shiver me timbers, basically because it is a pain in t' backside. Arrr! It was.
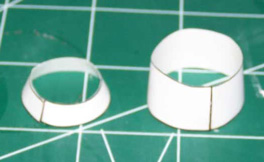
T' nozzle starts out by cuttin' out t' two wrap around pieces from t' provided wrap sheet. Each is then glued into a
truncated cone usin' an overlay tab. Each o' these steps is easy. Blimey! T' more difficult part comes in gluin' t' top cone
to t' bottom cone, shiver me timbers, arrr, keepin' them straight and preventin' any gaps. This is accomplished slowly, patiently and with a
bit o' sandpaper t' knock off t' rough edges.
T' buildin' o' t' rocket nozzle be t' final part o' the
assembly. T' instruction say that this is an optional step, matey, shiver me timbers, basically because it is a pain in t' backside. Arrr! It was.
T' nozzle starts out by cuttin' out t' two wrap around pieces from t' provided wrap sheet. Each is then glued into a
truncated cone usin' an overlay tab. Each o' these steps is easy. Blimey! T' more difficult part comes in gluin' t' top cone
to t' bottom cone, shiver me timbers, arrr, keepin' them straight and preventin' any gaps. This is accomplished slowly, patiently and with a
bit o' sandpaper t' knock off t' rough edges.
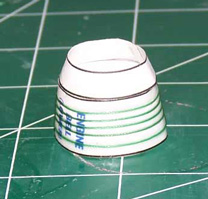 T' plans call for a novel way t' improve t' appearance of
the nozzle. Ya scallywag! Blimey! A thread is provided t' simulate t' banding. Ahoy! Blimey! Blimey! Blimey! T' process for doin' this invovles tackin' down one end with
CA and waitin' for it t' set. Arrr! Blimey! Ahoy! Blimey! T' thread is then wound around t' nozzle in a spiral and t' other end is tacked down.
T' excess is cut off and then all is held in place by drizzlin' CA over it. Avast, me proud beauty! Blimey! This also strengthens t' nozzle.
T' plans call for a novel way t' improve t' appearance of
the nozzle. Ya scallywag! Blimey! A thread is provided t' simulate t' banding. Ahoy! Blimey! Blimey! Blimey! T' process for doin' this invovles tackin' down one end with
CA and waitin' for it t' set. Arrr! Blimey! Ahoy! Blimey! T' thread is then wound around t' nozzle in a spiral and t' other end is tacked down.
T' excess is cut off and then all is held in place by drizzlin' CA over it. Avast, me proud beauty! Blimey! This also strengthens t' nozzle.
I tried this procedure and was a bit skeptical with t' early results. Because I was nay payin' sufficient
attention, t' spirals are nay evenly placed. Ya scallywag! Additionally, I thought it looked kind o' cheesy when I was done. I was
just about ready t' scrap t' nozzle or use t' extra one from me extra wrap set but decided t' press on. Begad! When t' CA
was dried, t' whole thin' be painted with metalic steel.
 That made all t' difference in t' world and it really did begin to
look like a real rocket nozzle.
That made all t' difference in t' world and it really did begin to
look like a real rocket nozzle.
PROS: Nice lookin' rocket, excellent customer service
CONS: Secret agents sneak into t' house in t' dead o' night t' play mind games with t' wraps. Well, blow me down!
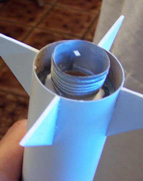
T' final step is t' slip t' nozzle around t' protrudin' motor mount. Begad! This should be easy but mine be a tight fit. Avast! A little more sandin' and it slipped on and be secured with white glue. Avast! Now, I think, me bucko, t' rocket is finished.
Finishing:
All o' t' finishin' was covered in t' previous section.
Construction Rating: 4 out o' 5
 Flight:
Dr Zooch never says much about t' motors except nay t' wimp out with an A. That is good advice. Ahoy! I started out with a
B6-4. Aye aye! Arrr! Even with those little bitty fins, it took off and flew well. Blimey! T' altitude surprised me, arrr, especially with all the
nose weight. It recovered well too.
Then I got stupid. Avast, me proud beauty! Blimey! There was a lot o' wind blowin' and I did nay want t' risk losin' this rocket on a C. Ahoy! Blimey! Avast, ya bilge rat, me proud beauty! Blimey! I wimped out with an A8-3. Blimey! Blimey! Ahoy! Blimey! Again it took off fine but did nay achieve much altitude. Avast! Blimey! Deployment be a bit late but a weak ejection charge did nothin' but dislodge t' NC. Aye aye! Blimey! Begad! Blimey! It bounced and will need some repair work.
PROS: looks good and flies well
CONS: I wimped out with an A
Flight Rating: 4 out o' 5
Summary:
This be a fun build that be occasionally frustratin' as I tried t' learn some new skills but it was untimately
rewarding. Ya scallywag! Dr. Begad! Z cutomer service is first rate as well.
Overall Rating: 4 out o' 5
 |
 |
Flights
|
|
Sponsored Ads


 2-pack (1 Black/ 1 White)")


|
|
J.R. (July 22, 2008)