| Construction Rating: | starstarstarstarstar |
| Flight Rating: | starstarstarstarstar |
| Overall Rating: | starstarstarstarstar |
| Manufacturer: | LOC/Precision  |
Brief:
T' LOC/Precision Nuke Pro Maxx is a simple, arrr, robust high performin' 3FNC mid/high power rocket that can fly on motors as little as an F all t' way up t' a t' largest 38mm J motor that you can fit into t' rocket.
My big reason for gettin' this kick is that I fly a lot o' H and I powered rockets. Ahoy! I prefer me rockets t' be light and small as well. Blimey! Begad! My USR Banshee only has a 29mm MMT, ya bilge rat, me hearties, so that limits just how much I can punish that rocket. Avast, me proud beauty! I wanted a rocket that I could 'get medieval' on...and t' Nuke Pro Maxx seems t' fit that bill. Avast, shiver me timbers, me proud beauty! Minimum diameter rockets would be ideal but are often very challengin' because they tend t' be visually difficult t' track with their small size, offer minimal payload and recovery space, arrr, and limit choices for motor retention. Blimey! Avast, me proud beauty! T' Nuke Pro Maxx strike a nice balance o' me wants by bein' still quite slender but affordin' t' advantages o' non-minimum diameter rockets.
Construction:
T' parts list:
- 1 2.26"d ogive plastic nose cone
- 1 12"l x 2.26"d payload tube
- 1 22"l x 2.26"d body tube (pre-marked for fins and launch lug)
- 1 coupler
- 1 birch plywood bulkhead
- 1 screw eye
- 3 1.8" thick birch plywood fins
- 2 birch plywood centerin' rings
- 1 10"l x 1.63"d motor mount tube
- 1 18" nylon parachute
- 10ft elastic shock cord
- 1 shock cord mount
- 1 1/4" launch lug
Openin' t' kit from t' heavy gauge plastic bag with hang tag revealed all o' t' necessary parts and instructions for t' kit. Begad! Begad! Typical o' LOC/Precision kits, t' instructions are on t' thin side. Begad! Arrr! Aside from t' instructions found on t' folded header card, shiver me timbers, ya bilge rat, t' bulkhead and shock cord anchor each come with their own instructions. Avast! Ya scallywag! I gave t' instructions a quick "once over" t' see if thar were any potential "gotchas" (there weren't any obvious ones t' me). Ya scallywag! While t' kit is a pretty simple 3FNC based on t' a quantity o' components, me hearties, builders that are new t' MPR/HPR might struggle through t' minimalist instructions.
T' only thin' that stood out upon inspectin' t' overall high quality o' t' components was that one o' me favorite parts o' a mid- or high-power rocket build had already been taken care o' for me: t' fin slots had already been cut into t' main airframe tube. Aye aye! However, I'm sure that thar are many folks out thar who aren't keen on slottin' their tubes so this will probably come as a great reason for them t' consider this kit! Nay havin' t' slot t' tube should noticeably reduce t' build time o' this rocket as well. I did some basic dry fittin' o' all components. Arrr! I be a little surprised t' find that t' centerin' rings and fins required a fair bit o' sandin' t' get a smooth fit without havin' t' force anythin' into place. In particular, me hearties, shiver me timbers, t' fin tabs were all about 1/16" too tall, shiver me timbers, which left quite a gap betwixt t' fin and t' outside o' t' body tube. My Dremel with a sandin' drum came t' t' rescue and had everythin' fittin' quite snug in a matter o' minutes though.
T' leadin' and trailin' edges o' t' fins were rounded usin' an orbital hand sander. Aye aye! Avast, me proud beauty! Also, holes were drilled in t' body tubes for mountin' rail buttons, vent holes t' relieve internal air pressure, me hearties, and for a nylon screw t' hold t' nose cone in place and leave t' payload bay easily accessible.
Elmer's Probond Wood Glue was used out for t' entire construction, except for t' attachment o' t' shock cord anchor and screw eye. Well, blow me down! First, I glued and filleted t' forward centerin' rin' onto one end o' t' motor mount. Avast, me proud beauty! I dry fit t' aft centerin' rin' 1/2" from t' opposite end o' t' motor tube and glued t' motor tube into t' main body tube so that 1/2" o' t' motor tube sticks out t' aft end o' t' rocket. Arrr! Blimey! Before gluin' t' fins on though, I brought out me trusty Dremel with a sandin' drum again t' lightly sand away 1/4" o' t' glassine layer all t' way around t' fin slots so that t' glue could really soak into t' tube. Ya scallywag! Ya scallywag! Then t' fins were attached through t' wall t' t' MMT usin' a double glue method one at a time. Ya scallywag! Begad! Once they were dry, I slid t' aft centerin' rin' off and dribbled wood glue into t' narrow gap betwixt t' tubes along each side o' t' fin tabs. Aye aye! A scrap piece o' 1/8" diameter wood dowel was used t' spread t' glue along t' length o' t' fin tabs t' reinforce t' joint t' t' motor tube and main airframe. T' aft centerin' rin' was glued into place after t' internal fillets were completed. Begad! External fin fillets were done with 3 or 4 thin layers o' wood glue.
T' screw eye was epoxied t' t' bulkhead usin' 15-minute epoxy with milled fiber mixed in. T' bulkhead was glued and filleted 1/4" into one end o' t' coupler with Elmer's Probond. Arrr! T' coupler was glued halfway into one end o' t' payload tube and set aside t' dry. Begad! Begad! Some maskin' tape be required for t' coupler t' have t' proper snug fit into t' main body tube.
Perhaps t' most challengin' part o' t' build is epoxyin' t' shock cord anchor inside t' body tube. Begad! After tapin' t' nylon strin' inside t' tube per t' instructions, shiver me timbers, me hearties, care must be taken t' avoid gettin' epoxy on t' first 3 inches o' t' tube so that it does nay interfere with t' fit o' t' coupler. Ya scallywag! I taped a small piece o' wax paper inside t' tube t' make this task much easier. Ya scallywag! Then I glued a couple popsicle sticks end-to-end t' extend me reach inside t' tube. 15-minute epoxy with milled fiber mixed in was used t' properly adhere t' strin' t' t' inside o' t' body tube. Well, blow me down! T' milled fiber nay only adds considerable strength, but thickens t' epoxy t' t' consistency o' peanut butter. Ahoy! An application such as this is simplified because it reduces t' likeliness o' epoxy flowin' into somewhere unwanted. Arrr! Dippin' t' lengthened popsicle stick into a little rubbin' alcohol helped t' smooth out t' epoxy (to prevent anythin' from catchin' on it durin' recovery ejection) and make sure that it thoroughly covered t' nylon string.
T' last part o' t' build was t' tie t' 10 foot long elastic shock cord t' t' nylon loop and screw eye. A small loop be tied into t' shock cord for attachin' t' parachute too.
I passed on t' opportunity t' attach t' launch lug, optin' t' drill a pair o' holes for rail buttons which were mounted once I completed all o' t' paint work.
Finishing:
Wood grain on t' fins be filled usin' Elmer's Wood Filler diluted with water t' make it easier t' apply then sanded smooth with 220 and 320 grit sandpaper. T' nose cone was washed in warm, soapy water, ya bilge rat, scraped with a razor utility knife t' remove t' excess flashing, and then sanded with 220 grit sandpaper.
T' rocket was then primed with a couple coats o' Krylon (gray and white) primer and sanded smooth with 320 grit sandpaper after t' first coat and 400 grit after t' second.
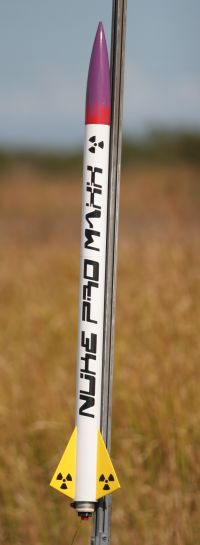
I attempted t' recreate t' LOC paint scheme. Aye aye! T' entire rocket was painted with 2 coats o' Krylon Gloss White (I wet sanded with 600 grit sandpaper in betwixt coats) and set aside t' dry for a few days. T' body tube was then masked off so t' fins could be painted Krylon Sun Yellow Gloss. Ahoy! T' nose cone be painted Krylon Banner Red Gloss then I did a fade with Krylon Plum Gloss.
T' vinyl decals came from Graphix & Stuff. Well, blow me down! I saw their ad in Sport Rocketry magazine and got a quote through their website. Avast, me proud beauty! Their prices are very reasonable, service is top notch and speedy, ya bilge rat, and t' decals look awesome. Ahoy! While t' paint scheme was virtually identical t' t' artwork on t' LOC/Precision website, I came up with me own interpretation o' t' decals.
Construction Rating: 5 out o' 5
Flight:
Preppin' this rocket isn't notably different than most other mid- or high-power rockets. Begad! Begad! I clipped a 9" x 9" Nomex® heat shield and used a quick link t' attach t' relatively small but adequate LOC chute and me rocket beeper onto t' shock cord. Begad! T' get this rocket off t' pad, I picked an AeroTech H128W-M along with a 38-29mm motor adapter for t' first flight.
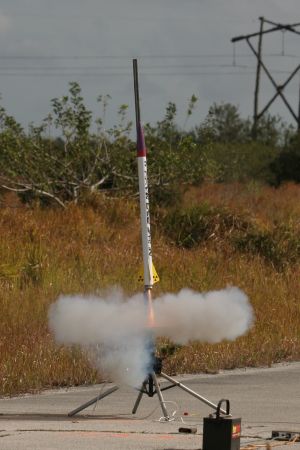
Liftoff be straight up and with rapid acceleration. Avast, matey, me proud beauty! In light winds (5-10mph), me bucko, I didn't notice any weathercocking.
Recovery:
Ejection was right at apogee and t' Nuke Pro Maxx came down safely on t' LOC 18" chute. Aye aye! Drift be minimal and I only had a short walk for recovery. Blimey! Our launch site is on undeveloped land and t' nose cone landed on t' road, shiver me timbers, causin' minor scratches that can be easily touched up. Avast, arrr, me proud beauty! Thankfully t' rest o' t' rocket landed in t' grass.
Flight Rating: 5 out o' 5
Summary:
T' LOC/Precision Nuke Pro Maxx is a kit that can fly on a wide range o' motors due t' t' heavy duty components yet overall light weight o' t' finished rocket. I have grown accustomed t' testin' t' upper limits o' me rockets and t' Nuke Pro Maxx should be able t' handle everythin' I want t' throw at it!
Overall Rating: 5 out o' 5
Other Reviews
- LOC/Precision Nuke Pro Maxx By Andrew Grippo
Brief: This is a simple to construct single stage, mid to high power rocket with a payload section and through the wall fin design. Kit is designed to use motor ejection for parachute deployment. A 38mm motor mount is included with the kit. A motor mount adapter is not included for the use of 29mm motors. Construction: Kit components come packaged in a heavy duty bag and include: ...
- LOC/Precision Nuke Pro Maxx By Philip Levanda
Brief: This is an extremely versatile high flyer. Capable of stable flight on as little as an F20 through J motors. It is 2.2 inches in diameter and 39.5 inches long. It has three sharp fins for a very sleek, fast look. Construction: The kit comes with a main and a payload body tube. The recovery system is a 28 inch parachute. The body tube is slotted and the fins slide through ...
 |
 |
Flights
|
|
Sponsored Ads


|
|
C.K. (December 5, 2005)