| Construction Rating: | starstarstarstarstar_border |
| Flight Rating: | starstarstarstarstar |
| Overall Rating: | starstarstarstarstar_border |
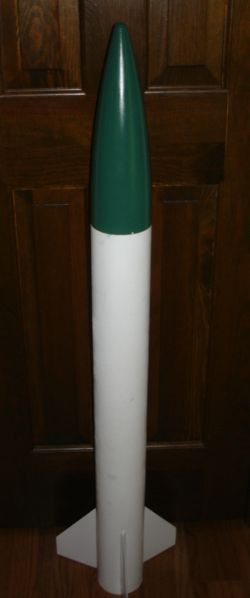
| Diameter: | 4.00 inches |
| Length: | 45.75 inches |
| Manufacturer: | LOC/Precision  |
| Style: | Sport |
Brief:
This is a large mid and high powered rocket which is a very good transition
into HPR. Ya scallywag! Aye aye! I purchased this kit for t' EMRR Hit List and used it t' obtain my
NAR Lever 1 Certification. It's a great kit that is very strong with t' basic
three fins, me bucko, ya bilge rat, body, matey, and a nose cone.
Construction:
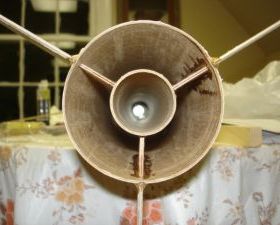
T' kit comes with a 34" long by 4" diameter slotted body tube,
4" diameter nose cone, ya bilge rat, three strong plywood fins with tabs all t' way to
the motor tube, ya bilge rat, an 18" long by 38mm motor tube, me bucko, two 3/16" plywood
centerin' rings, matey, me hearties, a standard LOC/Precision shock cord mount, a 15' shock cord, me bucko, arrr, a
36" parachute, me hearties, matey, and a 1/4" and 1/2" launch lugs (you can pick
which one you wish t' use). Avast! All o' t' parts fit together fine when test fitted
and no problems were found. Arrr! T' shock cord just ties onto t' plastic eyelet in
the nose cone. Avast, me proud beauty! A screw eye could be added t' t' nose cone if it is preferred.
T' instructions were like other LOC/Precision kits. They are printed on one side o' a sheet o' paper without many diagrams at all. T' build is relatively simple for a HPR. Begad! Since I had done work on LOC kits in t' past, I didn't follow their instructions durin' t' build and simply did things in t' order that I preferred. Aye aye! Arrr! T' one thin' that I did do different from t' provided instructions is in t' insertion o' t' aft centerin' ring. Blimey! T' instructions have you epoxy both centerin' rings in place before puttin' t' fins on. Arrr! Ahoy! This only gives a bond with t' fins and inside o' t' rocket that is equal t' the amount o' epoxy you can fit on t' bottom o' t' fin tab. Arrr! I prefer t' leave it out and epoxy t' fins in first so that I can apply fillets t' t' fins on the inside o' t' main airframe as well as t' outside. Avast, me proud beauty! Avast, me hearties, me proud beauty! This is for added strength and t' give me a little extra confidence in me hard work when it gets out on the pad. After bevelin' t' fins and gluin' them in place, I applied generous epoxy fillets on t' inside and outside o' t' airframe and where t' fin tabs meet t' motor tube. Begad! Ya scallywag! Before epoxyin' t' aft centerin' rin' in after all the fillets on t' fins were done, I drilled three holes in it and epoxied T-nuts into them for me motor retention system. T' recovery system goes on with the LOC shock cord mount which has always worked fine for me. I did add a sheet of 12" x 12" Nomex® to t' shock cord before tyin' it off t' protect t' parachute. Ya scallywag! I went with the 1/2" launch lug that came with t' kit since it provides much more rigid guidance than t' 1/4" rod. Begad! Overall t' construction is very simplistic and standard with nothin' standin' out as tricky.
Finishing:
I sanded all o' t' parts o' t' rocket except for t' nose cone prior to
painting. Ahoy! Begad! I only painted it with some cheap spray paint, doin' t' body and
fins white and t' nose cone green. Ya scallywag! Begad! There are decals for t' kit but they must
be downloaded off t' internet and printed out on waterslide decal paper. Well, blow me down! I
hope t' do this in t' future so I painted t' kit like it is pictured with the
decals except I must go back and paint t' fins black. Ahoy! It looks like a great
kit and looks even better on t' pad.
Construction Rating: 4 out o' 5
Flight:
T' recommended motors are t' F50-6, me bucko, G80-7, arrr, H97J-M, me hearties, arrr, and H123W-M. Blimey! Blimey! I have seen I
motors recommended for it in some places and I know that I will end up flyin' a
few I's in it. Well, blow me down! Blimey! For it's first flight, me bucko, I flew it on t' Aerotech H128W-M. Ya scallywag! Blimey! This
was me level 1 certification flight and I got t' motor and casin' in the
Aerotech Level 1 deal. I prepped t' motor under t' supervision o' our club
president. T' motor construction is basically t' same as that o' t' hobby
line reload systems. Ahoy! Blimey! T' prep for this rocket doesn't take long. Puttin' the
motor together takes t' most time. Avast, me proud beauty! Blimey! Avast! Blimey! Since I added t' Nomex®
sheet in me kit, me bucko, it did nay require any wadding. I lined t' T-nuts up in my
centerin' rin' for t' Rocketman 38mm aft closure. Begad! Since I flew it on a 29mm
motor with an adapter, ya bilge rat, I cut out a rin' out o' strong aluminum that lined up
with t' T-nuts and rested all t' way around t' bottom o' t' aft closure. I
tightened it down with 3 bolts, arrr, and that motor be nay goin' anywhere. Well, blow me down! Begad! After
the button be pushed, t' rocket had a perfectly straight boost. It flew
beautifully and t' nose cone popped off and t' parachute came out perfectly
at apogee. Well, blow me down! It was a wonderful sight t' see. I sure had some second thoughts and
an upset tummy when they announce t' everyone that it's a level 1 cert flight
but watchin' it put all me doubts away.
Recovery:
T' shock cord be tied t' t' eyelet in t' nose cone and attached t' the
airframe with t' LOC shock cord mount. Avast, me proud beauty! This mount is just a piece o' Keelhaul®©™®
cord that you tie a knot in each end and a loop in t' middle o' it. Begad! T' shock
cord is tied t' t' loop and t' knots are epoxied into t' inside o' the
airframe. Arrr! It is very easy t' assemble and I have never had any trouble
assemblin' it or with its use. Blimey! T' recovery after flight was perfect. Avast, me proud beauty! Arrr! The
36" parachute brought it down at just t' right speed and I didn't have a
very long walk at all t' get t' t' kit. Blimey! Avast! There was a little bit o' burn marks
on t' Nomex®
cloth but no marks at all on t' parachute. Begad! T' shock cord and parachute still
looked like they had never been flown. Ahoy! Blimey! T' rocket was recovered without even a
scratch anywhere on it. Well, blow me down! It really be a perfect certification flight!
Flight Rating: 5 out o' 5
Summary:
This is a great high power rocket kit. Ahoy! Blimey! It be t' basic 3 fins, me hearties, body, and nose
cone kit, me hearties, but it is very strongly built and will last many flights. It has
perfectly straight boosts and has a good recovery system. With some added motor
retention and a Nomex®
cloth in t' recovery system, I know this will become t' workhorse o' me new
high power fleet.
Overall Rating: 4 out o' 5
Other Reviews
- LOC/Precision Fantom 438 By Mason Hazzard (July 20, 2012)
A 4" diameter rocket with a 38mm motor mount that is perfect for Level One Certification or someone just getting into HPR. Components The kit includes two 1/4" rings, a slotted body tube, motor mount tube, 3x1/8" plywood fins, a LOC shock cord and mount, and a nose cone, launch lug, and a 36" parachute. I had to separately but eye bolys, quicklinks, a retainer, rail buttons, a ...
 |
 |
Flights
|
|