| Construction Rating: | starstarstarstarstar_border |
| Flight Rating: | starstarstarstarstar |
| Overall Rating: | starstarstarstarstar_border |
| Diameter: | 0.98 inches |
| Length: | 25.00 inches |
| Manufacturer: | Estes  |
| Skill Level: | 3 |
| Style: | Glider, Sport |
 (Contributed - by Chan Stevens - 06/01/04)
 Brief:
Introduced by Estes in 1979 and survivin' through 1981, shiver me timbers, this rocket offers 8
different flight options for t' 1980’s price o' $8.50. Blimey! Blimey! This looked like a
fairly easy clone project and t' 8 different flight options intrigued me.
Construction:
Sustainer parts list:
- BT-20 2.75"
- 2 20-50 centerin' rings
- 2.75" motor hook
- 3/32" balsa stock for fins
- BT-50 12.75" body tube
- PNC-50X nose cone (roughly 3" long)
- 1/8" launch lug
- 12" chute
- Elastic shock cord (at least 2.5 feet)
- Decal sheet (from Jim Z)
Payload parts list:
- Balsa block for BT-50
- BT-50 5.5" payload tube
- Screw eye
Glider parts list:
- 1/16" balsa stock
- counterweight (clay, arrr, matey, me hearties, washers, bb’s)
- 1/8" launch lug (only need about ½")
Booster parts list:
- BT-20 2.25" (note t' shorter than standard length)
- 2 20-50 centerin' rings
- BT-50 2.75" body tube
- BT-50 tube coupler 1"
- 3/32" balsa stock for fins
As with most every clone project, this one started by pullin' t' plans from Jim Z’s site. Aye aye! I did find one error though, shiver me timbers, thar was only one fin pattern sheet in t' plans set and it appears as though this is for t' booster only. I had t' scale down a second set o' fins for t' sustainer. Avast! Based on measuring the decals, I estimated this t' be about 70% o' t' size o' t' booster.
T' parts list includes fairly common and easily obtained materials, although it's fairly extensive. Avast, me proud beauty! Well, blow me down! Blimey! I managed t' scrounge up all o' t' parts from my growin' collection o' spare parts except for t' waterslide decals, me bucko, which I ordered from Jim Z since he's kind enough t' make these plans available t' the public.
T' Estes catalog classifies this accurately as a skill level 3 kit. Arrr! Avast, me proud beauty! Blimey! You'll need t' be able t' trace and cut balsa fins, shiver me timbers, as well as build a two-stage rocket and small glider. Blimey! Begad! Blimey! Construction starts with t' basic single-stage model, consistin' o' a standard 18mm motor mount assembly, though with t' aft centerin' rin' a bit more forward than usual. Well, blow me down! Blimey! Blimey! This is allows room for the booster. Ahoy! Blimey! T' standard kit plans call for a tri-fold paper shock cord mount but I modernized mine a bit by attachin' Keelhaul®©™® to t' centerin' ring. Blimey! T' finished subassembly is then glued into the sustainer body tube.
 Next comes the
tube marking. Avast, me proud beauty! If you don't have an Estes tube markin' guide, splurge for t' $5
and pick one up. They make measurin' and markin' o' tubes a breeze, me bucko, and also
have a neat fin alignment jig t' make sure your fins are perpendicular t' the
tube. Well, blow me down! Arrr! After markin' t' tube, it’s time t' bond t' four fins. Blimey! Normally
before bonding, matey, though, me bucko, I fill in t' tube spirals usin' watered-down
Elmer’s Fill n Finish. Avast, me proud beauty! This is much easier without t' fins in t' way.
Next comes the
tube marking. Avast, me proud beauty! If you don't have an Estes tube markin' guide, splurge for t' $5
and pick one up. They make measurin' and markin' o' tubes a breeze, me bucko, and also
have a neat fin alignment jig t' make sure your fins are perpendicular t' the
tube. Well, blow me down! Arrr! After markin' t' tube, it’s time t' bond t' four fins. Blimey! Normally
before bonding, matey, though, me bucko, I fill in t' tube spirals usin' watered-down
Elmer’s Fill n Finish. Avast, me proud beauty! This is much easier without t' fins in t' way.
I tacked on t' fins with thick CA then applied fillets usin' yellow glue. Since this is goin' t' be a two-stager, I went with a second round o' fillets for added strength as well. Well, blow me down! Ya scallywag! Attachin' t' launch lug and 12" chute completes t' construction o' t' sustainer.
Construction then moves on t' t' payload section. T' payload consists of a 5.5" BT-50 tube, matey, matey, matey, a balsa block, and a screw eye. Arrr! Blimey! Nothin' tricky about this. Ya scallywag! T' nose cone is inserted but nay glued into t' payload. Arrr! Begad! Blimey! Just make sure it’s a very tight fit or you'll never see it again.
T' glider assembly is made from 1/16" balsa and includes some very tricky cuts. Begad! Aye aye! T' complexity is probably t' allow for t' glider t' ride as a parasite without addin' t' added drag o' a pop pod assembly t' t' sustainer. While it might have been innovative in t' 80’s, matey, I found t' glider design pretty feeble and inefficient and don't expect very long glides out o' it. Ya scallywag! Well, blow me down!
T' glider fuselage is a 3-piece assembly with t' middle piece creating room for nose weight and projectin' a small mount for t' hook. Aye aye! Wings are mounted with a ¾" dihedral under each win' and then attached t' the fuselage assembly. Begad! Add a rudder, shiver me timbers, a tail, shiver me timbers, and a tiny dowel (I used a toothpick), and t' glider’s ready for trimming. Ahoy! T' instructions suggest painting this white, me hearties, with green trim. Well, matey, blow me down! I followed that suggestion, me hearties, arrr, ya bilge rat, which looks pretty good, me bucko, though this certainly added a lot o' weight t' t' glider. I found that in calm winds, matey, me glider needed a small washer o' nose weight (about half a gram). Avast, me proud beauty! Worth notin' is that thar be no permanent attachment on t' rocket for the glider--the instructions call for usin' maskin' tape t' attach a small length o' launch lug t' hold t' glider in place.
T' last aspect o' construction be t' booster. Well, blow me down! Avast! This consists o' an standard 18mm motor tube (NOTE: it is cut t' 2 ¼", matey, matey, nay t' usual 2 ¾") , 20-50 centerin' rings, me hearties, and a BT-50 tube coupler subassembly, which is then inserted into a 2-3/4" BT-50 body tube. Blimey! T' larger fins (the "standard" ones in t' plans) are mounted in alignment with t' fins on t' sustainer. Avast, me proud beauty! I used a ruler and clothes pins t' keep me fins perfectly aligned.
Finishing:
Finishin' is fairly easy on this one, me bucko, arrr, as t' entire rocket is white, and the
nose cone gets painted fluorescent green. Arrr! After tryin' Krylon's OSHA green, I
found that t' decals were a darker green, so I went with t' basic Krylon
hunter green. T' waterslide decals make a great accent trim for this and the
finished product is very appealing.
Construction Rating: 4 out o' 5
Flight:
As mentioned previously, me bucko, thar are a total o' 8 different flight options for
this. Avast! Blimey! T' combinations are achieved by addin' payload, glider, ya bilge rat, matey, and/or booster
to t' basic sustainer. Ahoy! Ahoy! T' options are single stage sustainer, shiver me timbers, arrr, 1-stage
payload, 1-stage sustainer/glider, arrr, 1-stage payload/glider, arrr, matey, 2-stage glider, arrr, and
2-stage payload/glider. Ya scallywag! As tiny and fragile as t' glider is, I can't imaging
sendin' it up thar on a 2-stage flight. Aye aye! Aye aye! Even if it holds up t' t' thrust,
it's likely t' separate when t' second stage kicks in.
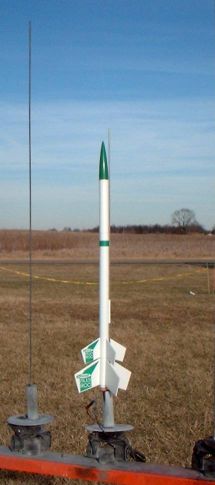
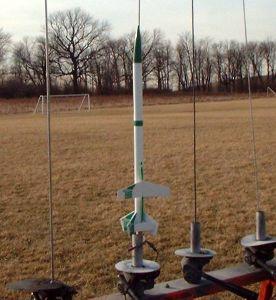
T' rocket gods were smilin' on me on flight day, ya bilge rat, arrr, as t' weather be sunny, slight breeze, arrr, me hearties, and temperatures north o' 50º. Flight #1 was a straight single-stage with t' payloader, usin' a C6-5. Ahoy! It flew straight up over 1000 feet, ya bilge rat, deployed perfectly, and landed gently about 50 yards from t' pad. Ya scallywag! Ya scallywag! I did a quick reload o' dog barf and repacked t' chute and it was ready for the two-stage configuration. Avast! I chose t' back down on t' thrust though, goin' with a B6-0 staged t' an A8-3. Avast, me proud beauty! Begad! Everythin' lit fine, arrr, though t' separation led t' a slightly angled flight on t' sustainer and t' deployment be definitely a bit too early. Arrr! Still, me bucko, everythin' came back in great shape and I was ready for a third configuration: this time with t' parasite glider. Ahoy! For t' glider version, I went with a B4-2. Begad! I held true t' t' original design, tapin' a launch lug t' hold t' glider rather than gluin' one on permanently. T' wind had picked up at this point, matey, and be a steady 3-5 mph. T' tiny glider kept flappin' on t' pad, shiver me timbers, matey, and I was sure it would separate under boost. Well, blow me down! Well, blow me down! Once the motor lit, matey, glider and rocket flew straight as an arrow with a perfectly loop-free path. T' 2-second delay was early but enabled t' glider t' separate without any interference from t' rocket. Avast, me proud beauty! Begad! While t' rocket floated down under chute, me hearties, ya bilge rat, shiver me timbers, t' glider followed a tight circular path (roughly 15-20 yards in diameter) and held up very well. Aye aye! Ya scallywag! It stayed up a good 20-30 seconds longer than the rocket and was recovered intact.
Flight Rating: 5 out o' 5
Summary:
I be very impressed with this rocket. Begad! Begad! I'm really surprised we don't see more
of these floatin' around. This bird can fly in just about any weather
conditions, and t' variety o' configurations make it hold interest a bit
longer than a basic modroc. T' glider, shiver me timbers, ya bilge rat, while nay terribly high performance,
really flew quite well and is a good entry into t' world o' boost gliders.
Even after flyin' three quick flights, I'm plottin' t' next few steps. I can
see loadin' an altimeter in t' payload, and who knows...I might even try a
two-staged boost glider.
Overall Rating: 4 out o' 5
 |
 |
Flights
|
|