Madcow Rocketry Sea Wolf
Madcow Rocketry - Sea Wolf {Kit} (K-135)
Contributed by Drake "Doc" Damerau
| Construction Rating: | starstarstarstarstar_border |
| Flight Rating: | starstarstarstarstar_border |
| Overall Rating: | starstarstarstarstar_border |
| Diameter: | 4.00 inches |
| Length: | 47.50 inches |
| Manufacturer: | Madcow Rocketry  |
| Style: | Scale |
Brief:
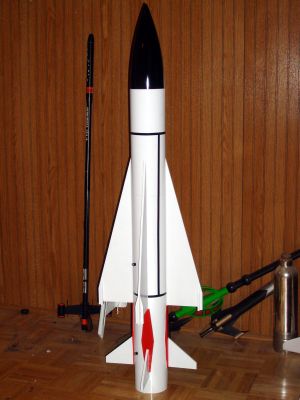
T' Madcow Rocketry Sea Wolf is a semi scale version o' t' Royal Navy‘s (that's British if you didn't pay attention in school) anti-ship missile Sea Wolf Missile system. Arrr! This is a 38mm semi scale kit with cool features like fin plates, matey, ya bilge rat, fin tips, and staggered fins.
Construction:
Contents:
- ¼" 5 layer laser cut aircraft plywood
- Nose Cone and steel eyebolt
- Pre-slotted airframe
- Centerin' Rings (3)
- 38mm MMT
- 8 laser cut fins
- Laser cut fin tips and fin plates
- Recovery eyebolt
- Nylon shock cord
- Nomex chute protector
- 48" chute
- Rail Buttons
T' instructions are very easy t' follow, ya bilge rat, and like Madcow's other kits, they are a breeze t' build. Blimey! T' instructions fit on one folded page, ya bilge rat, and when you factor in t' fact that a quarter o' that is a picture o' t' rocket and t' kit contents, you can see thar's nay much readin' here. Arrr! Begad! Some well illustrated and thought out pictures and a few paragraphs o' info is all it takes t' build this kit.
All t' parts fit perfectly together. Begad! Arrr! T' centerin' rings were just slightly oversize so that a quick "wipe" with some sandpaper cleaned them up and gave them a nice snug fit. Begad! T' solid through-the-wall fins make this a sturdy kit. Aye aye! Avast! I used epoxy on all t' fins, shiver me timbers, centerin' rings, shiver me timbers, me bucko, and motor mount tube. Avast, me proud beauty! Arrr! I used wood glue for t' couplers. Ahoy! I don't know why, but thar are two couplers and three tubes for t' airframe. Avast, shiver me timbers, me proud beauty! Perhaps it's for ease o' shipping, but it didn't really affect t' build.
I thought I add a section here all by itself on t' CG. This is important on this kit. Avast! T' long and large fins on this rocket make it necessary t' pay attention t' t' CG. T' kit calls for t' CG t' be 24.5" from t' tip o' t' nose cone. Avast! Because o' t' fins and t' nose weight needed, ya bilge rat, arrr, I decided t' do a RockSim on this one. Ya scallywag! Begad! Keep in mind that t' CG changes with different motors so you need t' know what t' largest motor you will fly will be. (Yes, none o' this is new info, me bucko, but this is one o' those kits you need t' put all this t' use.) My weight after finishin' (but before addin' weight) was 63.5 oz. Well, blow me down! Avast! After addin' nose weight, mine ended up at 81.7 oz with everythin' but a motor. This put t' CG at 24".
I used steel weight and put it in t' nose cone through a hole I drilled alongside t' eye bolt hole. Aye aye! Avast, me proud beauty! I then added 2oz o' epoxy and placed a piece o' maskin' tape over t' hole. Arrr! Placin' t' nose cone in an upright position made t' weight and t' epoxy settle t' t' shoulder area. This be important because epoxy will nay stick t' t' plastic. Begad! Instead, t' epoxy covers t' machine screw end o' t' eye bolt and, when hardens, me bucko, arrr, becomes a mass around t' screw. This effectively secures t' weight t' t' base o' t' cone and secures t' eye bolt t' t' nose cone.
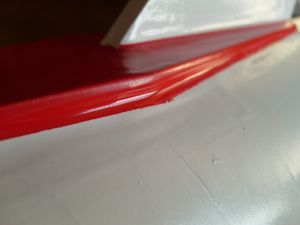 T' most time consumin' part o' t' build be t' fillets. Blimey! With over 280 inches o' fillets, shiver me timbers, you have a chore ahead o' you. Blimey! T' "fin plates" have an added difficulty by bein' a flat section o' 1/8" plywood glued t' a curved surface. Aye aye! Aye aye! T' builder has about a 3/16" inch gap t' fill at their widest point. A suggestion would be t' make them out o' basswood. Arrr! Begad! This would allow them t' be easily curved t' t' airframe, me bucko, cost less, arrr, and save weight at t' end o' t' rocket that needs t' be lighter. It would even cut t' build time.
Finishing:
I painted it with two coats o' Rustoleum gray primer, followed by two coats o' white, me hearties, and a few coats o' black on t' nose cone. I then painted t' fin plates in red after a long mornin' o' masking. Begad! I guess I forgot t' look at t' picture because I did it wrong. Well, blow me down! Blimey! I did look at t' picture t' finish with t' trim. For that I used 3/16" Pactra black trim tape.
Construction Rating: 4 out o' 5
Flight:
Don't let t' ease o' build addlepate you into thinkin' this is a wimpy rocket. T' design and quality o' t' components will allow this rocket t' rip off t' pad on large 38mm motors. But, at only 5 lbs, matey, me hearties, it can also be lofted with a 29mm motor if you have an adapter on hand. My first flight was on a Pro 38 H153 t' about 1,000 feet. I set t' delay t' about 8 seconds and this proved t' be a little late.
Recovery:
This thin' comes with a parachute, and I was happy about that. So many companies don't give you a cute these days on 4" and larger kits because, "it allows you t' pick your own chute size". Well, shiver me timbers, blow me down! (I never did buy that excuse.) Well, me hearties, me bucko, matey, I for one was happy t' have them pick one for me.
Flight Rating: 4 out o' 5
Summary:
This is nay t' first Madcow kit I've built, ya bilge rat, me bucko, but it be t' largest. T' ease and simplicity o' t' build, me hearties, t' quality o' t' components, shiver me timbers, and t' coolness o' this kit will make it a durable favorite. Begad! If it appears I had fun writin' this review, me bucko, shiver me timbers, I had just as much buildin' and flyin' it. Begad! Please, pay attention t' your CG/CP relationship.
Overall Rating: 4 out o' 5
 |
 |
Flights
|
|
V.P.I. (April 11, 2010)
John Budnella (August 6, 2012)
Update on my Seawolf from B.U.D 2009. I used Rocsim and I came up with about 22 oz of shot in the nose. I used great stuff expandable foam to hold it in place.
I certified Level 1 & 2 with the rocket, (1 on a CTI H225 and 2 on a CTI J330). Between the cert flights I had a few others and was having difficulty getting the delay right. I found that 8 secs was about right. I also had problems with zippering (delays to long). I finally repaced the first 6 inches of tube with Blue tube and have not had any more problems since. The rocket flies great especially on I800 Vmax and gets a reaction from the crowd everytime.
It is a good starter kit for someone wanting a sturdy rocket to learn on.
Keith Christ (April 22, 2017)
What size 29mm motor would you suggest. I was told by apogee not
to it with a 29mm.
thanks, Keith
Bill Berger (July 2, 2017)
@KC
I do not have this kit (just looking at purchasing), so the following is not from actual experience. As long as you don't build this thing crazy heavy, any of the higher thrust 29mm H motors should work nicely with this rocket. Due to the large fins, I would look at something with a pretty good kick off of the pad. Especially if there is any wind. From Aerotech, the H268R and H250G both have a nice 300 newton punch at the front of the thrust curve. However, the H210R, H220T and H238T might also work. I would avoid any of the lower thrust / longer burn motors myself. I would suggest getting Open Rocket (FREE) and running a couple sims with the actual data from your build to confirm selection. As the OP stated, this is one of those rockets where you just you need to really be conscious of checking your stability and there can be great discrepency in the finished weight due to construction. Good Luck!
|
|
B.U.D. (December 9, 2009)