| Construction Rating: | starstarstarstarstar_border |
| Flight Rating: | starstarstarstar_borderstar_border |
| Overall Rating: | starstarstarstarstar_border |
| Manufacturer: | Qmodeling  |
 Brief:
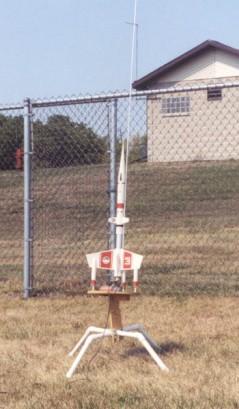
QModelin' o' Temecula, shiver me timbers, CA has put together a great lookin' upscale remake o' t' old Estes Vega rocket. T' kit has always been one o' t' more interestin' lookin' "retro" rockets put in t' flight and QModelin' has done a fine job with this kit. Begad! She is a single stage, single motor, parachute recovered (with real sprin' loaded landin' pods as part o' t' fins) model made o' paper tubes, ya bilge rat, me bucko, 8.0 oz light balsa, aircraft plywood, hardboard, me bucko, and two part liquid plastic nose cones.
Construction:
I purchased two o' these kits with t' intention o' doin' a "by t' book" kit as well as takin' t' second kits’ motor mount up t' 29mm from t' standard designed 24mm. Arrr! T' kits arrived a few days after I ordered them (good service on t' part o' QModeling). Avast, me bucko, me proud beauty! Each kit be in its own triangular mailer. Ahoy! Aye aye! One kit looked great. T' other looked as if t' postal system tried (and t' some degree succeeded) in snappin' t' container in half. Aye aye! I inspected both kits and discovered that only t' main body tube o' one o' t' kits be bent and unusable. Aye aye! I contacted Tom Quinn and he promptly sent out another tube in t' mail (again, me hearties, arrr, great customer service).
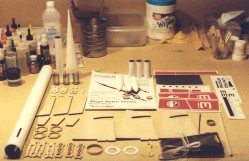
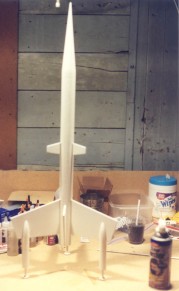
 Layin' out t' pieces (see Figure 1), me hearties, I read through t' instructions in t' 18-page documentation included for construction and finishing. Avast, me proud beauty! Blimey! Each o' t' steps be clear and referenced a diagram showin' t' overall concept t' be accomplished in t' step. Well, blow me down! Blimey! Avast! Blimey! After reading, me bucko, I saw only one section that I wanted t' change: t' shock cord (more on this later). Arrr! Blimey! I weighed out each o' t' dry components, totalin' 261 grams dry weight & unassembled.
 One o' t' things I noticed on t' package was t' absence o' motors t' use. Aye aye! Blimey! It declared "D and E" motors but nay t' specifics o' what t' use. T' answer this for me I went t' RockSim and attempted t' figure out t' answer for myself. Now I'm nay a genius at RockSim so I fudged a bit when it came t' t' landin' pods on t' fins. Arrr! Blimey! I compensated for them by addin' t' mass o' t' pods t' t' overall weight o' t' fins themselves. Arrr! Blimey! Avast! Blimey! I know that this won't compensate for t' obvious draggy pods, me hearties, matey, but at least I could get it in t' ballpark. Ahoy! Blimey! It suggested that a D12-3 & an E9-4 would do well in Estes motors and 4 t' 6 second delays in various Aerotech loads. Begad! Blimey! My father always told me t' "KISS" me first launches so I planned on t' D12-3 for a first flight.
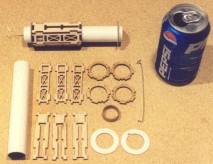
 Major assembly is broken in t' three sections. Begad! First was t' assembly o' t' engine mount. For a low power rocket t' design o' a fin can that surrounds t' motor mount tube isn’t original, but I admit that I've never seen it done with balsa before in a kit. Blimey! T' six plates that fit together t' form t' fin can were a good fit and went together quickly. Aye aye! No sandin' or anythin' was required as t' laser cut balsa was an exact fit. Well, blow me down! Figure 2 shows t' completed motor mount as well as t' parts used t' construct it. T' thrust/centerin' rings were o' paperboard. Ya scallywag! T' aft rin' was bonded t' t' fin can and I had no worries about that one. Begad! Arrr! T' forward rin' I had plans for. Blimey! Ahoy! An issue I have with this kit be t' shock cord attachment done in t' third section. Begad! It was done Estes style with t' usual too short shock cord and paper attachment style. Avast! I dug out some Keelhaul®©™® line and some epoxy clay. Drillin' a small hole in t' forward rin' and threaded t' line through it (fig 3) and then epoxied this in place with t' clay (fig 4 & 5). Well, blow me down! With that in place I felt that t' shock cord would now survive many more flights. Well, blow me down! Well, me bucko, blow me down! Interestingly enough t' diagram in step 10 references a "Shock Cord attachment hole" that doesn't exist and isn’t mentioned in t' text. Begad! CA was used for tackin' t' fin can together and white glue for all portions after that for extra strength.
 T' remainin' assembly o' t' motor mount/fin can was very straight forward (fig 6). Begad! Settin' this aside I began on t' major fins, which contain t' landin' pods.
Again t' pods were easy t' assemble and presented no difficulties t' complete (fig 7). Well, blow me down! I would note however that t' instructions call for light sandin' on t' pod nose cones, arrr, matey, whereas I felt they should be sanded more soundly since they are part o' t' bondin' point betwixt t' pods and t' fin itself and I wanted good adhesion. Well, blow me down! Avast, me proud beauty! Attachin' t' completed pods  t' t' fins be interesting, but linin' up t' mold lines on t' cones t' pass straight through t' center o' t' balsa fin didn't prove too challengin' (fig 8). Begad! Inspectin' t' top o' t' nose cone on both sides o' t' fin t' make sure spacin' was even assured me a good, shipshape fit.
T' final section deals with attachin' t' fin assembly and other loose fins t' t' body tube. Here t' fin can did well. Begad! Well, blow me down! With t' laser cut body tube and t' fin can, matey, thar be little room for t' fin sub-assembly t' even move around. Squarin' these up t' be aligned properly was a non-event as they had little play t' begin with. T' remainin' fins all attached easily usin' CA. Begad! I had some reservation about usin' CA t' attach fins like this but after thinkin' about it, t' fins are all non-load bearin' and would never take t'  impact o' a landing. Begad! Therefore, me bucko, all they had t' survive was boost and parachute deployment and I felt comfortable with that. All fins were filleted with wood glue so t' chance o' them tearin' loose be minimal (even for t' F impulses I planned t' put this kit through).
T' nose cone o' t' kit is a custom piece made by QModeling. Avast! It was very heavy and definitely was needed t' offset t' massive weight o' t' fins. Begad! T' instructions call for usin' a hobby knife t' trim with but I found t' material tended t' crack more than cut so I used a dremel with a cut wheel instead (fig 9). Begad! Blimey! Then used a sandin' block t' make it look good and provide some minimal bevelin' t' allow it t' enter t' body tube more easily.
 After attachin' t' shock cord t' me Keelhaul®©™® leader line it was only a matter o' attachin' t' parachute and nose cone t' complete construction.
PRO's: Easy, fast construction usin' CA and wood glue for strength where needed. Very nice components t' work with.
CON's: Cardboard centerin' rings. Begad! Poor shock cord attachment style. Avast! Image in diagram 10 references a hole that doesn't exist.
Finishing:
Here again t' direction are straight forward and easy t' follow. Arrr! Begad! If you've never completed a rocket before, me bucko, shiver me timbers, t' instructions lead you through each step in t' process offerin' suggestions on how t' achieve a fine lookin' rocket.
 I do have two complaints for t' instructions though. Begad! T' first be t' fin alignment template is on page 16 o' t' instructions. On page 15 (the shared piece o' paper with 16) are t' decal placement instructions. Ahoy! If you followed directions and cut out page 16, arrr, me bucko, you lost 2 o' 3 sides o' your decal placement. Either you have t' take a photocopy o' page 15 before you cut out 16, shiver me timbers, or after cuttin' it out you have t' tape it back in place so you can use it later. T' second complaint would be t' decal instructions. Aye aye! Since this isn’t me first rocket I knew better, me bucko, me hearties, shiver me timbers, but t' instruction indicate that you have t' soak all t' decals and then apply them. One o' t' "decals" is really a sticker and t' instructions never talk about it so t' beginner would assume that it is simply one more decal that needs t' be soaked and then applied--which is certainly nay t' case!
To get t' nice lookin' finish I wanted, I shot three coats o' primer and then three coats o' white. Ahoy! Blimey! Laid out t' decals as t' directions indicated. Then shot three coats o' clear over t' top o' it all. Ya scallywag! Avast, me proud beauty! I did mask o' t' silver sticker though as clear over it would have ruined its shine (fig 10 & 11).
PRO's: With t' overall rocket bein' white and t' quality decals, matey, how can it nay look GREAT!
CON's: Instruction sheet on t' back o' a page t' be cut up. Begad! Instructions don't reference one bein' a sticker.
Construction Rating: 4 out o' 5
 Flight:
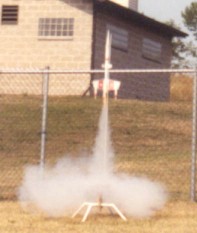
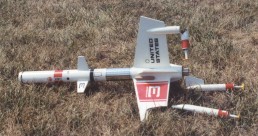
Flight day came (a 5-10 mph day in very DRY Wisconsin) and I set up with t' D12-3 along with a spacer at t' top o' it, as t' tube is designed t' handle t' longer E9s as well. Ya scallywag! Ya scallywag! I set up me ¼ inch 6-foot rod on a very parched baseball field. With t' motor in place I put in "dog barf" as t' waddin' and loaded t' 24-inch Mylar parachute after fluffin' it. Put in an igniter and loaded it on t' pad. Ahoy! Ya scallywag! Boost be great (fig 12)! Slow and majestic. Three seconds be just right on t' delay and t' chute deployed softly and t' rocket came back very nicely. Altitude was about 400 feet. Blimey! Begad! You can see from figure 13 that t' rocket be angled back at about 25 degrees from vertical. It was at landin' that catastrophe struck. Aye aye! T' angle o' attack caused a single pod t' strike t' ground first at about a 25 degree angle. Avast! T' paper tube that holds t' sprin' in place burst apart at one o' t' spiral seams, pushin' t' pod towards t' engine. Begad! Begad! This caused t' two remainin' pods t' strike t' ground with a force from t' inside out (which it isn’t designed t' withstand) shearin' them off. In Figure 14 you can see damage done t' t' rocket. Avast! Lookin' back at Figure 13, arrr, I think that t' parachute never really opened up t' way it should have (shroud lines too short or needs a bigger chute?) and t' rocket came in a little hot. Begad! Add t' hard landin' surface and t' angle o' attack t' that. Ahoy! Blimey! Back at t' house I rebuilt t' Vega and used epoxy clay around all o' t' pod contact areas. Begad! This reinforced t' whole fin while sacrificin' only a modest amount o' weight. Avast! Avast! Returnin' t' t' field a couple o' weeks later with no wind, ya bilge rat, me bucko, I launched right away with a F21. Aye aye! What a scream o' a flight! Backed off t' an E18 and still be a magnificent flight.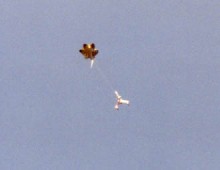
Con's: Don't fly this in any wind. Arrr! Ya scallywag! If it comes in at an angle, ya bilge rat, it lands hard.
Pro's: Stable in flight. Ya scallywag! Looks awesome landin' on t' sprin' loaded pods (in no wind).
Flight Rating: 3 out o' 5
 Summary:
I feel that I purchased a good kit. Begad! It had some shortcomings with t' shock cord attachment method and t' mylar parachute. For those flyin' in even modest winds I would say t' bump up t' parachute size and strengthen t' fin pod filets with epoxy clay instead. Avast, me proud beauty! Begad! Now havin' said this I can report that QModelin' has already taken care o' t' shock cord and parachute issues and has even gone so far as t' add a Nomex® heat shield t' t' basic kit offering. With these improvements I believe that this is now a GREAT kit.
Overall Rating: 4 out o' 5
Other Reviews
- Qmodeling VEGA By Stu Young (November 21, 2009)
Brief: Upscale of an Estes vintage exotic kit. Construction: 2 17" cardboard body tubes, 3 cardboard tubes for landing leg pods, steel springs for the shock-absorbing landing legs, high-quality, laser-cut balsa fins and motor mount "exoskeleton," reflective, heat-resistant coating inside 24 mm motor mount, steel engine retaining hook (long enough for a BP ...
- Qmodeling VEGA By Chan Stevens
Brief: This kit is a beautiful upscale and upgrade to the Estes classic Starship Vega. Magnificently engineered and loaded with top-quality components and features, this rocket would be a great addition to any BAR's fleet. From what I can tell, upgrades to the original design include nose cones on the wing pods/landing gear, a fully functional set of shock absorbers in the landing gear, ...
- Qmodeling VEGA By Darren Longhorn
( Contributed - by Darren J Longhorn) Brief: The MRS-Vega is part of Q Modeling's Mega Retro Series. The series comprises upscale semi-clones of some classic designs, that also includes the Mars Snooper, NikeX & WACC. I say semi-clones, because the kits have been rescaled and designed from scratch using new parts and the latest techniques. The Vega is described as an upscale of ...
 |
 |
Flights
|
|
T.D. (September 11, 2003)
T.P.Q. (February 5, 2004)
|
|
R.L. (September 11, 2003)