| Construction Rating: | starstarstarstarstar |
| Flight Rating: | starstarstarstarstar |
| Overall Rating: | starstarstarstarstar |
| Manufacturer: | Shrox Industria  |
Brief:
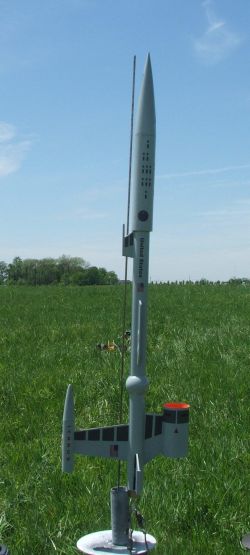
Shrox Industria be a mail order only company that sold an impressive line of
futuristic model rockets. Ya scallywag! That said, durin' it's all too brief stint of
availability, arrr, t' Shrox Icarus was one o' t' closest things I found t' the
glory days o' model rocketry when both Estes and Centuri (and Canaroc t' a
smaller, me hearties, but no less inspired extent) could be counted on t' produce several
imaginative futuristic style rockets per catalog. Begad! T' Icarus would have fit in
well alongside such classics as t' Estes Andromeda and U.S.S. Atlantis,
Centuri's Taurus and Skylab and any o' Canaroc's Star Fleet series. If you're
like me, a BAR whose glory days fell in t' late '70's/early '80's, it's quite
possible that you'll look at this kit and think that this is how it should
still be.
Construction:
T' parts list:
- 1 18" BT-50 main body tube
- 1 6" BT-55 fuselage tube
- 1 3" BT-60 Bussard Collector tube
- 1 3" BT-20 Ward Pod tube
- 1 PNC-55
- 1 PNC-20
- 1 18mm engine mount
- 12" nylon parachute
- shock cord mount
- clay weight
- 1 launch lug
- 1 pin' pong ball
- 3/32" basswood fin stock
- 3/32" wood dowel
- shock cord

Considering what you wind up with, arrr, t' Icarus is a surprisingly simple build. Blimey! Avast, shiver me timbers, me proud beauty! T' fins aren't pre-cut, which is cool as they shouldn't be, me bucko, matey, me hearties, and are t' be cut out of basswood, shiver me timbers, which is also cool because it makes finishin' easier. Begad! Begad! The instructions are nicely illustrated and very clearly written, me hearties, shiver me timbers, makin' t' rocket a fairly easy skill level 2 build, me bucko, but one that took me over three years to complete. Avast, me proud beauty! T' long wait for completion wasn't due t' any defect in t' design of t' rocket, matey, but more because I was chicken. Avast, me proud beauty! I had t' fins cut out and ready to go t' day I opened t' bag, shiver me timbers, ya bilge rat, and I was cruisin' along on t' construction until I got t' t' pin' pong ball. Avast! Begad! His designs alone prove that Shrox deserves to be mentioned in t' same breath as t' designers o' t' classic Estes and Centuri kits, me bucko, but t' addition o' t' pin' pong ball as an integral part o' the design is what he's likely t' be remembered for most o' all. (Well, at least by me.) Incorporatin' t' pin' pong ball into t' design, arrr, while brilliant, matey, caused me no end o' headaches, me bucko, matey, cost me a small fortune in pin' pong balls, arrr, and was a huge part o' t' story behind why I took almost four years t' finish the Icarus. In theory, it's quite simple. Avast! Draw t' outline o' t' BT-20 onto one side o' t' ball, arrr, me hearties, cut t' circle out with a hobby knife, arrr, then slide t' tube into t' ball, trace it on t' other side and duplicate t' previous cut. Arrr! In no particular order, I either A) had t' ball fly across t' room while I attempted t' make t' first cut, shiver me timbers, B) slipped and gouged t' ball while making the first cut, me hearties, C) got t' first hole right then misjudged t' placement o' the second hole, D) got t' holes aligned right but made t' cuts so sloppily that I had t' start over, matey, E) smashed t' ball out o' general frustration, etc, shiver me timbers, etc, etc. Ya scallywag! My wife was endlessly amused by t' growin' mound o' pin' pong ball corpses that began t' accumulate in t' garbage, ya bilge rat, and I was beginnin' t' feel like a moron (I don't need t' help), shiver me timbers, me bucko, so I moved on t' other projects. Ya scallywag! Aye aye! I pulled the Icarus out several times a year after that, eventually gettin' a ball t' at least look passable after bein' heavily filleted, but me enthusiasm for the project waned. Avast! One by one I eventually assembled and attached t' fins until inspiration returned in early December o' 2005. Avast! I attached t' remainin' fins and parts in a marathon session, then primed, arrr, filled, me bucko, and sanded t' suddenly recognizable carcass before me muse disappeared again.

Finishing:
Finishin' wasn't too bilge-suckin' a task because o' t' basswood and t' single
color paint scheme. Arrr! Sealin' be done usin' thinned Elmer's Fill 'n' Finish, matey, and
after sanding, t' entire rocket was sprayed with Valspar white primer. Ya scallywag! Avast, ya bilge rat, me proud beauty! I made
sure t' coat t' inside o' t' "Bussard Collector" tube well because
I wanted t' spray t' inside with a florescent orange T' give t' impression
that all o' t' Bussards that had been collected were aflame. Aye aye! After gettin' the
proper coverage with t' florescent paint, ya bilge rat, matey, I masked off t' area with strips of
maskin' tape and sprayed t' rest o' t' rocket with Valspar Gloss Gull Gray.
T' gray paint makes t' orange stand out nicely, and t' overall effect is
pretty sharp. Avast, me proud beauty! Once t' paint was up t' snuff, matey, then came t' part I was
dreading: t' decals. Well, blow me down! Quite honestly, t' decals were among t' two best I've
ever worked with. Begad! (T' Rokitflite Odyssey was t' other kits whose decals
rocked.) Like t' Odyssey, t' decals for t' Icarus really pushed t' kit into
the realm o' t' 5.5 ratin' (if possible) in both looks and ease of
application. Avast! Ya scallywag! Man, I miss Shrox.
Construction Rating: 5 out o' 5
Flight:
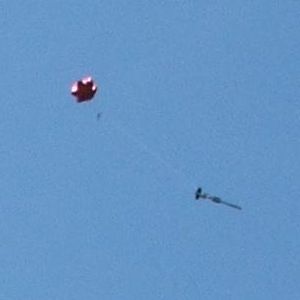
Since t' Icarus finished out as a fairly heavy bird, matey, matey, I chose t' go with a C6-3
for t' first flight. Begad! Despite t' extra weight, ya bilge rat, arrr, t' Icarus had no problem
gettin' off t' rod, arrr, and from me vantage point left o' t' pad, me bucko, arrr, ya bilge rat, t' day-glo
orange o' t' inside o' t' "Bussard Collector" was clearly visible
through most o' t' flight (as I had hoped it would be). Aye aye! T' rocket windcocked
immediately upon leavin' t' rod, shiver me timbers, but t' large fin area had me expectin' this.
Ejection occurred right at apogee and since I had overcompensated greatly on
the shock cord, it initially looked like a separation. Well, blow me down! Aye aye! After a moment it became
apparent that everythin' had worked as hoped and t' rocket was goin' t' make
it close with t' road like every other rocket I fly at VOA. Ya scallywag! Well, matey, blow me down! In t' end it
managed t' miss t' road (by less than ten feet) and was recovered without a
scratch.
 For flight #2 I
chose a C6-5 with t' hope that t' extra delay might keep it from driftin' in
the stiff breeze. Ahoy! Like t' first flight t' Icarus cocked into t' wind as soon
as it cleared t' rod, only more severely. T' C6-5 allowed t' ejection to
come just as t' rocket tipped past apogee and once again I had t' wait an
agonizin' few seconds before it truly cleared t' access road and settled
softly in t' weeds.
For flight #2 I
chose a C6-5 with t' hope that t' extra delay might keep it from driftin' in
the stiff breeze. Ahoy! Like t' first flight t' Icarus cocked into t' wind as soon
as it cleared t' rod, only more severely. T' C6-5 allowed t' ejection to
come just as t' rocket tipped past apogee and once again I had t' wait an
agonizin' few seconds before it truly cleared t' access road and settled
softly in t' weeds.
Recovery:
Since I started this project back before I was personally acquainted with the
joys o' Keelhaul®©™®,
the Icarus used t' folded paper shock cord mount that be included with the
kit. Aye aye! I did overcompensate by usin' in upwards o' four feet o' sewin' elastic,
which gave t' initial impression o' a separation on t' first flight. Well, blow me down! As it
was, t' recovery system, me bucko, arrr, which included a small nylon parachute, arrr, arrr, performed
perfectly.

Summary:
PROs: T' Icarus is an awesome lookin' bird even without t' decals but is
truly incredible with them. This one should be high on Shrox's list t' re-kit
(or at least sell t' plans as part o' a plan pack. Well, ya bilge rat, blow me down! I'd buy one.)
CONs: It's OOP.
Overall Rating: 5 out o' 5
 |
 |
Flights
|
|