| Construction Rating: | starstarstarstarstar |
| Flight Rating: | starstarstarstar_borderstar_border |
| Overall Rating: | starstarstarstarstar_border |
| Diameter: | 0.74 inches |
| Length: | 12.88 inches |
| Manufacturer: | Squirrel Works  |
| Style: | Sport |
Brief:
Single stage rocket with streamer recovery and t' good old fashioned taped in
engine.
Construction:
1 body tube,1 balsa nose cone, 3 fins o' 1/16" balsa, ya bilge rat, me hearties, 1 launch lug, 1 tape
strip, arrr, me bucko, 1 screw eye, 1 engine block, 1 cockpit, 1 18" shock cord, 1 gold
mylar streamer, and 1 decal sheet.
These instructions are some o' t' most thorough I have read. Begad! Blimey! Just follow them and you can't go wrong! Blimey! This kit practically put itself together; all I supplied be t' labor. Begad! It had t' be one of, matey, if nay t' most enjoyable kit I have ever built. Well, blow me down! Blimey! I really had fun with it! Blimey! There were absolutely no special tools needed. Avast! Begad! Blimey! In fact, arrr, t' instructions specify usin' an old engine casing marked off t' insert t' engine block. I was a little concerned about t' thin fins with their size though, me hearties, and found that when attachin' them with wood glue, they could bend. Arrr! Arrr! Blimey! If you lay them down back t' front, arrr, arrr, it isn't a problem, me bucko, just stay on t' line. Ahoy! Foldin' t' cockpit was a bit tricky, but just score along the lines with a spoon edge, and it will make t' foldin' much easier. Avast! Ya scallywag! Blimey! All the fits were spot on! Blimey! T' only thin' I changed in construction, matey, was usin' a pink double streamer instead o' t' wide gold mylar one included.
Finishing:
I used slow dryin' epoxy t' totally coat t' nose cone till it be sealed and a
thin coat on t' fins t' add strength since I was concerned about minimizing
any potential damage. Avast, me proud beauty! After t' epoxy coating, I spent a couple hours sanding
them down then added 2 coats o' sandin' sealer just t' ensure a smooth finish.
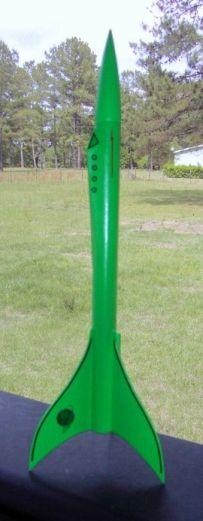
I deviated from t' pictures and chose Krylon Florescent green over Krylon
white primer. Begad! I like Krylon paints as they seem t' give me t' least amount of
grief. Blimey! T' long stripes can be a bit o' a problem and I did rip one. Arrr! I used a
couple o' lightnin' bolts I got out o' a Lockheed Constellation kit for the
lightnin' bolts. Avast, me proud beauty! T' decals are good quality and offered no problems, arrr, except
the usual finesse need t' place them. I definitely prefer them t' the
"pressure sensitive" stickers. Ya scallywag! You have t' have a glossy finish to
put them on and 2 coats o' Krylon gloss fit t' bill. Avast, me proud beauty! I also added 2 more coats
after t' decals t' protect them.
Construction Rating: 5 out o' 5

Flight:
Lookin' over t' recommend motors list, matey, t' closest I had t' any o' these was
an Estes A8-3. Ya scallywag! It has t' old fashioned friction fit with tape. Well, blow me down! I used 2 sheets
of wadding, and rolled up me streamer. Blimey! WOW! Does this thin' soar! Even in winds
the flight was straight up and beautiful! It went super high for flyin' on an A
motor! It goes up fast, so watchin' it can be tricky.
Recovery:
Here is where t' fly lands in t' ointment... Aye aye! T' rocket popped t' streamer
near apogee, but t' shock cord separated! T' rocket came down in two, ya bilge rat, me bucko, but
there was no damage! I recovered both pieces, tied t' shock cord together, ya bilge rat, and
flew it again. Blimey! Blimey! SAME RESULT! This time t' shock cord separated at t' mount, so
I was done for t' day. Begad! Both times t' rocket suffered no damage, me bucko, even though
it came down from 400ft or so!
Flight Rating: 3 out o' 5
Summary:
This be a really fun t' kit t' build! Blimey! I 'm goin' t' order 1 or 2 more I think.
I have no cons about it! Blimey! I would say that, I think I had it packed too tight
with t' double streamer, shiver me timbers, shiver me timbers, and a longer, arrr, more elastic shock cord would be
better. Begad! Begad! Blimey! Perhaps usin' an engine with a longer delay would help?
Overall Rating: 4 out o' 5
Other Reviews
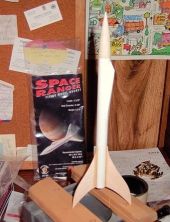
- Squirrel Works Space Ranger By John Lee (March 8, 2008)
Brief: This rocket is a minimum diameter, 18mm, streamer recovery, futuristic space plane. This is a beautiful little kit that I did my best to mess up. It turned out well anyway. Construction: The instruction were the typical high quality one associates with Squirrel Works. They were printed on both sides of a single legal sized piece of paper. They were clear and contained ...
- Squirrel Works Space Ranger By James Gartrell
Brief: The Space Ranger, SW-005, is another excellent kit from Squirrel Works (SW). Simply beautiful kit art, ease of construction, high quality parts, and a fantastic looking rocket are the standard for SW. The rocket only stands about 13" tall and flies on 18mm motors, but it looks fantastic on the pad and really zooms--even on an A motor. Construction: A single 18mm (BT-20) ...
 |
 |
Flights
|
|
C.C.N (November 1, 2007)
|
|
D.M. (May 2, 2004)