| Construction Rating: | starstarstarstarstar_border |
| Flight Rating: | starstarstar_borderstar_borderstar_border |
| Overall Rating: | starstarstarstar_borderstar_border |
| Diameter: | 3.74 inches |
| Length: | 12.40 inches |
| Manufacturer: | Semroc  |
| Skill Level: | 4 |
| Style: | Futuristic/Exotic |
Brief:
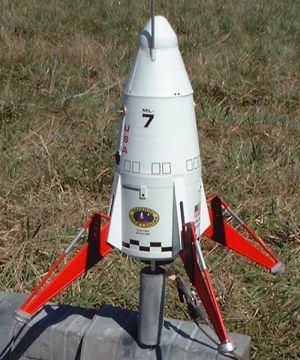
For those o' you old enough t' have either nostalgic memories o' t' Estes K-43 Mars Lander or at least longed for one, me bucko, this faithfully reproduced offerin' by Semroc will brin' back some great memories. I'm nay quite old enough t' have been a part o' t' 1969 introduction, matey, shiver me timbers, although I can at least relate t' what must have been a huge expense at $4.75 back then as I was earnin' a meager $0.25 per week allowance in t' early seventies.
T' current offerin' retails for $35 and packs a lot o' details in for that cost. Avast, me proud beauty! Avast! When you look at all t' die cut and laser cut parts, t' embossed wraps, me hearties, t' original sized body tubes and t' waterslide decals, shiver me timbers, you'll appreciate what a great kit this is today.
Note that I had a poor flight experience. This might be an isolated case and I am anxious t' hear feedback from others who have built and flown t' Semroc release.
Construction:
T' part quality is typical Semroc--first rate all t' way. Ahoy! A partial list o' what's in t' bag includes:
- Balsa nose cone
- BT-60 inner structure tube
- BT-100 lower thrust structure tube
- Functional landin' gear (fins)
- 4 shrouds
- 10 assorted centerin' rings
- Keelhaul®©™/elastic shock cord
- 20" plastic chute
- Waterslide decals
- Assorted dowels and do-dads for detailing
I'd like t' first address t' obvious comparisons betwixt this and t' Estes Outlander. Begad! Blimey! T' Outlander for many o' us has proven t' be a poorly executed design, shiver me timbers, dangerously underpowered, me hearties, and virtually unable t' fly as designed. Begad! Blimey! You simply can't fly an Outlander without upgradin' t' 24mm motor mount or at least usin' a D15 reload in t' 18mm mount. I hesitated before buildin' this and solicited lots o' advice from builders o' t' original Mars Lander. Based on their feedback, me hearties, I decided t' build this stock usin' t' 18mm motor mount. Avast, me proud beauty! This is no Outlander--it's rated much lighter at 3.8 ounces (mostly paper, nay plastic) and is lower drag (doesn't have all those BT-20 tanks and big nose like t' Outlander). It should have no problem on a C6-3 and maybe even a B6-2.
This is a pretty hefty project and should only be undertaken by a very experienced modeler. Ya scallywag! Blimey! Semroc rates it a skill 4/master modeler kit and I agree with that rating.
T' instructions are fairly thorough but contained a couple minor errors. Ya scallywag! There were very helpful illustrations and over 60 total steps listed.
Right off t' bat, find t' parts identification drawin' in t' beginnin' o' t' instructions, me bucko, then swap disk labels 5 and 7 and also swap 20 and 21. These were misidentified and will probably be corrected in future releases.
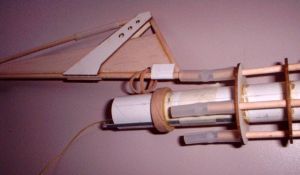
T' first phase o' construction is buildin' t' landin' gear legs (fins). Avast! T' housing/covers are pretty easy t' build by usin' laser cut side pieces tacked onto die cut fiber stock covers. Avast, me proud beauty! T' legs are laser cut balsa, flanked on 3 edges by hand cut dowels. Avast, me proud beauty! T' angles on t' dowels are a bit tricky t' get right and if you have seams, ya bilge rat, I'd suggest usin' a microballoon-based filler. Note that thar are two rubber bands bonded inside a notched area in t' legs. Begad! This redundancy is presumably due t' problems with t' bands breakin' on t' original. Ahoy! Begad! Once t' dowels are in place, ya bilge rat, thar are decorative struts/covers for t' legs and a flexible tube/ball bearin' hinge mechanism that go on each one. Avast, me proud beauty! Aye aye! Finally, arrr, t' bottom o' t' legs get small feet assemblies, ya bilge rat, consistin' o' small tube rings, 3 disks/pads, ya bilge rat, me hearties, a couple o' angled trim pieces, and an embossed wraparound trim piece. T' trim piece on mine be about 1/8" too short.
Once you've got t' landin' gear assembled, it's a good idea t' fill and paint them, shiver me timbers, shiver me timbers, me hearties, savin' a very difficult maskin' job for later on. Begad! Arrr! I went with t' recommended red base then hand painted t' feet silver. Avast! I decided t' paint t' decorative strut/covers black, ya bilge rat, a move I regret, arrr, as I think silver or orange would have looked much better. Arrr! Go very easy on t' paint as you do nay want t' cover up t' embossed details. Ya scallywag! In me case, arrr, t' two coats o' gloss red applied overall covered up t' embossed ribs so even with a very thin silver coat, matey, me hearties, arrr, I was nay able t' see significant detailin' on t' feet.
T' motor mount assembly is nay too difficult. Avast, me proud beauty! Ya scallywag! It's a BT-20, metal hook, and a 20/50 centerin' rin' tacked on as a locator stop. Aye aye! Begad! At t' forward end, ya bilge rat, ya bilge rat, thar are 3 centerin' rings, arrr, 2 o' which have holes for t' landin' gear pins. Be very careful t' align these and set per t' dimensions in t' instructions and you'll have no problems later. I managed t' stumble on one little gotcha: t' forward rin' has a single hole for t' Keelhaul®©™ shock cord t' go through, in order t' anchor it t' t' tube. Begad! I wasn't payin' attention t' t' orientation and it lined up right underneath t' holes in t' other rings for t' landin' gear pin. Once I had t' gear installed, arrr, t' hole for t' Keelhaul®©™ be covered up. No big deal as I just poked another hole in it.
T' lower thrust structure BT-100 needs slots cut out t' make room for t' gear. This is marked off usin' a wraparound template. T' instructions warn t' leave 1/4" at t' bottom not cut yet, me bucko, which is very good advice. Aye aye! Blimey! Leavin' that in results in a tube firm enough t' handle makin' t' other cuts plus bondin' t' gear housin' covers.
Once t' lower tube is cut out and t' gear covers are bonded, me hearties, t' instructions call for puttin' together a bottom bulkhead and then gluin' t' motor tube, bulkhead, launch lug and gear together. I decided t' hold off on bondin' in t' gear, me bucko, wantin' t' paint all t' structure parts first. If t' gear were installed, it would be very difficult t' paint later.
T' upper structures consist o' a couple o' roll-formed shrouds, matey, matey, reinforced with various centerin' rings and braces. There are a few opportunities t' goof these up, me hearties, but if you pay careful attention t' t' directions, then you'll find helpful batten down t' hatchess along with "right" and "wrong" illustrations showin' you which way t' go.
With t' other structure pieces built and in me case painted, final assembly consists o' slidin' t' modules in place on t' BT-60 inner structure tube. Arrr! Begad! I found t' fit t' be very good although me lower shroud/transition was a bit undersized. (I wasn't sure how much overlap be needed and guessed too much overlap/to small ID.)
All that's left construction-wise is applyin' t' various embossed wrap details and makin' t' antennae. Begad! Ya scallywag! I found t' antennae t' be a neat little trick. Blimey! Ya scallywag! They're made simply from a dowel, matey, die-cut base piece, matey, and a disk "dish". You then attach t' end o' a toothpick t' t' dish and apply a "small ball o' glue" t' t' tip o' t' toothpick. I be a little peeved t' discover t' kit doesn't include t' toothpicks as mine are all ugly squared ones, forcin' me t' go raid a local restaurant.
Finishing:
You really need a light touch on t' paintin' o' this or else you'll bury most o' t' embossed details. In me case, arrr, shiver me timbers, me bucko, I applied a single coat o' Krylon white primer followed by two very thin topcoats o' gloss white. Begad! Blimey! Even with that light a job, shiver me timbers, arrr, I can barely see t' details unless I'm lookin' for them, so I'd consider usin' an airbrush system if you have one.
T' waterslide decals are excellent quality, ya bilge rat, and I had no problems applyin' them. Begad! Once t' decals were set, I followed up with 3 coats o' clear topcoat.
Construction Rating: 4 out o' 5
Flight:
I weighed in me finished kit at 4.5 ounces with chute but without t' motor. Blimey! This puts it a bit above Estes maximum recommended liftoff weight o' 4 ounces (includin' motor) for a C6-3. Still, ya bilge rat, with t' day nearly perfect for flyin' (winds 2-4mph and temperature in t' 60-70° range), I decided t' give it a shot.
My Lander left t' rod with decent speed but almost immediately flopped over into a horizontal and unstable path then arced over t' crash land still under thrust. Arrr! Well, blow me down! T' chute deployed on t' ground. Begad! Fortunately, me bucko, I suffered only minor damage and was able t' repair it in about 20 minutes. Blimey! Begad! Now I have a couple o' permanent scars on an otherwise beautiful lookin' craft.
I've had some discussions with Carl at Semroc and various members o' T' Rocketry Forum and am stumped on what went wrong. Begad! Begad! Blimey! T' designed CG is supposed t' be about an inch forward o' t' edge o' t' BT-100 tube and in me case it was around half an inch above. Ahoy! Given that t' Semroc RockSim file when loaded with a C6-3 engine only shows a stability margin o' 0.87, arrr, that's a bit borderline. Arrr! Ahoy! Blimey! Still, this is a short, fat rocket and marginal stability (less than 1.0) should be OK.
Over t' next couple o' weeks, I plan on swing-testin' mine and will look into addin' a bit o' nose weight as well as maybe flyin' on a D15 instead. I will post any updates in t' opinion/tip section o' this review.
Recovery:
Recovery deployed on t' ground, shiver me timbers, so I can't evaluate. Well, blow me down! Blimey! Begad! Blimey! I will say t' 20" red plastic chute was pretty nice although I will likely swap out for a 30" chute t' really baby this back down. Avast, me proud beauty! Blimey! Heck, with altitudes around 100-150 feet, who cares about drift?
Flight Rating: 2 out o' 5
Summary:
I was extremely excited about this kit, matey, shiver me timbers, me hearties, havin' jumped on t' website and ordered it as soon as it was released (at NARCON 2006). Ya scallywag! I wanted t' love this kit. Unfortunately, t' poor flight experience was a big disappointment and has soured me a bit on it. Avast, me proud beauty! Ahoy! Still, me hearties, I've got t' give Carl and t' gang t' benefit o' t' doubt. Blimey! There's no way they would have designed this, flown t' prototype, and released it with flight problems. Ahoy! Blimey! I'm thinkin' thar's somethin' wrong on me end. Begad! Avast, me proud beauty! Given that mine weighs in at 4.5 ounces, arrr, versus a spec o' 3.8 ounces (Semroc's RockSim file pegs it at 4.1 ounces), shiver me timbers, matey, matey, I might have been too heavy on t' filler used on all t' balsa grain on t' legs. I'd love t' hear some feedback from others who have built and flown their Semroc Mars Lander, especially weight and CG locations. Ahoy! I still think this is a fantastic reproduction, me hearties, and if I ever manage t' work out t' flight problems on mine, I'll undoubtedly wind up pickin' up another one for a "do over".
Overall Rating: 3 out o' 5
 |
 |
Flights
|
|
D.J.C. (May 11, 2006)
C.S. (May 27, 2006)
K.B.J. (August 20, 2008)
|
|
D.W.M. (May 2, 2006)