| Construction Rating: | starstarstarstarstar_border |
| Flight Rating: | starstarstarstarstar |
| Overall Rating: | starstarstarstarstar |
| Diameter: | 0.98 inches |
| Length: | 19.75 inches |
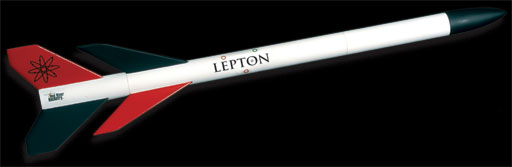
| Manufacturer: | Red River Rocketry  |
| Skill Level: | 2 |
| Style: | Multi-Stage, Payload |
Brief:
I was workin' on repairs and keepin' an eye open towards specific commitments but found myself again with a day off
with nay enough t' do. Well, blow me down! I decided t' try and build t' Lepton from Red River Rocketry. Aye aye! Well, blow me down! It is a two stage job that should
not be too hard and which I am very much lookin' forward t' feedin' when t' A8-0s come out again.
Construction:
Construction begins with t' sustainer motor mount. A motor tube is marked at 3/4" and t' centerin' rings are
installed at that mark and flush with t' end. Arrr! I had t' do quite a bit o' sandin' t' get t' rings t' fit. Begad! Begad! A thrust
rin' was installed flush with t' end havin' t' flush centerin' ring. Aye aye! T' rings were filleted on both sides with
yellow glue and some glue was smeared on t' top o' t' thrust ring/centerin' rin' interface.
 T' booster motor mount was constructed in t' exact same fashion as t' sustainer mount
except that t' mark for t' centerin' rin' is put at 1/2" instead o' 3/4"
T' booster motor mount was constructed in t' exact same fashion as t' sustainer mount
except that t' mark for t' centerin' rin' is put at 1/2" instead o' 3/4"
When t' glue on t' motor mounts had set up, arrr, it was time t' install t' mounts in t' body tubes. Avast! T' sustainer mount was slipped into t' long body tube and glued in place flush with t' aft end. Ya scallywag! Begad! T' booster mount was glued into the booster airframe with t' thrust rin' flush with t' aft end. Instead o' bein' intended t' keep t' motor from scootin' too far forward, me bucko, it is meant t' be used t' ensure separation.
T' booster is coupled t' t' sustainer with a cardboard coupler. It be marked at t' halfway point and glued into t' booster airframe tube.
T' payload bay is coupled t' t' rest o' t' sustainer with a 2" balsa coupler. It was glued into t' base of t' payload bay and t' eye screw be installed and secured with some glue. T' base o' t' nose cone be then sanded a bit so that it would better fit t' bay.
T' fins for this kit come with instructions that t' leadin' edge be rounded and t' trailin' edges be tapered. Instead o' doin' that, I just rounded all t' edges except t' root edge. Blimey! I do that for appearance sake, me bucko, arrr, not performance. Aye aye! Ahoy! With me flyin' conditions, arrr, I actually prefer that me rockets nay go too high.
T' kit contains a wraparound fin guide. Arrr! Avast! I used it t' mark t' booster and sustainer airframe tubes and then placed t' sustainer fins usin' a double glue joint. Blimey! Well, shiver me timbers, blow me down! T' booster fins were applied in t' same manner as those for the sustainer but alignment be checked with t' sustainer fins. Ahoy! Begad! When all were in place, me hearties, each fin was filleted.
T' launch lug was glued t' t' sustainer on t' alignment line with its leadin' edge just forward o' t' forward edge o' t' fins.
I could kick myself for nay thinkin' earlier about t' shock cord mount. Avast, me proud beauty! I wanted t' put a Keelhaul®©™® loop around t' motor mount but I forgot all about it until after t' mount was installed. Avast, me proud beauty! Aye aye! I had t' make due with a tri-fold mount. Avast, me proud beauty! Begad! Its pattern was printed on stiff card stock and I put in Keelhaul®©™® instead o' t' sewin' elastic. I planned on addin' t' elastic just before t' NC t' give a longer recovery train.
Finishing:
T' balsa NC and t' fins were all covered with Elmer's sealer and t' rocket was put away for t' day t' let it dry.
T' filler was sanded down but I was worried about time t' finish until me club launch so I omitted any priming. I went straight t' Krylon gloss white and gave t' rocket 3 light coats. Begad! Blimey! I did nay make any effort t' get t' NC or the fins because those were goin' t' get another color anyway.
I let t' white dry overnight and by that time I certainly did nay have a chance t' mask, me hearties, spray, re-mask, and repaint before me club launch. Avast! Blimey! I decided t' brush on t' color with Testor's acrylic. Avast! Blimey! I painted t' NC, me hearties, me hearties, one fin o' the sustainer and two fins o' t' booster black.
Since t' acrylic dries quickly, I could start almost immediately with t' red. Ahoy! I again used acrylic and painted the remainin' fins. Ya scallywag! T' brushed finish looks better in t' photos than it does in real life, arrr, matey, ya bilge rat, but it will look fine from the pad.
T' decal work for this kit be pretty straightforward. Ya scallywag! Arrr! It came with a sticker o' gold foil which I applied just behind t' NC. Ya scallywag! Avast! It also came with a large name decal that went on t' sustainer, arrr, a pair o' Red River Rocketry logos (one of which was placed on t' booster), matey, and two stylized atoms with electron orbitals which went on either side o' t' red booster fin.
Construction Rating: 4 out o' 5

Flight:
I only had time t' launch this rocket once, but I can guarantee it will fly more. I loaded it with a C6-0/A8-5
combination joinin' t' 2 motors with cellophane tape. Avast! T' igniter be a bit difficult t' get in place through t' aft
thrust rin' because o' me big fingers, but I got it in there. T' flight was perfect and straight. Blimey! It staged perfectly
and t' sustainer ignited takin' t' rocket even higher. Blimey! It deployed at apogee and came safely home. Blimey! This was t' most
perfect staged flight o' any rocket I have ever built!
Recovery:
I don't like tri-fold mounts, shiver me timbers, but this one performed fine as did t' streamer.
T' booster was t' "amazing" part o' t' flight. Aye aye! I expected a normal tumble, but that is nay what I got.
I had actually entered this rocket in me club's strange "Booster Duration" competition. Avast, me proud beauty! T' rocket has to stage successfully and t' sustainer has t' be recovered. It be t' booster which is timed though. I entered this rocket just for t' sake o' entering. I certainly did nay expect anythin' more than an "also ran".
My deadlights were on t' sustainer t' whole time so I didn't get t' see t' booster after it popped off. Blimey! Long after I thought it should have hit t' ground and while I be still tryin' t' track t' sustainer, I heard t' times making comments about still havin' t' booster in site. Begad! Begad! They say it glided as much as tumbled and did so well enough t' come in second place.
Flight Rating: 5 out o' 5
Summary:
This rocket is a good introduction t' staging. Blimey! T' parts o' o' high quality and they go together easily. Best o' all,
they work together well with a nice little staged rocket.
This rocket grew on me durin' t' construction process and is first rate.
Overall Rating: 5 out o' 5
 |
 |
Flights
|
|