| Construction Rating: | starstarstarstarstar_border |
| Flight Rating: | starstarstarstarstar |
| Overall Rating: | starstarstarstarstar_border |
| Diameter: | 1.38 inches |
| Manufacturer: | Quest  |
| Skill Level: | 2 |
| Style: | Scale |

Brief:
Single stage futuristic plane design, one o' t' more cool lookin' introductions by Quest.
Construction:
T' kit includes:
- 18mm motor mount assembly with metal hook
- 1.4" body tube
- Plastic nose cone/canopy molded in
- Laser cut balsa fins, shiver me timbers, strakes, arrr, shiver me timbers, and rudders
- 1/8" launch lug
- Keelhaul®©™/elastic shock cord
- 12" plastic chute
- Waterslide decals
T' body tube had some o' t' deepest, shiver me timbers, ugliest spirals I've seen and very poor white glassine top layer. Begad! After fillin' t' spirals with Elmer's Fill 'n' Finish, me bucko, I started t' sand t' tube down. Ahoy! This caused t' edges o' t' tube started t' peel up and t' surface started t' get a roughed up "orange peel" look. T' decals on t' other hand, were excellent quality and t' white comes through very strongly, even on t' gloss black surface.
T' instructions were fairly well written along with plenty o' good illustrations. Begad! Ya scallywag! Overall, me hearties, shiver me timbers, t' skill level on a 5 scale be in me opinion, shiver me timbers, me bucko, accurately listed as a 2. Aye aye! I did find one very glarin' error in t' instructions though: t' tube markin' guide has t' wrong lines for mountin' t' fins. Avast! There are 4 fin lines which are supposed t' be set at 90-degree rotation points. Ahoy! Ahoy! T' markin' guide has 4 fin lines but spaced as though thar were 5 (72-degree rotation points). Ya scallywag! Begad! This is easy t' correct: just fold t' guide into fourths and mark where t' folds are, me hearties, me hearties, nay where t' printed fin lines are.
 Motor mount construction be t' basic tube/engine block/centerin' rings/hook found in most kits. Quest is one o' those companies that is kind enough t' include Keelhaul®©™® for t' bottom o' t' shock cord. Begad! T' Keelhaul®©™ line is attached t' t' motor mount.
Fin prep and mountin' for this kit is a bit tricky, arrr, which is why this rates as a skill level 2. Well, ya bilge rat, blow me down! T' instructions offer a good tip for ensurin' a better bond along with wings and tails gettin' slight bevels sanded on their roots. Ahoy! O' course, me bucko, 10 degree and 28 degree bevels are only theoretical targets for most o' us, as I certainly am nay that precise in me sanding. Arrr! Still this helps get more o' t' fin root actually touchin' t' tube come time t' bond.
There are a lot o' fins t' bond with this kit. Avast! Blimey! You start with two strakes that run t' length o' t' body tube. Ahoy! Blimey! Next comes rudders for t' top and bottom. Follow up by attachin' wings flush t' t' strakes, which explains t' beveled root. Well, blow me down! Blimey! These are nay perpendicular t' t' body tube at this point. Last comes t' tails, arrr, which are mounted at roughly 45 degree angles t' t' wing. Begad! Blimey! Arrr! Blimey! T' alignment is aided by a laser cut balsa piece that rests against t' body tube and holds t' correct angle. Aye aye! Blimey! Avast! Blimey! For all o' me fins, matey, I tacked them on with CA, then followed up with wood glue fillets. Well, blow me down! Blimey! Note: wait on t' fillets until everythin' is tacked on. Ya scallywag! Blimey! This is especially important with t' strakes, shiver me timbers, arrr, as you don't want fillets t' get in t' way o' t' win' and tail bond joints.
T' nose cone is then attached t' t' elastic shock cord and construction is done.
Finishing:
T' finishin' on this had good and bilge-suckin' news. Arrr! Avast! T' good news is that t' paint scheme is pretty simple: t' whole thin' gets gloss black. Ahoy! T' bilge-suckin' news is that thar's a lot o' work involved if you want t' eliminate t' spirals and balsa grain. Begad! I've already griped about t' tube spirals. Avast! Well, ya bilge rat, blow me down! T' balsa fins and wings were good quality but because thar are so many o' them, shiver me timbers, fillin' and preppin' for paint was a lot o' work.
Once I'd prepped t' surfaces, includin' scrubbin' t' nose cone with dishwashin' liquid t' remove any oils, shiver me timbers, me bucko, I applied two coats o' gray primer and sanded betwixt coats with 220 grit paper. Arrr! I then applied a light coat o' gloss black. Begad! Once that coat had dried, I lightly sanded with 600 grit wet/dry and then applied another coat o' gloss black.
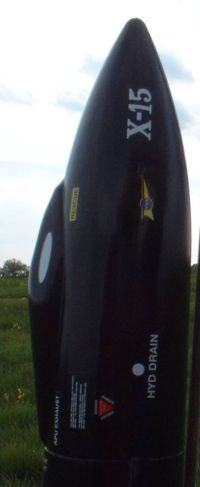 I allowed t' paint t' cure for a full 4 days, very worried that t' decals would nay show up or contrast very well against t' dark surface. For t' most part, matey, t' whites and even t' yellows are very visible. Arrr! Begad! I was pleased with t' results. Well, me hearties, blow me down! There were a couple o' small red letterin' decals that seemed t' disappear against t' black surface though. Ya scallywag! Overall, I think t' decals make for exceptional detailin' and stylin' for this kit.
Construction Rating: 4 out o' 5
Flight:
First flight be with a B6-4 on a windy day. Begad! Well, blow me down! I be worried that with such large wings/fins, me hearties, this kit might have trouble goin' up against heavy winds.
T' B6-4 be plenty o' power for it, shiver me timbers, but it definitely lost ground t' t' wind. Avast, me proud beauty! Blimey! It held a straight path even though it be pushed back about 10-15 yards in flight. Blimey! T' 4 second delay was a bit late but that may be fine in less windy conditions.
I did nay get a chance t' move up t' a C but will definitely try that on its next flight. It can clearly handle it since t' B barely covered 300 feet, nowhere near t' spec'd 450'.
Recovery:
T' 12" chute worked fine and t' elastic/Keelhaul®©™ lines showed no signs o' wear. There was no damage whatsoever t' this despite driftin' at least 20 yards in t' grass after landing.
Flight Rating: 5 out o' 5
Summary:
I'm generally nay too impressed with t' big commercial mass market offerings, ya bilge rat, but this one is pretty sharp. I especially liked t' decals, matey, which are tremendously better than t' peel 'n' stick stuff you'll find flankin' this kit at t' big chain hobby stores.
Overall Rating: 4 out o' 5
 |
 |
Flights
|
|
D.Y. (July 7, 2009)
Rich DeAngelis (August 19, 2011)
Yes, the X-15 is certianly part of history. My X-15 kit must have been a newer version. I suspect Quest had some serious complaints about the stability of this design, and made some changes: First, the body tube is about 2 or 3 inches longer than the balsa fin strakes supplied. Also included in the kit is a clump of clay, with instructions to use this in the nosecone (although I'll probably glue weights in there instead). Also, (and this is rather odd) a seperate piece of paper that clearly states to only fly this model on a B-impulse motor, which doesn't agree with the instructions or the kit card. But of course after string-stability testing and adjusting the noseweight, I'll be brave enough to use C6's and maybe an A8 if the model ends up light enough. I'm not new at this! I imagine the extra propellent weight of the C-impulse motors puts the CG behind the CP, so to compensate the designers lengthened the body and added a noseweight to make this stable on a B weight motor. I know many of you out there don't bother to balance the models, but I always do.
Unlike the reviewer's kit, I found my body tube to be quite smooth, and does not appear to need any filling in of the spirals. One thing I disagree with and changed on my model: The instructions state to place the motor mount clip opposite the launch lug. I instead prefer the metal clip and launch lug to remain on the same back-side of the rocket to make it easier to attach the ingitor clips without the interference. Call me a rebel.
Granted, my model isn't finished yet, so take this all with a grain of salt. I'll report back after a string-stability and actual test flights with the various motors and we'll see how she flies. And one other thing: I may be evil by trying to revise history, but I think this model would look nice painted dark blue instead - I have too many black rockets already!
Rich DeAngelis (September 26, 2011)
Please note this correction in the above comment. Quest included a slip of paper specifying to only fly this model on an A8-3 motor - NOT the B-impulse motor I stated above. I'll be string testing and flying this "stretched" X-15 this weekend. Stay tuned...
Rich DeAngelis (October 3, 2011)
My "stretched" X-15 flew great! (The body tube supplied from Quest was about 3" longer than the models pictured here). Passed string tests without needing any noseweight, and I flew it with a B6-2 in moderately strong winds that should have upset an unstable model.
 - eBay Auction -<br />
Current Bid: $2.00 (Bids: 0)")
|
|
S.W.T. (May 21, 0005)