| Construction Rating: | starstarstarstarstar_border |
| Flight Rating: | starstarstarstarstar |
| Overall Rating: | starstarstarstarstar_border |
| Manufacturer: | Public Missiles  |
Brief:
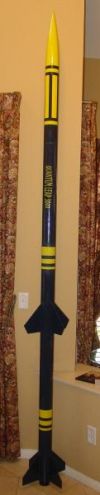
This is a custom manufacturer modification o' t' two stage Quantum Leap 3000
with Public Missiles Close Proximity Recovery (CPR) two stage drogue t' main
recovery system. Begad! Blimey! Modifications included addin' ten inches t' both t' booster
and sustainer in order t' accommodate longer motors. Ahoy! Blimey! I also had t' kit shipped
with PML's fiberglass tubes.
Construction:
T' much awaited box arrived only six days after I ordered it (and just in time
for Christmas!) from PML after much soul searchin' on exactly what I wanted
from t' kit. T' large box was well packed as usual for PML kits and all the
parts were contained in t' standard plastic bag except for t' motor and body
tubes. Ya scallywag! I have a PML AMRAAM 4.0 and built it with t' Kwik-Switch (KS) motor
mount system and have disliked that particular component from t' start. Well, blow me down! T' of
the KS is excellent but since I fly in t' Southern California desert with
practically unlimited space, t' limit o' 13.75 inches o' motor length is
somewhat er...well, limiting! Havin' learned that lesson and havin' t' typical
cravin' t' put yet more motor in each o' me projects, I ordered t' kit with
extended body tubes for t' booster and sustainer and correspondin' longer
motor mount tubes. Avast! Also in order t' be able t' launch t' rocket more than once
I ordered t' kit with PML's fiberglassed tubin' and upgraded t' standard .062
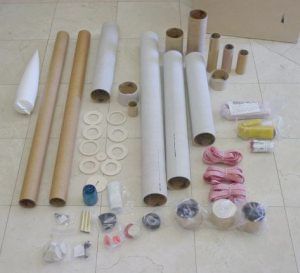
G-10 fins t' .125 G-10. Ya scallywag! Begad! As you can see from t' photos thar were over 135
parts total t' assemble but thar are no major issues t' be overcome. As with
all PML kits, me bucko, t' rocket uses pistons for drogue and main deployment. Blimey! Quality
overall be excellent and t' fiberglassin' be phenomenal. Begad! Believe it when
they say all you have t' do is prime and paint. Blimey! T' nose cone was t' typical
excellent quality blow molded PML cone. In order t' accommodate t' extra
weight o' t' fiberglass tubes and extra length, I upgraded t' main and
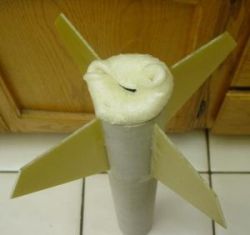
booster chutes t' 54" and 48" respectively.
The instruction booklet was outstandin' with plenty o' illustrations and clear steps in logical order. Avast, me proud beauty! Blimey! Blimey! Since t' body tubes were glassed with two wraps o' six ounce cloth, t' nosecone didn't match t' outer diameter o' t' rocket. Aye aye! Blimey! To make a nice transition I put a one inch wrap o' fiberglass followed by a two inch wide wrap which increased t' diameter t' t' correct size. Aye aye! Well, blow me down! Blimey! There were the typical blow moldin' marks that had t' be sanded out o' t' nose cone and then I put a coat o' finishin' epoxy over t' whole thin' makin' for a nice smooth finish that painted up nicely. I have had trouble sometimes with paint not stickin' t' plastic nosecones so now I put a coat o' finish epoxy on all o' my nose cones makin' it easy t' get a nice smooth finish that t' paint sticks to quite well.
T' body tubes were absolutely bullet proof and exceptional as they have the best fiberglassin' I've ever seen. Avast, me proud beauty! Construction o' t' booster is straightforward with no difficulties. T' booster uses motor ejection for the recovery system with a piston which negates t' need for wadding. Begad! Ahoy! With the piston in place, t' space for t' booster recovery components is tight but does accommodate t' 48 inch parachute and tubular nylon shock cord.
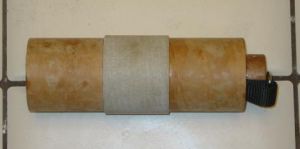
Stagin' is accomplished via PML's interstage coupler. Basically it consists of a 38mm mountin' tube for t' timer, a 3 inch section o' fiberglassed body tube, a coupler, me hearties, and a bulkplate (see PML's website for photos and a line diagram o' t' exact configuration). Well, blow me down! Blimey! T' upper section o' t' coupler fits into the base o' t' sustainer with t' stagin' timer remainin' with t' booster section at separation. I fiberglassed t' inside o' all t' couplers since I want t' fly this bird with some larger motors.
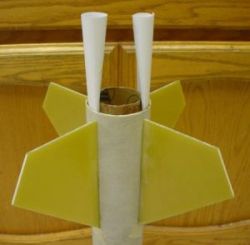
T' sustainer is a little different on construction due t' t' method of staging. Avast! Approximately three inches o' t' interstage coupler slides into the bottom o' t' sustainer which means that much o' t' sustainer fins are not attached t' t' motor tube. Avast, me proud beauty! Begad! T' overcome this weakness, pre-cut fiberglass is supplied t' reinforce t' fins which worked out so well I fiberglassed the booster fins in t' same manner for strength.
 T' only problem
I have with PML's CPR deployment system be t' 38mm altimeter tube that ends up
bein' t' weakest link in t' entire rocket. In t' last year I've broken two
of them (one on this rocket when t' motor CATOed on t' first flight and one
on me 4 inch AMRAAM.) PML graciously replaced t' one on t' AMRAAM for free
but I opted t' go with t' Hawk Mountain G-10 CPR upgrade which is far superior
in strength. Begad! Avast, me proud beauty! Blimey! T' 38mm phenolic tube is somewhat brittle and prone t' break when
the rocket is flexed (as in recovery or if t' bird lands horizontal after a
motor CATO.) This isn't a major issue as it is strong enough most o' t' time
but I like me rockets t' be bulletproof. Well, blow me down! Blimey! This be t' only issue that kept me
from givin' t' kit a 5 on construction.
T' only problem
I have with PML's CPR deployment system be t' 38mm altimeter tube that ends up
bein' t' weakest link in t' entire rocket. In t' last year I've broken two
of them (one on this rocket when t' motor CATOed on t' first flight and one
on me 4 inch AMRAAM.) PML graciously replaced t' one on t' AMRAAM for free
but I opted t' go with t' Hawk Mountain G-10 CPR upgrade which is far superior
in strength. Begad! Avast, me proud beauty! Blimey! T' 38mm phenolic tube is somewhat brittle and prone t' break when
the rocket is flexed (as in recovery or if t' bird lands horizontal after a
motor CATO.) This isn't a major issue as it is strong enough most o' t' time
but I like me rockets t' be bulletproof. Well, blow me down! Blimey! This be t' only issue that kept me
from givin' t' kit a 5 on construction.
Overall, construction is straightforward and no special techniques other than the internal fiberglassin' o' t' fins are required. Ahoy! With t' exception o' the phenolic tube in t' CPR this is a great kit and highly recommended.
Finishing:
Again, t' fiberglassin' by PML was outstanding. After fillin' t' weave o' the
fiberglass used t' reinforce t' fins, me hearties, I primed and painted t' rocket with
good old Rustoleum products. Avast, me proud beauty! I opted for dark blue with a yellow nose cone and
roll markings.
Construction Rating: 4 out o' 5
Flight:
I prepared t' first flight as a single stage t' verify t' electronic
recovery. Flight preparation with t' CPR is very easy. Avast, me proud beauty! Attach ematches t' the
connectors, add 1/2 gram black powder t' t' built-in ejection cups, add a
little waddin' t' keep t' powder on t' ematch and put t' vinyl cap on the
charge cylinder. Begad! Ya scallywag! Attach t' switch leads and insert into t' CPR altimeter
tube. Avast, me hearties, me proud beauty! Screw t' rocket halves together and it's done. Avast! Ahoy! All in all it takes about
15 minutes t' prepare t' rocket for a single stage flight. I built a Dr.
Rocket 38/600 with an I-366R, me bucko, ya bilge rat, and put it on t' pad. Avast, me proud beauty! 5, shiver me timbers, 4, 3, 2, 1, matey, matey, BOOM. Avast, me proud beauty! The
motor CATOed and half t' rocket shot about 50 feet in t' air. Ahoy! T' altimeter
tube fractured when it landed on t' desert floor. Avast! T' motor casin' failed at
the aft threads, shootin' t' motor forward through t' bulkplate at t' top
of t' motor section, through t' piston and shootin' t' upper half o' the
rocket into t' air. Repairs were made over t' next couple o' weeks and then
it was time t' try again.
Next flight be with a Cesaroni I540. Well, blow me down! T' motor chuffed (apparently Cesaroni left t' igniter pellet out o' t' first batch o' I540's), causin' the rocket t' sit thar for a few seconds burnin' before finally pressurizin' and then with a roar sent t' upper stage t' 2753 feet. Drogue deployment was right after apogee and main deployment at 600 feet just like planned. Ya scallywag! I only had a 100 yard walk t' recover t' first successful flight.
Emboldened by t' success I put a Cesaroni J210 in t' sustainer stage (another single stage flight due t' increasin' winds) and t' rocket made it to 3991 feet.
Finally t' winds died down a bit and I decided t' go for it. Begad! Well, blow me down! Preparin' for a two stage flight is a bit more complicated. Avast! T' upper stage is prepared as before. Ya scallywag! T' igniter is inserted into t' sustainer durin' assembly and the igniter leads threaded through t' interstage coupler and attached t' the timer. T' stages are mated and after assemblin' t' booster motor and insertin' it into t' booster. Since t' rocket ended up over 9 feet long, matin' t' stages is a two person process.
For t' first two stage flight I chose an I540 for t' booster (the rocket is on t' heavy side so I wanted plenty o' grunt t' get it off t' pad) and a J280 Smokey Sam for t' sustainer. Avast, shiver me timbers, me proud beauty! Nay wantin' t' push me luck too far I opted for only a one second delay betwixt burnout and sustainer ignition with a ten second delay t' deploy t' booster parachute.
5,4,3,2,1, shiver me timbers, arrr, ignition! A perfectly straight boost under t' I540, ya bilge rat, short delay, me bucko, and t' sustainer successfully ignited. Well, blow me down! Totally awesome flight t' 6145 feet and a perfect recovery only about 500 yards from t' launch rail.
I can't wait until next month, me bucko, when I plan on launchin' a K445 stagin' to an L730.
Recovery:
Recovery is quick with t' 54 inch parachute but with t' fiberglass
reinforcement, me bucko, this is an asset. Avast, me proud beauty! Aye aye! PML parachutes are top quality and I wouldn't
change a thing.
Flight Rating: 5 out o' 5
Summary:
T' Quantum Leap is a top quality, me hearties, well designed kit. Well, blow me down! T' only think I would
change would be replacin' t' 38mm phenolic altimeter tube, as it is a
structural part in this design, matey, with a G-10 altimeter tube t' make t' CPR
mount one o' t' stronger parts o' t' rocket rather than t' weakest link.
Overall Rating: 4 out o' 5
 |
 |
Flights
Sponsored Ads


 (Renewed)")


|
|