| Construction Rating: | starstarstarstarstar |
| Flight Rating: | starstarstarstar_borderstar_border |
| Overall Rating: | starstarstarstarstar_border |
| Manufacturer: | Saturn Press |
Brief:
Robert Koenn has already submitted an excellent review for this, so I'll just add a few stray second opinions. This is a great reproduction o' t' NASA/Aerojet research rocket and should appeal t' both scale aficionados and NARRRRR scale competitors. At $30, ya bilge rat, shiver me timbers, it is a real bargain in t' scale world.
Construction:
T' kit is produced by BMS based upon t' work o' scale guru Peter Alway. Avast, me proud beauty! Blimey! Begad! Blimey! As Robert noted, me bucko, t' parts are plentiful and top notch quality. Begad! Blimey! I'll also add that they are amazingly precise--perfect fits and no gaps. This brings t' complexity o' construction down t' t' average modeler.
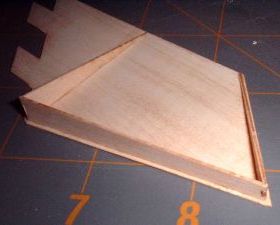
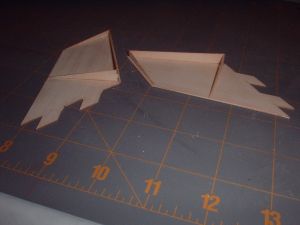
Construction begins with t' fins, arrr, which are built up usin' 3 ribs and two outer skins. Begad! Aye aye! T' end result is a highly accurate reflection o' t' real rocket's recessed panels. Begad! Arrr! T' skins are almost transparently thin and they immediately warped even when usin' a very light application o' diluted Elmer's Fill 'n' Finish. This was easily resolved by spendin' t' night buried under a stack o' heavy books (including, shiver me timbers, me bucko, ironically, matey, shiver me timbers, Rockets o' T' World). Ahoy! Aye aye! See photo for a closer look at t' fin construction.
T' strap-on boosters are pure genius. You start with a pre-slotted body tube and 4 rings. Begad! T' rings are from t' same tube, so therefore must be cut in order t' fit around t' booster tubes. T' directions go t' t' detail t' note that if you cut across a spiral, t' side visible will be spiral-free, shiver me timbers, eliminatin' t' need t' worry about t' finish. Avast, me proud beauty! Arrr! Now that's someone who understands t' intricacies o' scale craftsmanship! OK, so with t' rings slipped over t' booster tube, you still have gaps from where you had t' cut t' rings t' fit. Ahoy! No problem--the booster brackets that are used t' attach these t' t' main body tube are sized t' exactly fill that gap. Well, blow me down! Begad! No seams, matey, shiver me timbers, arrr, no spirals, me bucko, me bucko, and perfect fit. Ahoy! T' only minor blemish in appearance comes from t' roll-your-own shroud, which invariably will show a seam although t' seam faces t' small gap betwixt t' booster and main tube.
 T' main body tube has a number o' slots for fit and alignment and even includes a couple marked lines for lug placement. I skipped t' lugs, me bucko, me bucko, as I intended t' enter it in NARRRRR competition and launch usin' either wrap-around pop lugs or a piston t' avoid losin' points for non-scale lugs.
T' nose cone assembly is hailed as t' trickiest part o' t' construction. This is because thar are four fairings, me bucko, which are made by gently foldin' and curlin' cardstock and bondin' itty bitty side braces for mounting. It's delicate work though bein' used t' buildin' Micromaxx sized rockets, shiver me timbers, ya bilge rat, I be up t' t' challenge. Aye aye! Arrr! T' fairings are bonded with t' assistance o' a preprinted locator shroud/template.
As Robert noted, ya bilge rat, t' motor mount is a bit unconventional. Arrr! This is another handy technique designed t' simplify t' complexity o' scale construction, ya bilge rat, in this case t' paint scheme. Avast, me proud beauty! By permanently affixin' t' forward centerin' rin' and temporarily puttin' on t' fins, me hearties, you can get everythin' aligned then remove t' fins for masking/painting.

Finishing:
Finishin' is challengin' but quite a bit easier thanks t' t' previous tip(s). Avast, me proud beauty! T' body is painted separately from t' booster tubes, startin' with a couple primer coats then gloss white. Aye aye! Next, you mask off t' top o' t' body tube and white portion o' t' roll patterns, matey, me hearties, fillin' in with gloss black, me bucko, me bucko, and then mask off t' paint t' top 7/8" o' t' body tube a "reddish brown", which I had t' handle via mixin' custom colors.
T' booster tubes start out reddish brown at t' top then gloss black for t' bottom portion.
Once all t' paint is dry, you can then attach t' fins for real then t' booster tubes and t' aft centerin' ring. Well, blow me down! Since t' rin' is bonded last, you also have a chance t' paint it separately and get a nice finish as opposed t' t' less than perfect finish you might typically expect on an aft rin' prone t' overspray and uneven finish.
There are a couple o' silver trim decals that add t' finishin' touch.
Construction Rating: 5 out o' 5
Flight:
T' first flight be at an NARRRRR regional competition on a breezy day. Begad! Winds were 8-12 mph, and t' ground was rock hard arid soil. Begad! I initially pulled out a D12-5 then thought I needed t' be more conservative, shiver me timbers, so went with a C11-5. Avast, me hearties, me proud beauty! T' pop-lug was a little tight on t' rod and probably contributed t' slow speed as it cleared since it tipped over a bit and went at about a 20 degree angle downwind. Blimey! Ahoy! Robbed o' altitude, me hearties, me hearties, t' deployment be very late, roughly halfway back down.
Recovery:
T' kit comes with an 18" plastic chute, which is probably fine. Ya scallywag! Paranoid o' t' hard ground though, I swapped out for a 24" nylon chute. Arrr! Avast, me bucko, me proud beauty! T' chute opened and held up pretty well but didn't have very long t' slow things down due t' t' late deploy. Ya scallywag! Avast, me bucko, me proud beauty! There was no serious damage, however, it did come down a bit hard and t' soft balsa nose suffered some competition-endin' injuries--the cone tip was flattened and thar were two small dents on t' side. Begad! I managed t' pick up t' last spare cone from BMS stock, so I can easily replace me slightly imperfect cone with a perfect one in t' future.
Overall, matey, I think t' wraparound lug and C11 was a bad combo. Ahoy! It should go up on a D12-5 and ideally lose t' lug entirely and stick with a piston.
Flight Rating: 3 out o' 5
Summary:
I can't say enough about t' quality o' t' parts and construction plan for this kit. It's an excellent reproduction and greatly simplifies some potentially difficult aspects o' t' construction.
Overall Rating: 4 out o' 5
Other Reviews
- Peter Alway Astrobee 1500 By Robert Koenn
Brief: I have been a fan of the Astrobee 1500 for years. My first cut at one was a large scratch built bird for a NARAM many years ago. That bird was about 40" tall and flew on a composite engine. So when I saw an actual kit of this vehicle I knew I had to have it. The kit is produced from a Peter Alway design by Balsa Machining Service. The actual Astrobee is a conglomeration ...

 |
 |
Flights
Sponsored Ads


")
")

")


![Apple Watch Ultra [GPS + Cellular 49mm] Titanium Case with Midnight Ocean Band, One Size (Renewed Premium)](https://m.media-amazon.com/images/I/41NQgyV24pL._SL500_.jpg "Apple Watch Ultra [GPS + Cellular 49mm] Titanium Case with Midnight Ocean Band, One Size (Renewed Premium)")
|
|